In Kingdom Come Deliverance 2, players are incentivized for exploring with various hard-to-find loot treasures. The most valuable items are concealed at designated spots highlighted by treasure maps scattered throughout Bohemia. These maps can be discovered in different areas, and each one will guide you to a piece of uncommon armor or weaponry, such as the exceptional Brunswick Armor set.
This is where you can find every map and their marked locations.
Table of contents
- Treasure maps in Kingdom Come Deliverance 2
- Treasure map one
- Treasure map two
- Treasure map three
- Treasure map four
- Additional treasure maps
- Bonus: Brunswick Armor set
- Brunswick map one
- Brunswick map two
- Brunswick map three
- Brunswick map four
Treasure maps in Kingdom Come Deliverance 2
In Kingdom Come Deliverance 2, there are several ways to obtain maps. Four significant treasure maps are hidden within the game’s two primary regions. Two of these maps can be discovered in Trosky, and the remaining two are concealed in Kuttenberg. You may acquire all four maps during an unexpected event called “Seeking Man,” which could occur while you’re fast-traveling.
The places shown on these maps can be found within their corresponding regions, and this is the specific spot each map indicates.
Treasure map one

Treasure location: Apollonia
As an avid adventurer, I’d share that the initial treasure map leads straight to the far-eastern expanse of the Trosky map. The region known as Apollonia is a forested hideout teeming with rogue bandits and untamed beasts, so tread cautiously if you’re not well-equipped. Begin by making your way to the fast travel point and then follow the road that winds through the lower forest terrain towards higher ground.
As a gamer, when I make it to the northern exit, I’d veer left towards the intriguing spotlight on Apollonia – that’s where you’ll find the cave I’m referring to. From there, continuing along this route leads me straight to another point of interest marked above: the cave hidden under Trosky.

It’s essential to carry a flashlight since the cave can be tricky to maneuver without illumination. The route is generally clear, with several blind alleys and scattered bags of treasure hidden here and there. Ascend two ladders to locate the room you’re seeking. Search carefully for a key to open the padlocked treasure chest, then unlock it to receive some Groschen, Frankfurt Steel, and some Ancient Moonshine.
It’s best to search for this hidden treasure once you complete the primary questline at Trosky and open the door to the underground cave beneath Trosky Castle, allowing for a swift exit if needed.
Treasure map two

Treasure location: Rocktower Pond
The second hidden map leads you to Rocktower Pond, beyond the campsite where Henry’s group was attacked at the beginning of the narrative. First, retrace your steps back to your initial camp, but be cautious as outlaws now control it. After dealing with them, continue on the main road heading northeast for some distance, then make a direct path into the wooded area as indicated on the map above.

Here’s where you can discover some rocky outcroppings with treasure hidden among them. As you approach, look for the notable landmark called “Skeleton and Treasure“. Remember, you won’t be able to reach it unless you climb up the rocks, so keep going straight until you find a path leading upward. Once you’ve reached the summit, jump across to the central group of rocks. The “Featherweight” ability will come in handy during this part of your journey.
Leap from stone to stone cautiously until you spot a skeleton next to a chest filled with treasure. Grab the loot to discover hidden Groschen, precious jewels, and ornate golden and silver chalices.
Treasure map three

Treasure location: Kuttenberg Underground
The third treasure map leads you to the central city of Kuttenberg. Swiftly travel through the western gate of the city and proceed along the southern road to discover one of three entryways to the underground region of Kuttenberg, as indicated on your map. Each path will lead you to distinct zones within the Kuttenberg Underground, and you should select the southeastern entrance for your journey.

When you discover a dilapidated house with a covert trail leading to an underground entrance, that’s the correct spot. Descend and continue straight ahead until you encounter an archway. Turn left at the first opportunity and walk along the path till you come across another division. Move right thereafter until you reach the final division with three distinct paths. Once more, opt for the right path and keep advancing.
A circular emblem that corresponds with the map serves as your guide for the right route. Upon arrival at the destination, you’ll discover a bag containing coins (Groschen), a manual on a particular skill, and an item known as a Scapular with Aperture.
Treasure map four

Treasure location: Millstone Quarry
As a keen adventurer, the next clue on my treasure map directs me towards the Millstone Quarry, nestled in the southern half of Kuttenberg. This coveted location lies south of Bylany and north of Maleshov. To reach it swiftly, I’d suggest you fast travel to Bylany first. Once there, follow the forested path heading southeast. Keep on moving forward until the Millstone Quarry point of interest catches your eye, at which point, you’ve arrived at your destination!

Starting from now, keep an eye out for stones with a central hole, these are known as Millstones. By tracking them down, you’ll eventually stumble upon the hidden treasure. For optimal results, begin your search from the location marked above and head in a southeastern direction, following any Millstones you encounter along the way. The treasure is tucked away inside a chest beneath a massive willow tree that has fallen to the ground.
Unfasten the box to discover some coins, a manual on a craft, various pieces of jewelry, and a durable felt hat as your reward for your efforts.
Additional treasure maps
In addition to the four primary maps, you could pick up some secondary ones during your adventure. These maps often contain valuable items too, and many of them are useful for funding your ventures in the initial to middle parts of the game. If you wish to investigate those locations, you can do so.
| Map | Region | Treasure location |
| Drowner’s Map | Trosky | Water Goblin’s Treasure point of interest to the northeast of the Nomad’s Camp |
| Hired Hand Ventza’s Map | Trosky | Cave to the north of the Apollonia fast travel point |
| Lower Semine Woodcutters’ Map | Trosky | Fresh Clearing point of interest to the west of Lower Semine |
| Map of Game near Slatego | Trosky | Unfinished Cottage point of interest to the south of the Apollonia fast travel point |
| Vidlak’s Treasure Map | Trosky | Hollow Tree and Washed-up Chest points of interest upstream to the northeast of Vidlak’s Pond |
| Bohuta’s Map | Kuttenberg | Buried Stash point of interest to the southwest of Pschitoky |
| Krizhan’s Treasure Map | Kuttenberg | Cave near a bandit camp to the northeast of Old Kutna |
| Map from Chest by Sedletz | Kuttenberg | Hidden Ladder point of interest to the northeast of Kuttenberg |
| Smuggler’s Map | Kuttenberg | Locked chest in a hut to the northwest of Old Kutna |
Additionally, you might stumble upon extra maps through chance occurrences such as random events or run-ins with bandits, potentially uncovering additional riches. If you’ve pre-ordered the DLC, you’ll also gain access to a significant amount of extra treasure.
Bonus: Brunswick Armor set
The Brunswick Armor collection can only be obtained by those who own “The Lion’s Crest” DLC expansion. This add-on was given as a pre-order bonus. This quest will guide you to spots marked with crosses on the Trosky map. Gathering these locations will reward you with parts of the Brunswick Armor set. Accumulate them all to discover the complete set of exclusive armor and weapons.

To initiate the Lion’s Crest quest, converse with Scribe Gaibl located within Troskowitz Town Hall. Following what appears to be a riddle-solving process (though it may not always be the case), you will receive your first assignment: locating the initial piece. Travel via fast travel to Trosky Castle and proceed northward. Make your way through the wooded region until you encounter the “Chapel Amongst the Stones,” a notable landmark. This is where you discover a cross that can be moved aside.
Dig up the area to find a chest with Brunswick’s Dagger, Brunswick’s Gauntlets, and some clues.
Brunswick map one

Turn your direction towards the north from the present sanctuary until you reach the notable location known as the “Wolf Hunting Spot.” This spot is positioned some distance to the north of Tachov. Upon arrival, be prepared to defend yourself against a number of wolves feeding on a carcass. Upon dropping down from the carcass, you will discover a bag that contains Brunswick’s Chainmail Coif, Brunswick’s Plate Leg Armor, Brunswick’s Caparison, and additional hints.
Brunswick map two

After that, make your way to Vidlak’s Pond and keep moving in a direction roughly north-east until you reach the landmark known as the “Crosses etched into the Stones”. In this area, you’ll encounter some rocky terrain that you’ll need to navigate until you spot a fallen tree trunk. This log will lead you to another stone cross. Right beside the cross, there should be a chest waiting for you. Open it to discover Brunswick’s “Enchanted Arm Sleeves” and a hint for your next destination.
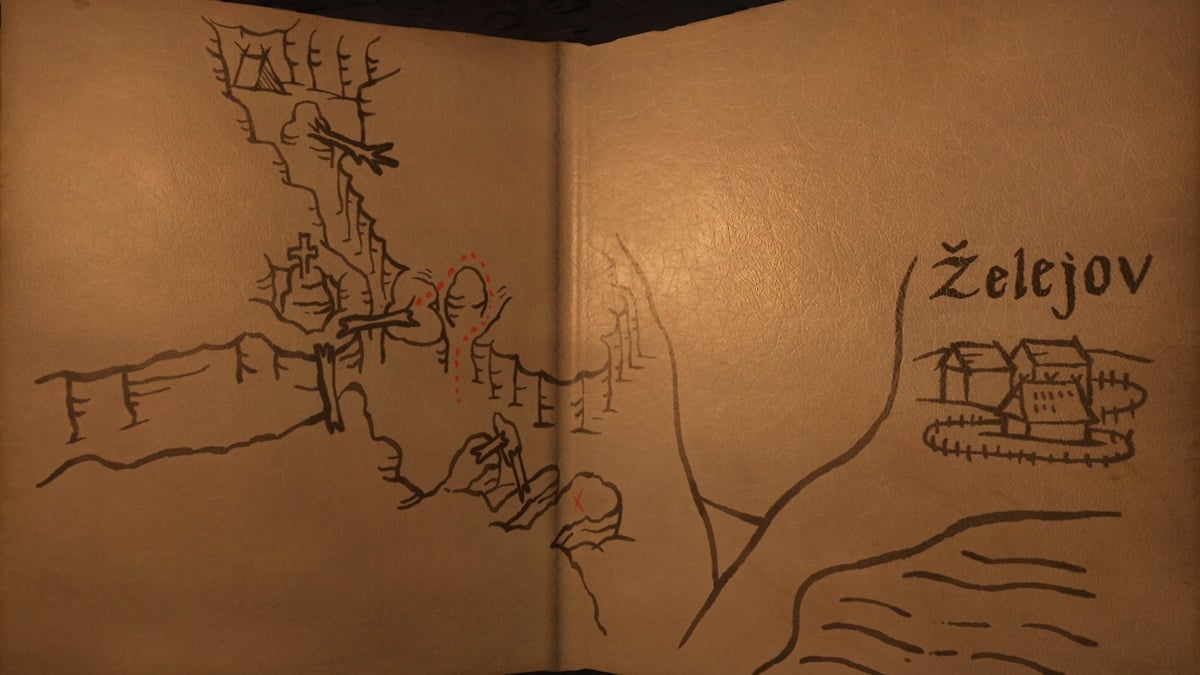
Brunswick map three

Make your way to the Zhelejov Wagoner’s Inn as your travel destination, then journey northward through the wooded region to discover the Cross and Skeleton landmarks. Approach these points of interest closely, and look for a large tree with a skeleton resting against it. You will encounter a damaged cross near this tree, along with a sack nearby. Interact with the setup to uncover Brunswick’s Brigantine and your final hint.
Brunswick map four

To locate the final artifact, Brunswick’s Bascinet, head towards the Treasure Hunter’s Camp, which lies to the northeast of the Nomad’s Camp. Keep in mind that the treasure hunters there might not welcome you warmly, so be prepared to deal with them before you start your search. Look for a grouping of stones marked by a cross – that’s where you’ll find the artifact and conclude the quest.
To achieve optimal success, we advise enhancing your expertise, particularly in the Scholarship area, up to level 18. Upon doing so, you’ll unlock the Explorer privilege. This bonus will unveil the entire map for you, showcasing all significant spots and points of interest. This will make it a breeze to scan and locate the specific locations you require.
Read More
- Silver Rate Forecast
- Black Myth: Wukong minimum & recommended system requirements for PC
- Gold Rate Forecast
- USD CNY PREDICTION
- Former SNL Star Reveals Surprising Comeback After 24 Years
- Grimguard Tactics tier list – Ranking the main classes
- Arknights celebrates fifth anniversary in style with new limited-time event
- Gods & Demons codes (January 2025)
- PUBG Mobile heads back to Riyadh for EWC 2025
- Maiden Academy tier list
2025-02-25 18:24