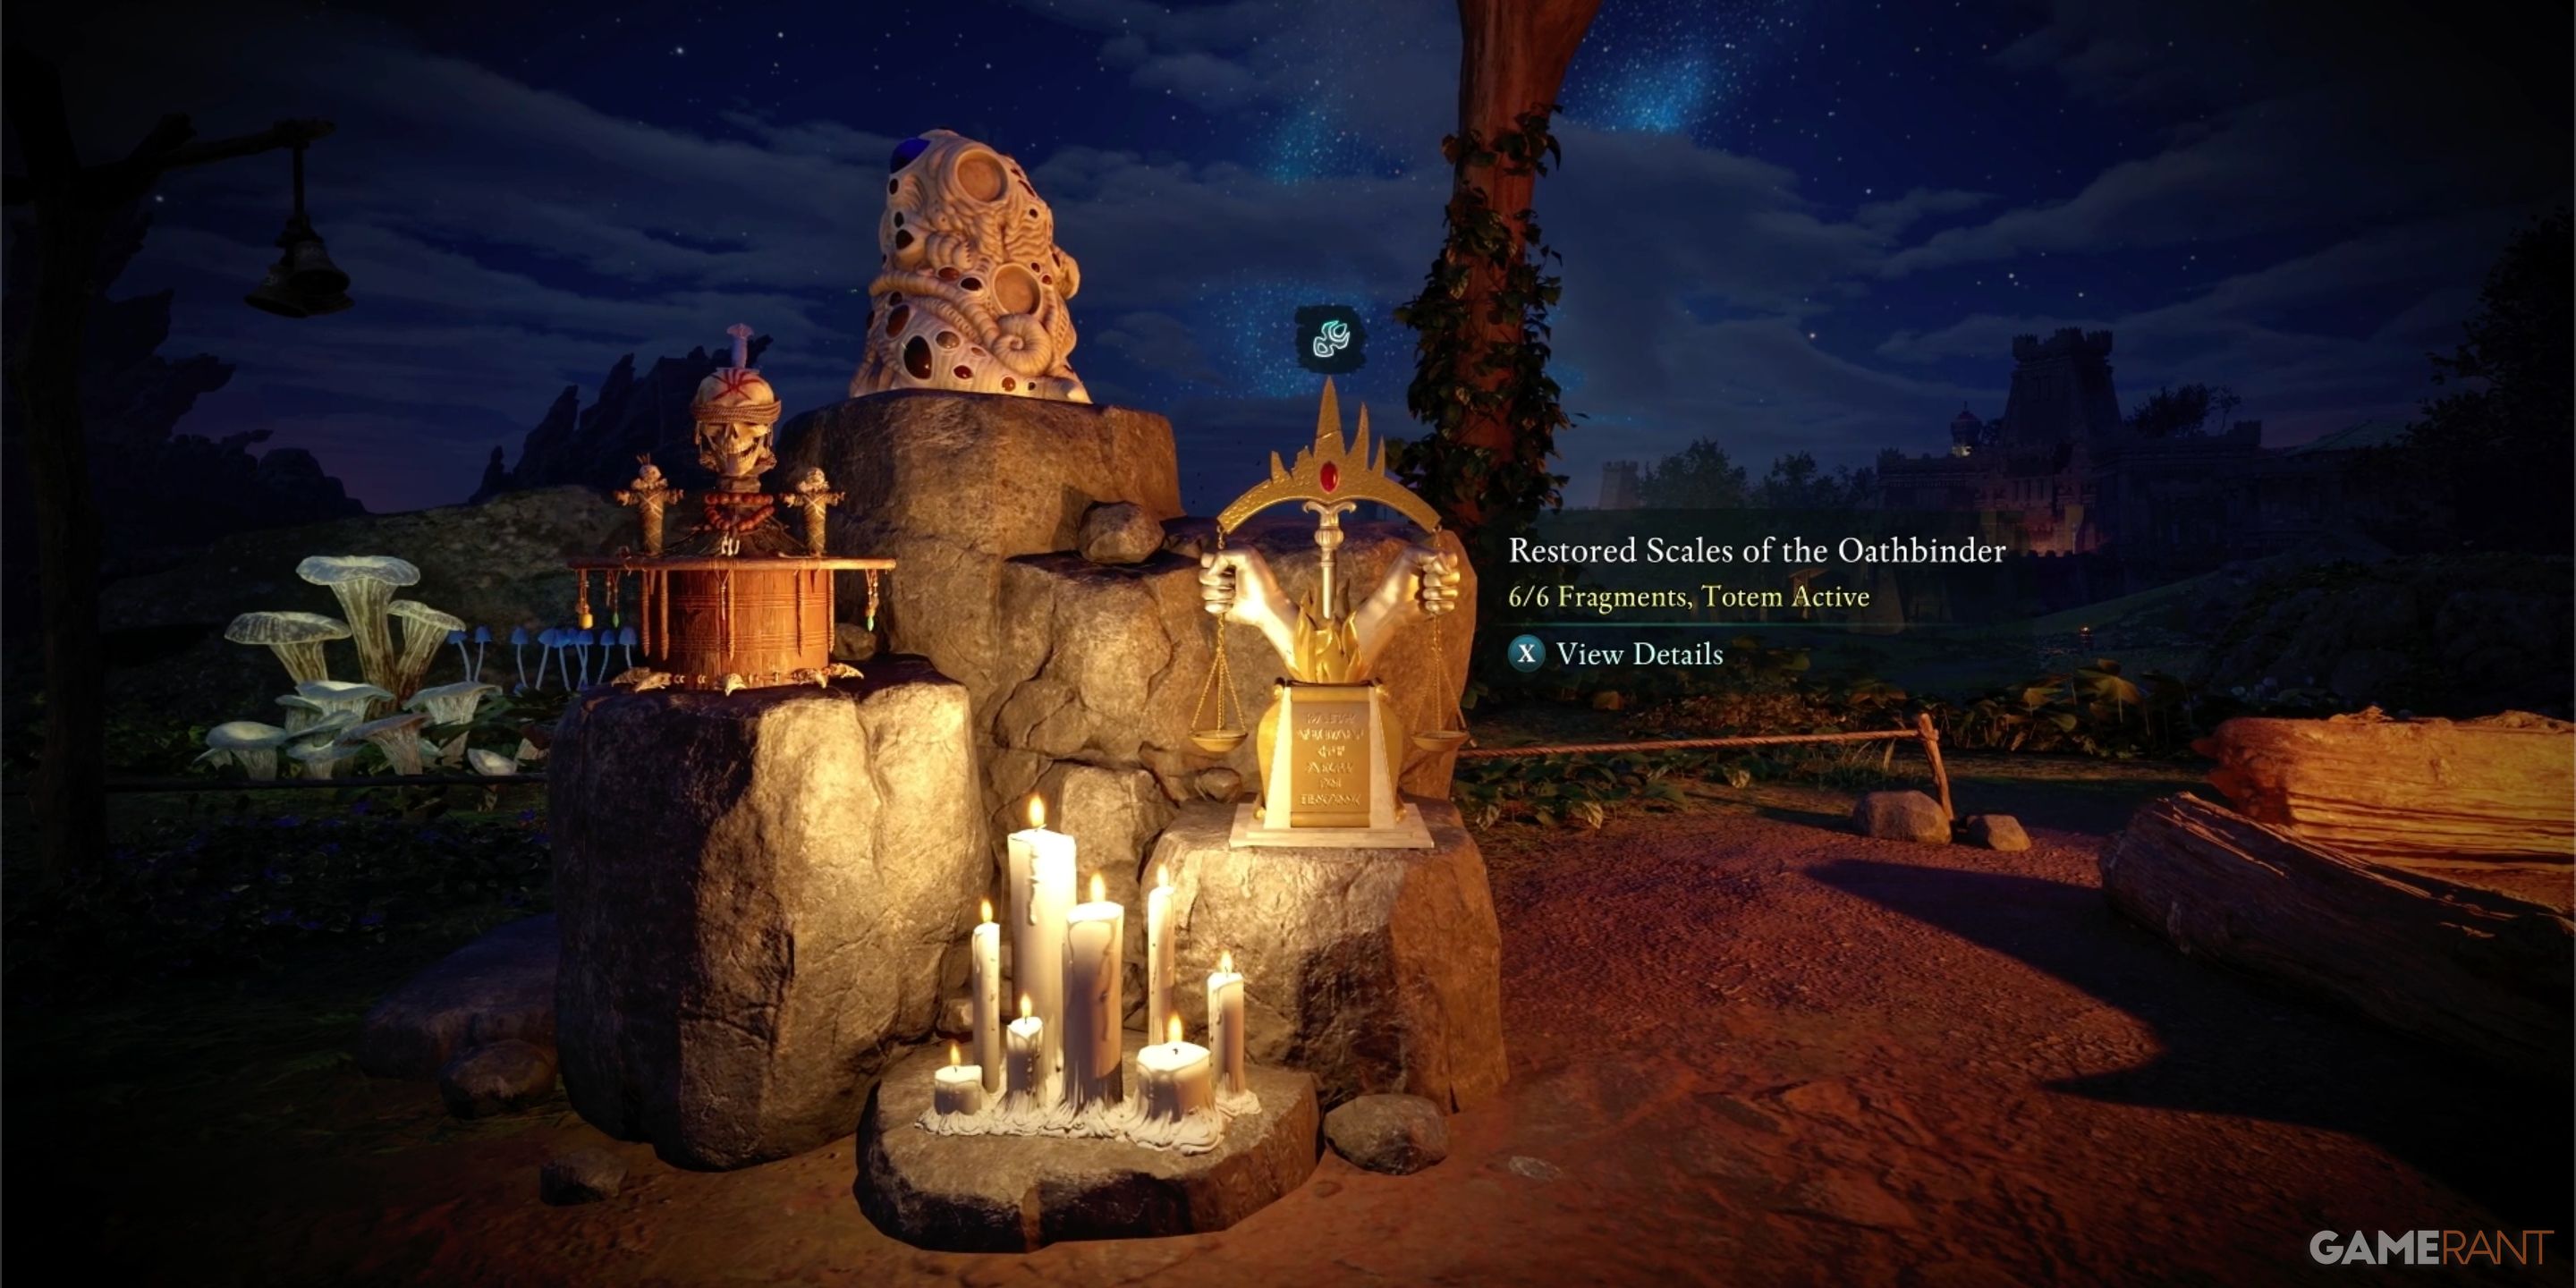
Among Avowed’s engaging gameplay features, the Totem Shrine stands out as particularly intriguing. Situated within the Party Camp, the Totem Shrine is one of several ways players can amplify their character’s strength. Constructed from four platforms, each platform accommodates a unique totem symbolizing one of the Living Lands’ principal deities. To activate each totem, players must discover its components and bring them back to the shrine, thereby claiming the exclusive benefit each piece offers.
In the game ‘Avowed’, the first totem is associated with the character Woedica, known as the ‘Scales of the Oathbinder’. Players have two options: they can hunt for the fragments on their own, or buy a guide called the ‘Fragments of the Scales‘ which offers hints for each piece. This tutorial will walk you through solving every riddle in ‘Fragments of the Scales’, and uncover the locations of all the pieces of Woedica’s totem within ‘Avowed’.
Fragments of the Scales Riddles Solved – Avowed

How to Get the Fragments of the Scales Document:


Instead of just stumbling upon the Scale fragments at Dawnshore, you can actively seek them out by acquiring the ‘Fragments of the Scales’ document. To obtain this essential guide, look for Sanza, a resourceful Paradisan trader who is trying to chart the Living Lands first.
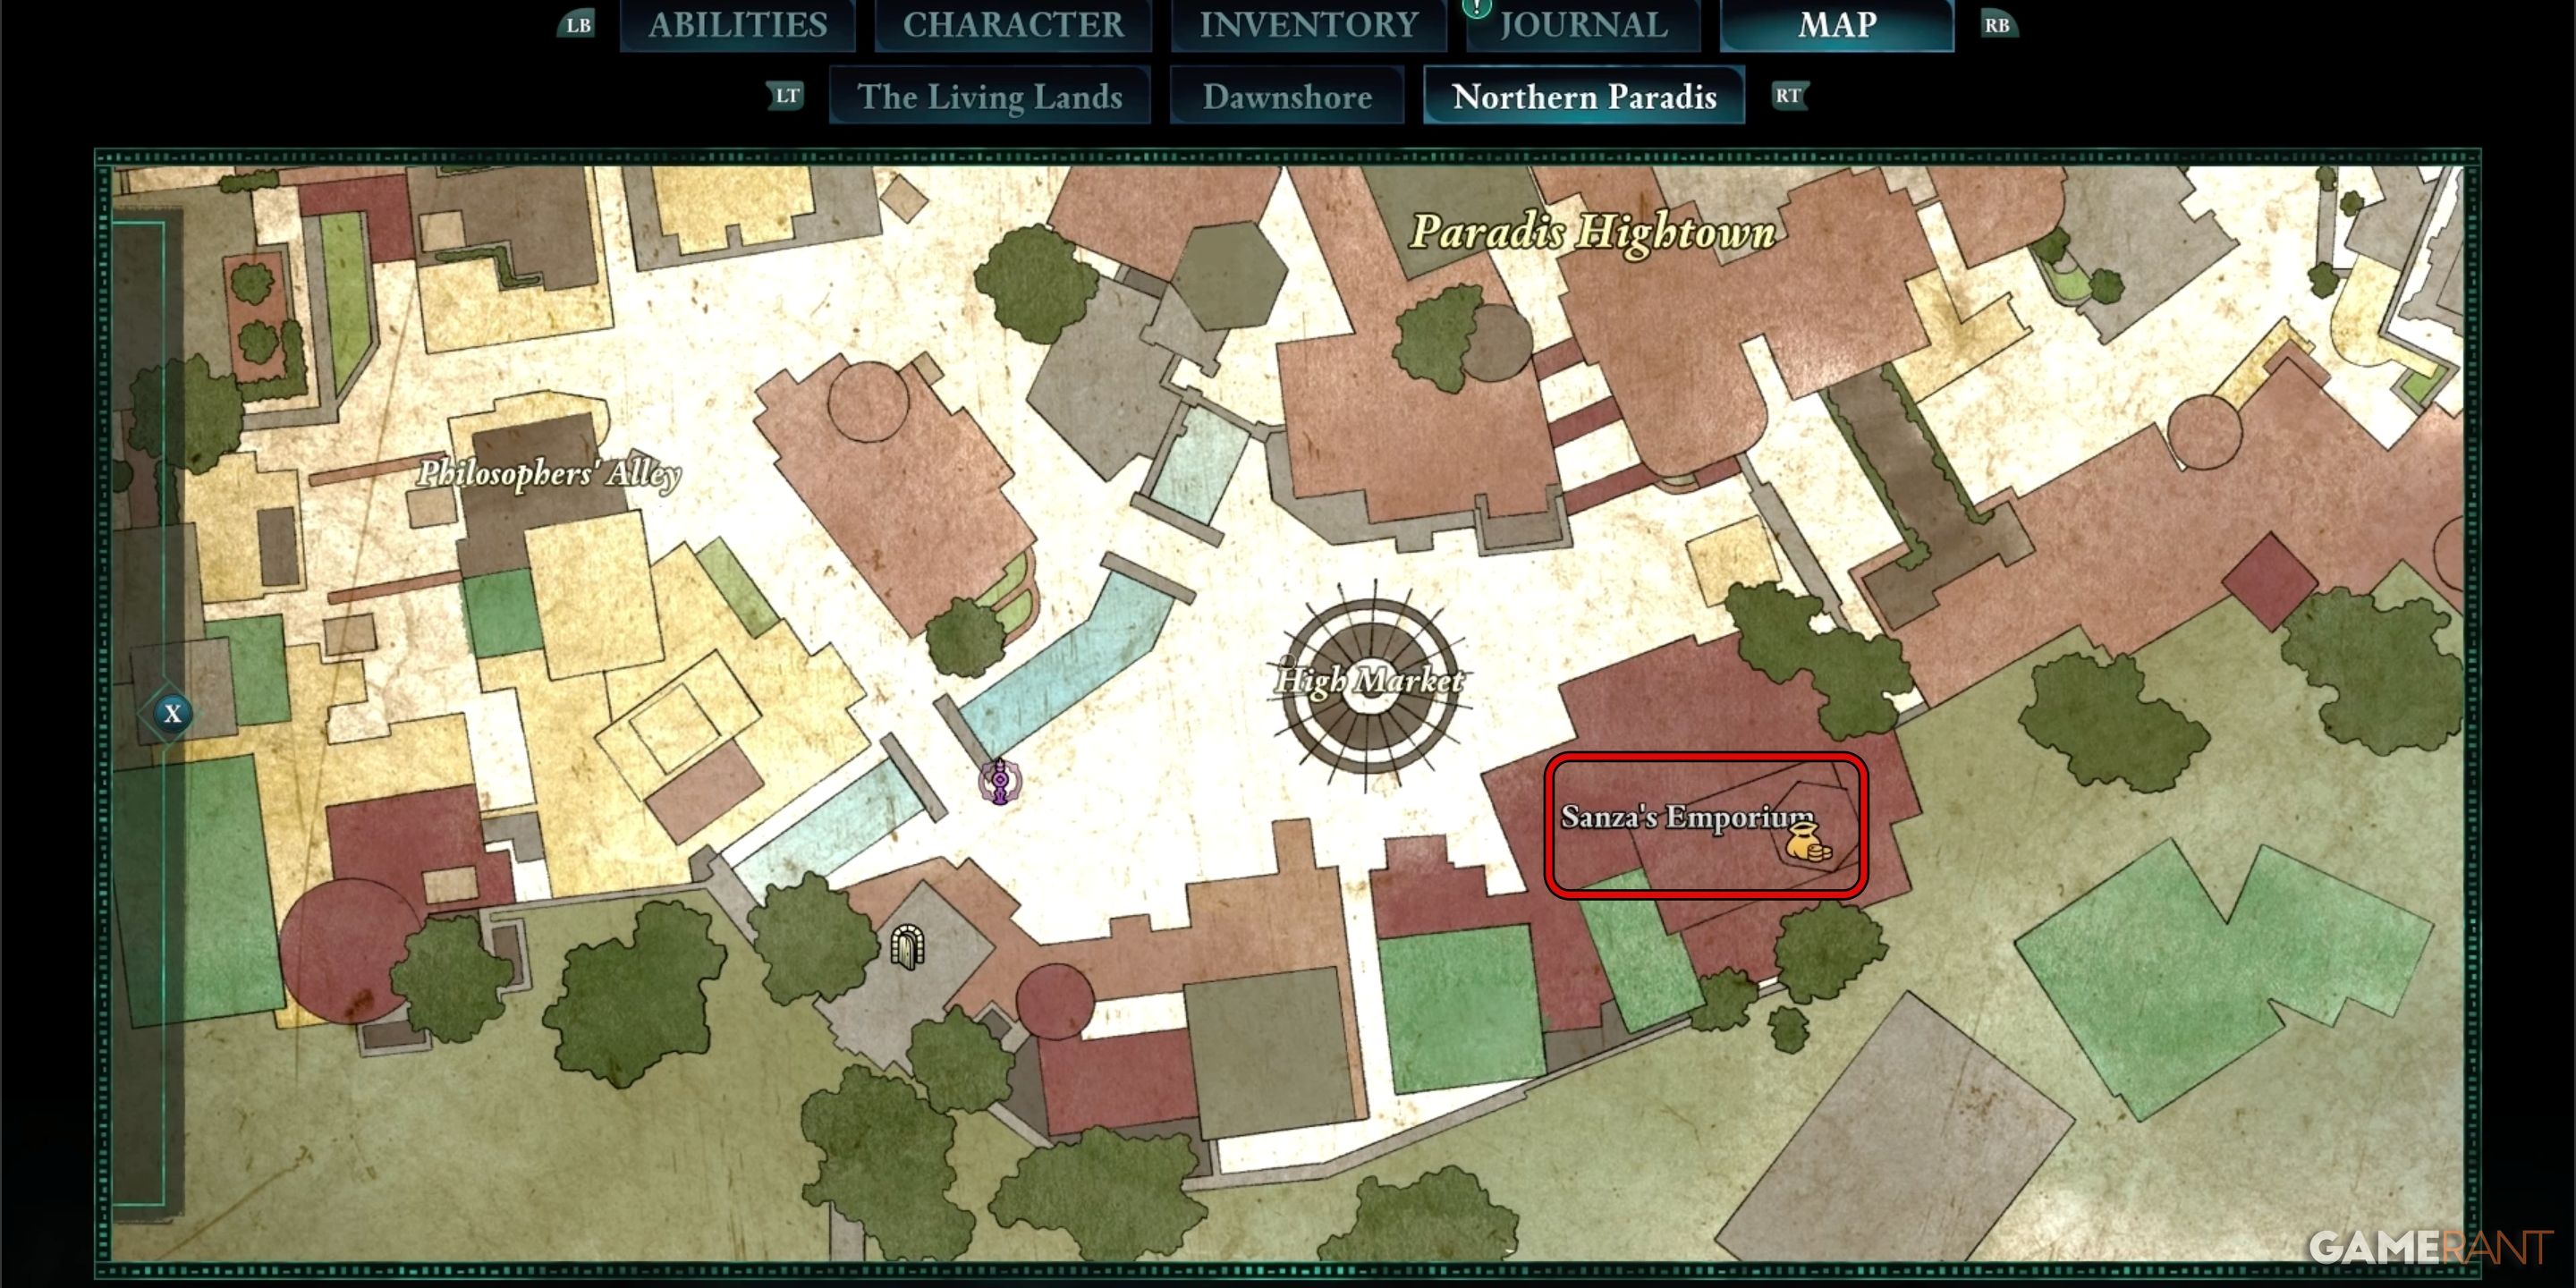

In the opening stages of the game, you’ll run into Sanza near a place called Claviger’s Landing. After finishing his initial side quest, he’ll request a meeting at his shop in Paradis. As soon as it’s feasible for you, venture into the city and seek out Sanza’s Emporium. Inside, you can buy Fragments of the Scale for 500 gold. Once you acquire this document, consult your journal to view all the riddles.
All Fragments of the Scales Riddles:
Buying and inspecting Scale Fragments triggers the “Totem of Rightful Rulership” side mission. From now on, all the riddles from the document can be found under this quest in your journal.
Riddle 1 – Totem Base/Core:
The Burned Queen’s totem patiently waits amidst ruins of the heathens she hates.
- Solution Location: Shrine to Woedica
Riddle 2 – Broken Crown Jewel:
The golden crown’s stolen gem, can be found in the emporium.
- Solution Location: Sanza’s Emporium in Northern Paradis
Riddle 3 – Golden Scale of Order:
In Dwarven halls ‘neath mountain shroud, the Strangler’s justice can still be found.
- Solution Location: Pargrun Cache
Riddle 4 – Golden Scale of Justice:
Overlooking booths where goods are sold, this balcony leads to order’s hold.
- Solution Location: Market District, Paradis
Riddle 5 – Golden Plaque of Oaths
Below death’s grip so icy and cold, await ancient oaths cast in gold.
- Solution Location: Usher’s Hand
Riddle 6 – Golden Plaque of Promises:
Beneath an amethyst light on high, this shining plaque draws sailors’ eyes.
- Solution Location: Lighthouse
Riddle 7 – Golden Flames:
Atop the isle of wicked outlaws, flicker golden flames of a glorious cause
- Solution Location: Castol’s Folly
How to Complete Totem of Rightful Rulership in Avowed
Once all the puzzles have been unraveled, we can clearly guide you to where each totem fragment is hidden at its specific spots. The Scales of the Oathbinder are divided into seven distinct pieces, and they’re scattered across Dawnshore. We will find each piece in the sequence as it’s listed in the journal.
After locating the Totem Core and setting it at the Totem Shrine, you don’t need to wait until you’ve gathered all the totem fragments before enjoying the advantages. You can deposit each fragment found at the Totem Shrine to activate its perk. When multiple totems are repaired, you’ll have to choose which one remains active. In Dawnshore, this won’t be a problem since Woedica’s totem is the only one accessible.
How to Find the Totem Base:


The temple dedicated to Woedica is situated in northeastern Dawnshore. On your map, look for “The Rise” landmark and you’ll find the old Godless ruins just to its east. As you get closer, notice a series of small steps under an archway that leads to the ancient structure. Instead of starting at the base, climb the second set of stairs from the path to reach the upper level of the structure.
Upon reaching the summit, you’ll find the Totem Base perched atop a compact platform right smack in the middle of a quaint, round, open-air courtyard.
How to Find the Broken Crown Jewel:

The “Broken Crown Jewel” artifact is kept at Sanza’s store, which is situated in the north of Paradis. You can grab it as soon as Sanaza reappears in his shop. To your left, behind Sanza’s counter, you’ll notice a door that opens into a back room. Don’t worry, entering this area won’t cause any problems, and Sanza will make a remark about it.
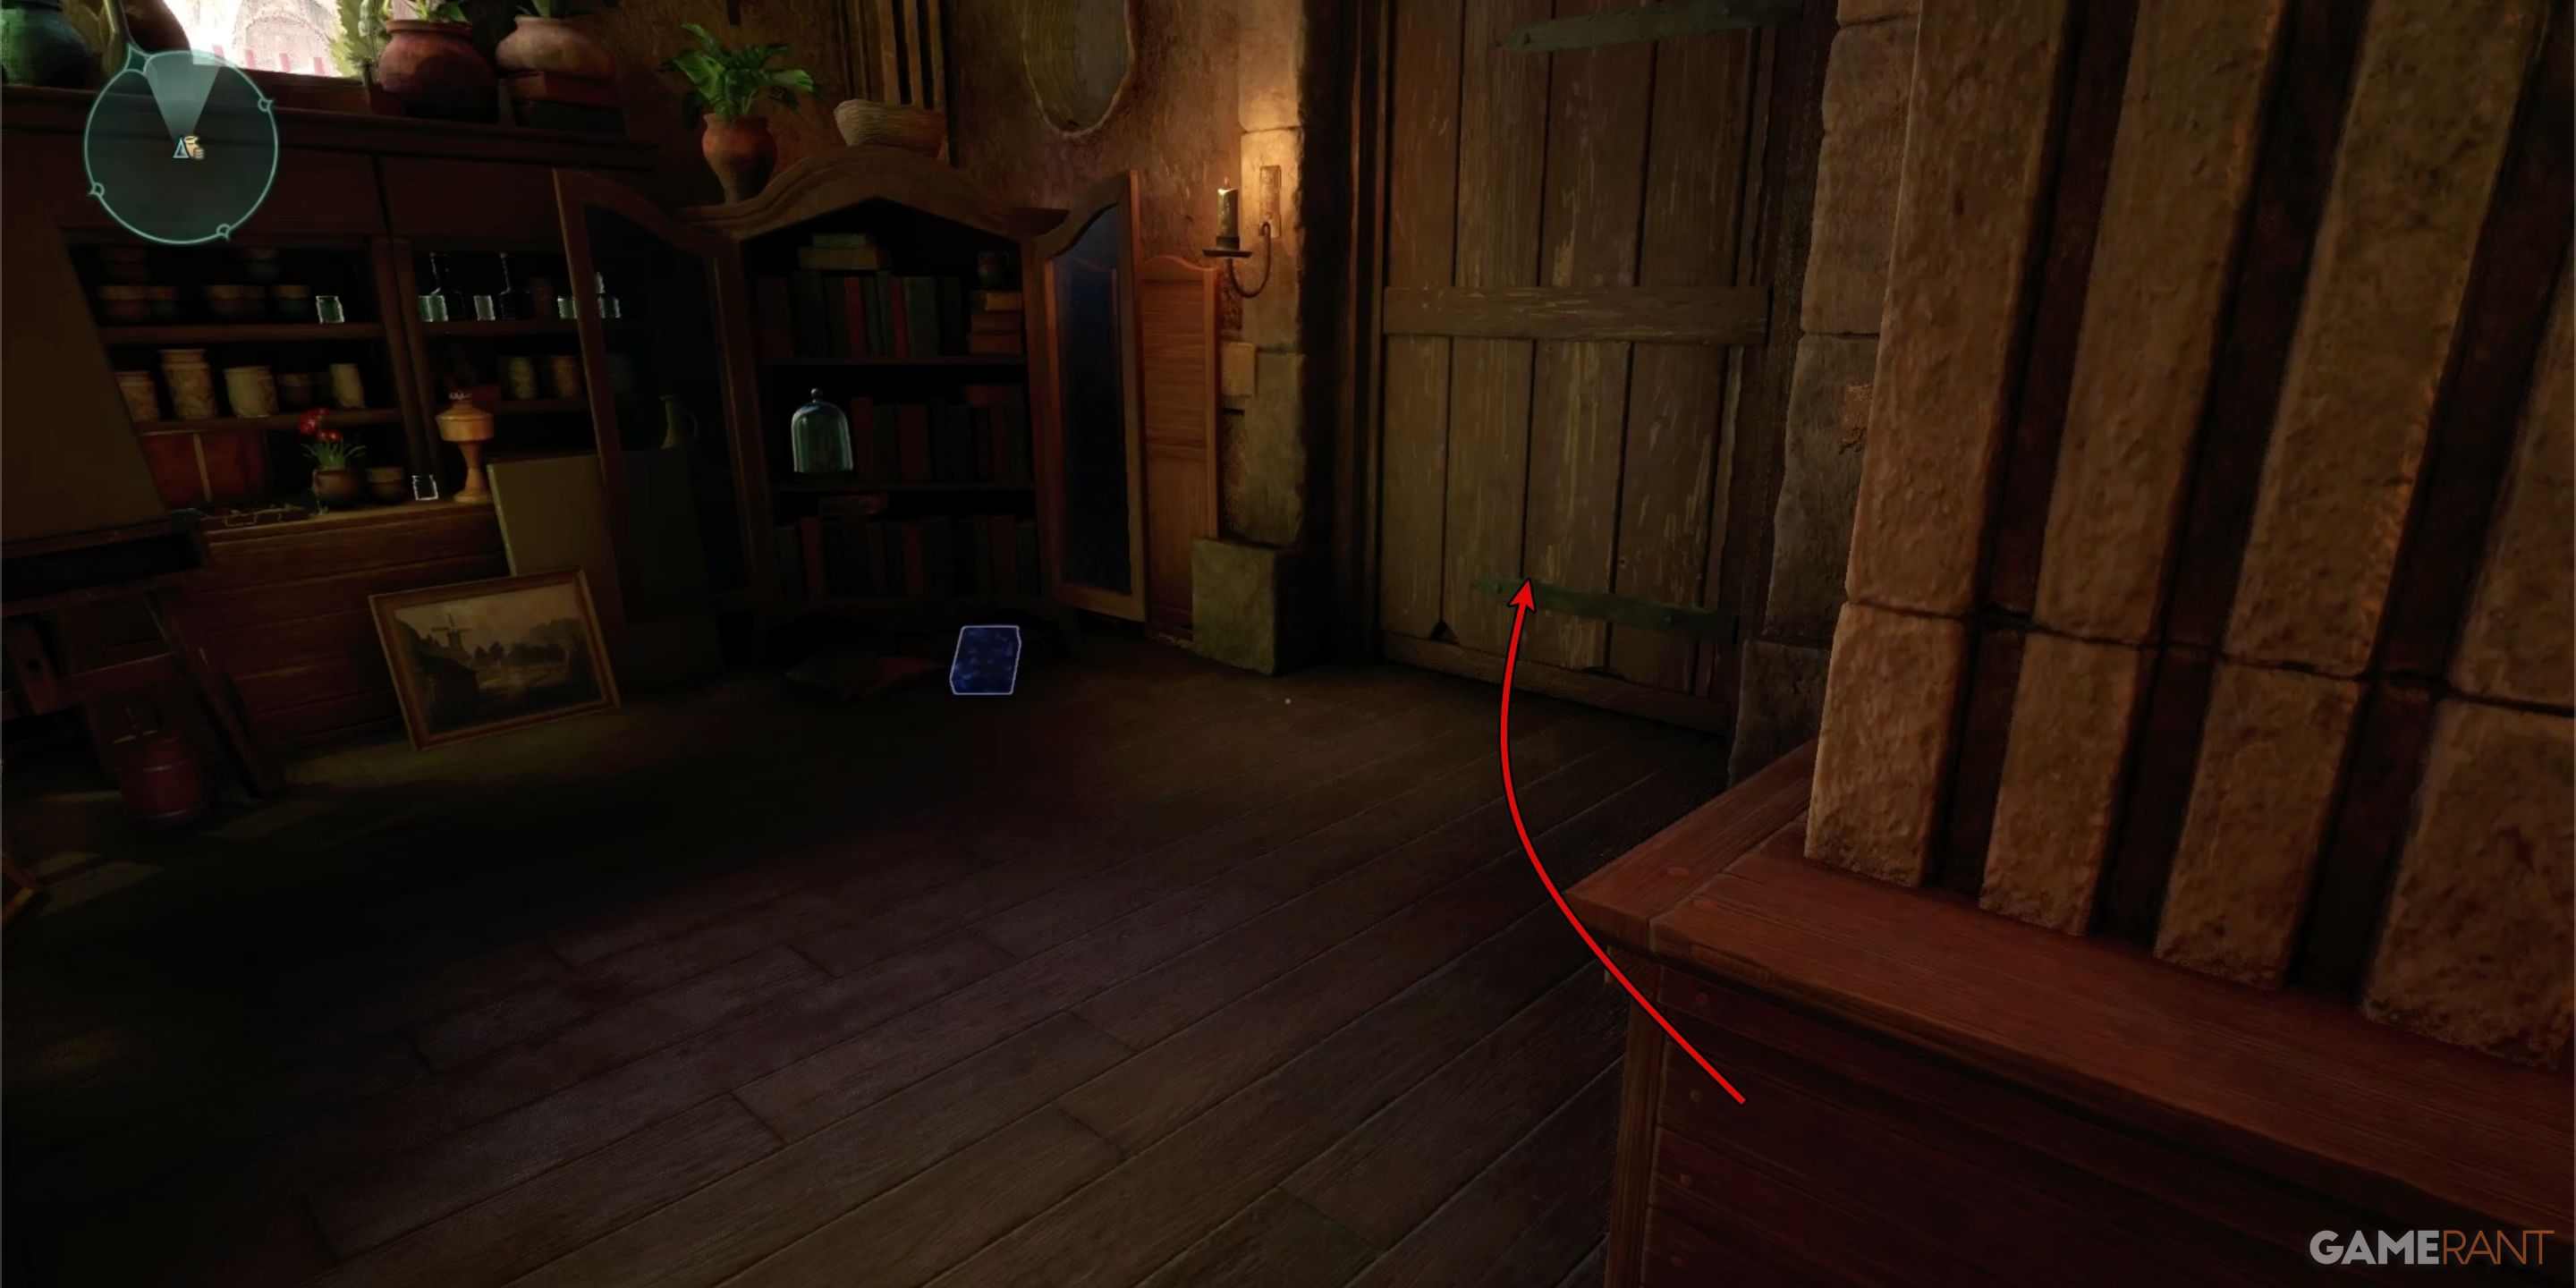
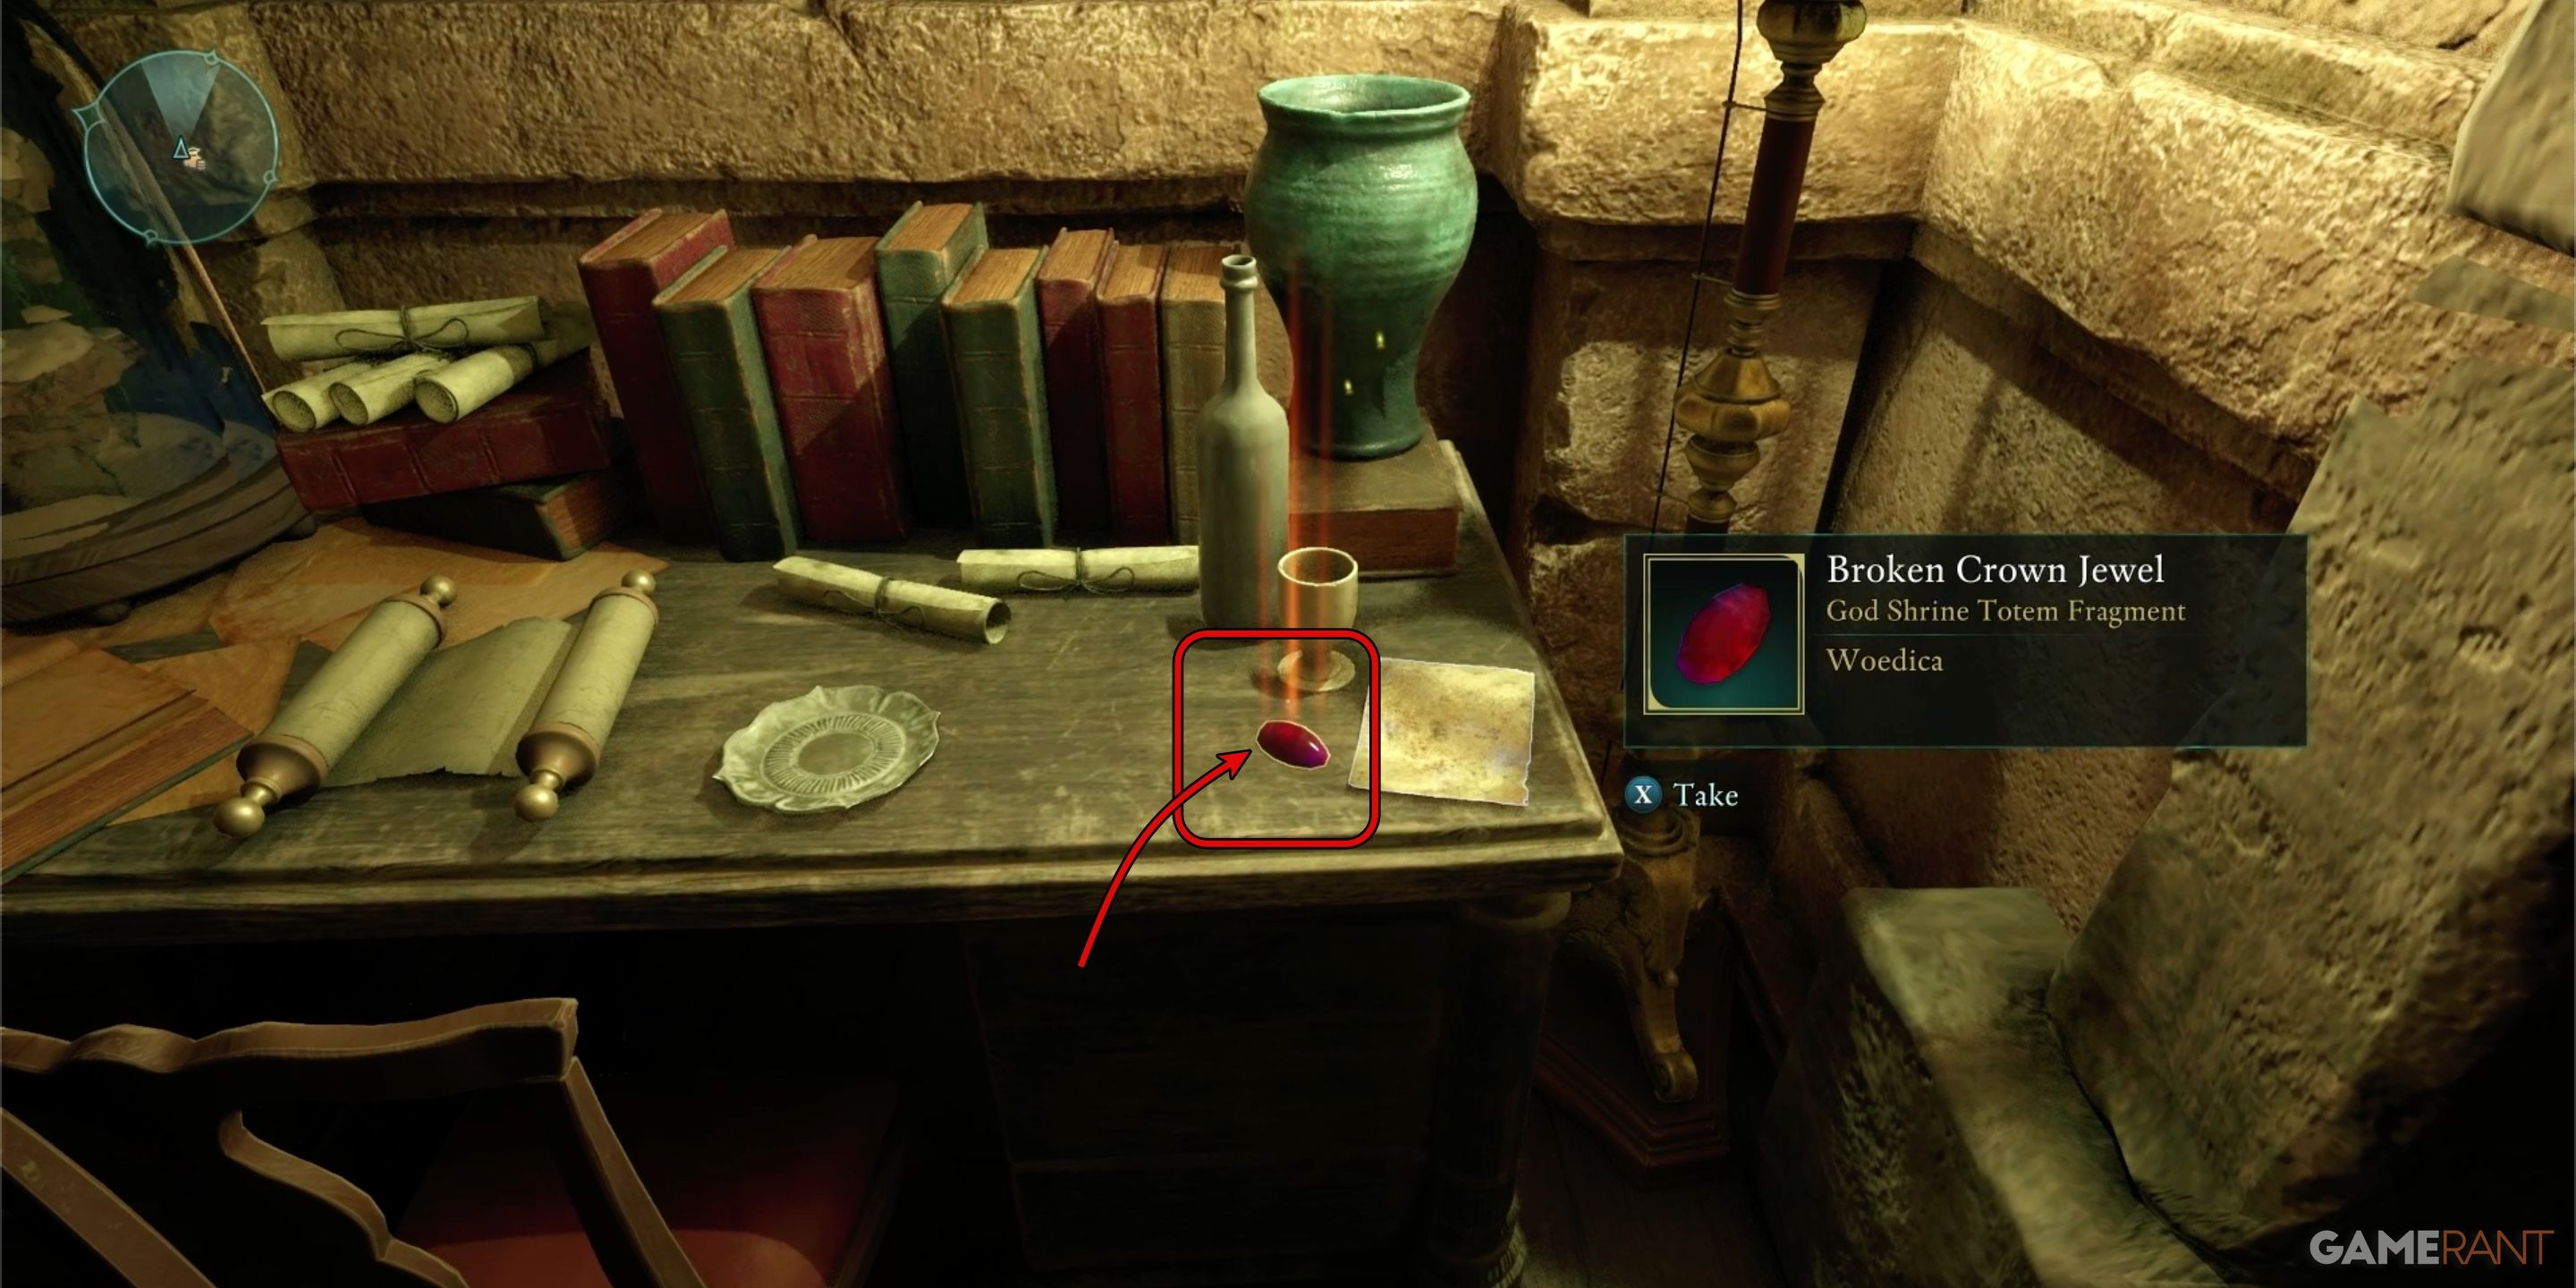
Upon entering the room, you’ll spot Sanza’s desk with the damaged Crown Jewel placed on its right side.
How to Get the Golden Scale of Order:
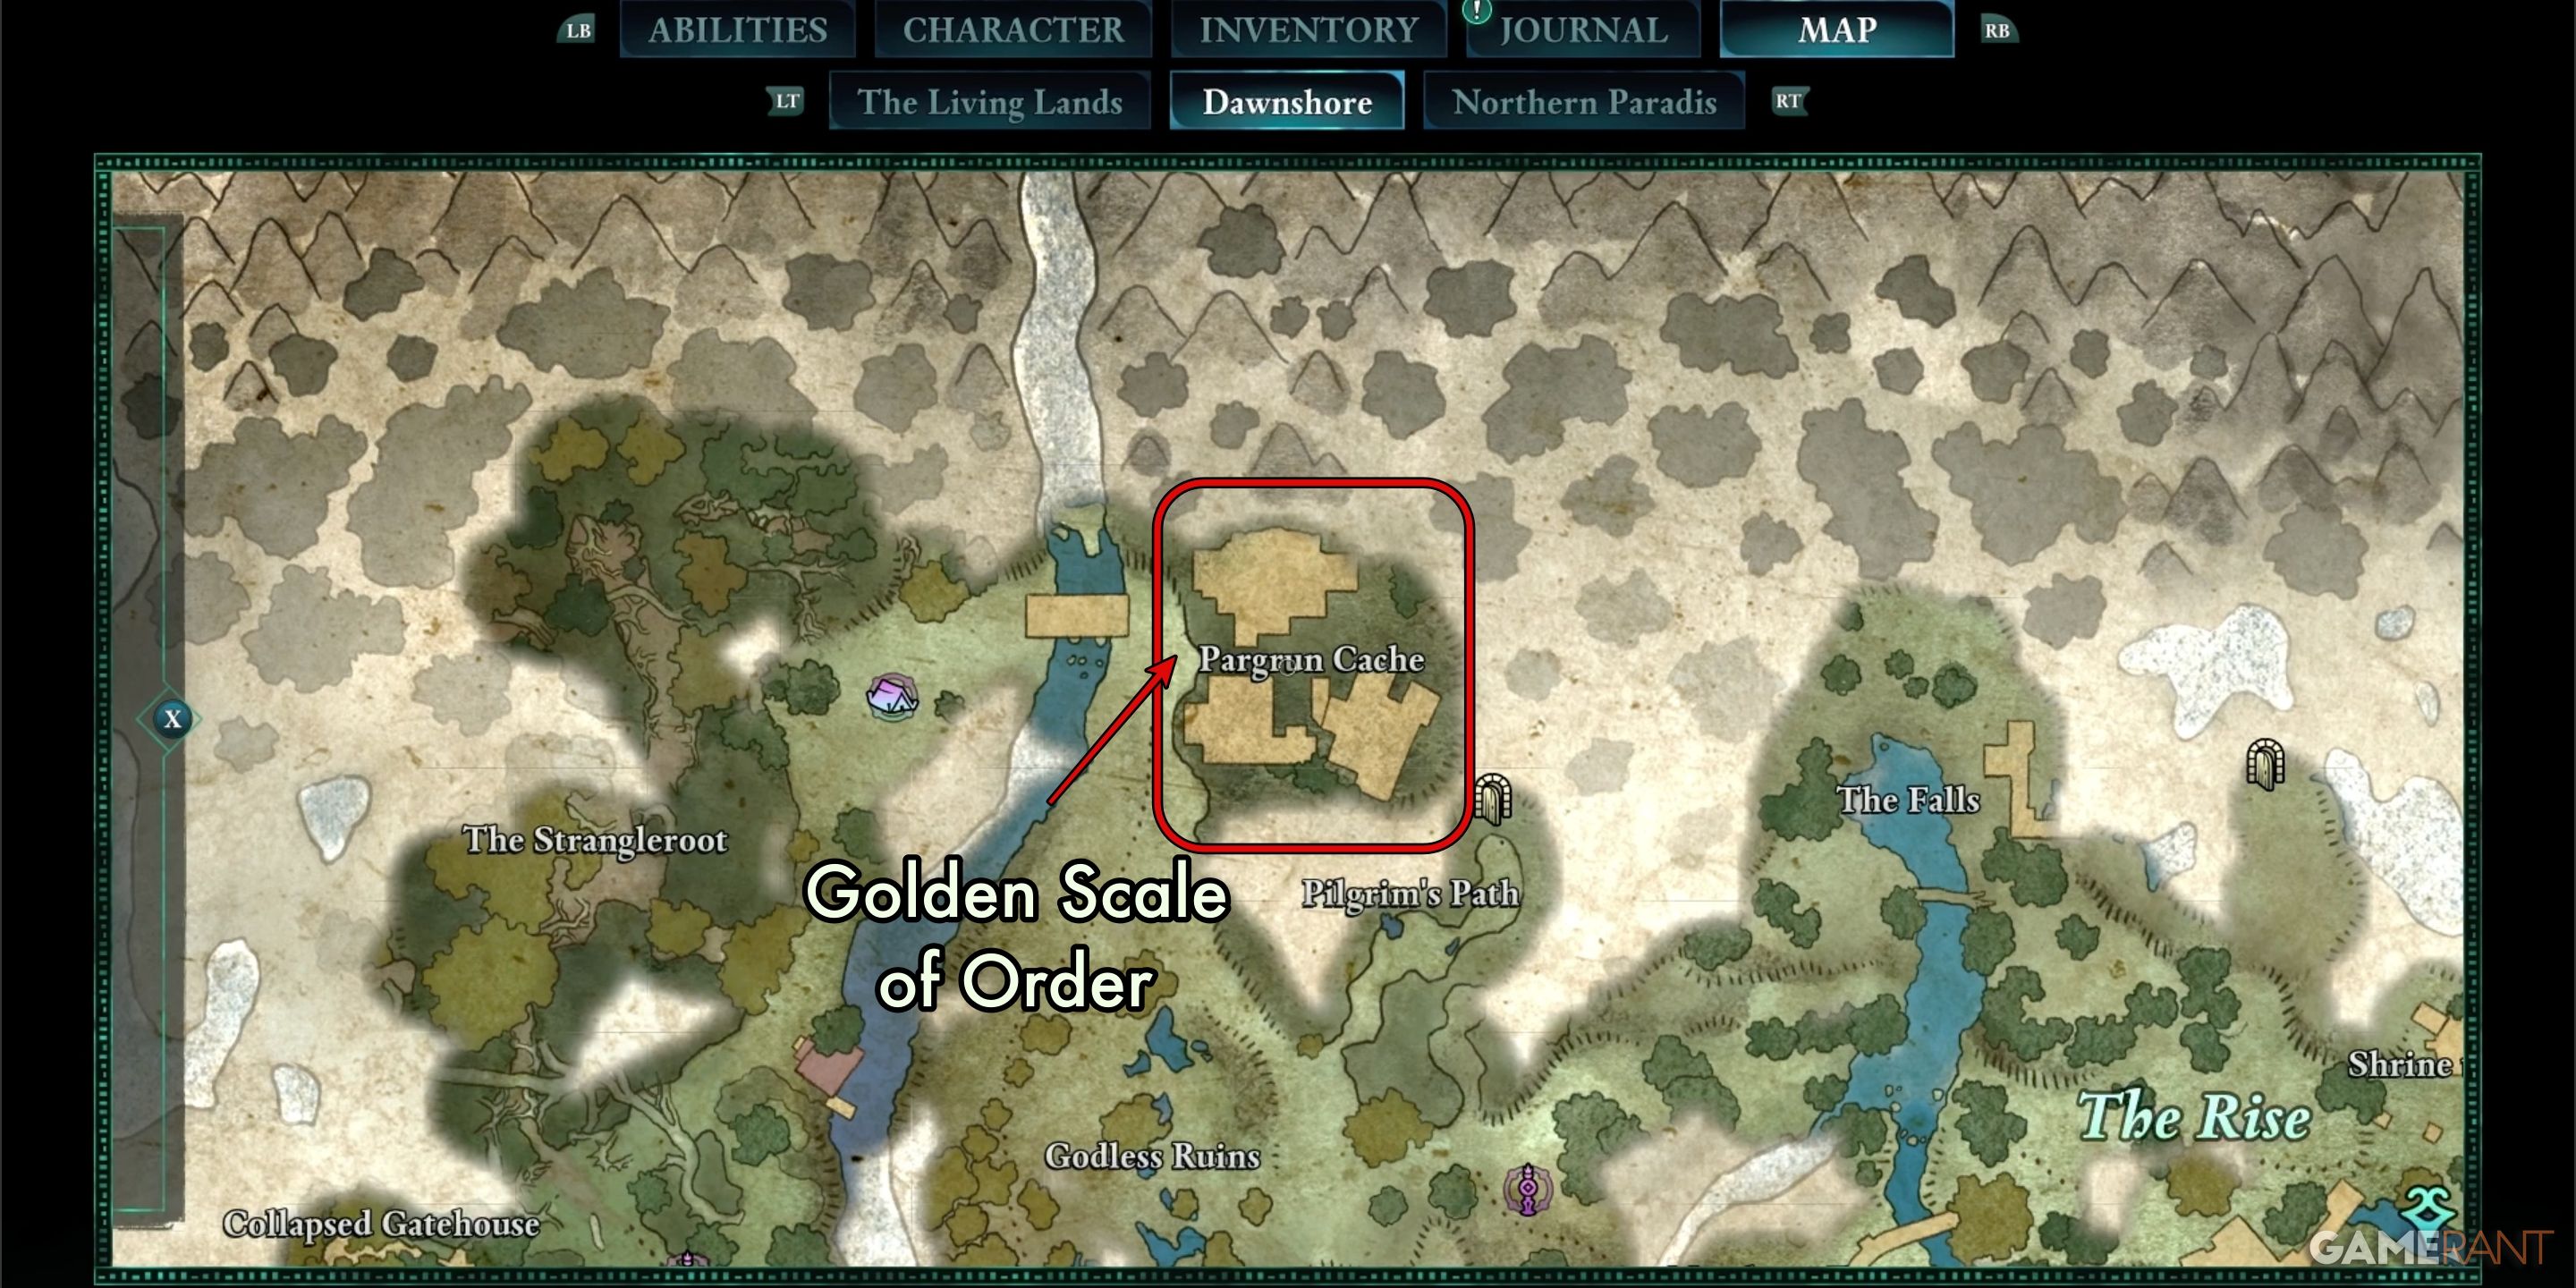
The Golden Scale of Order is found in the Pargrun Cache near the northwestern corner of Dawnshore.
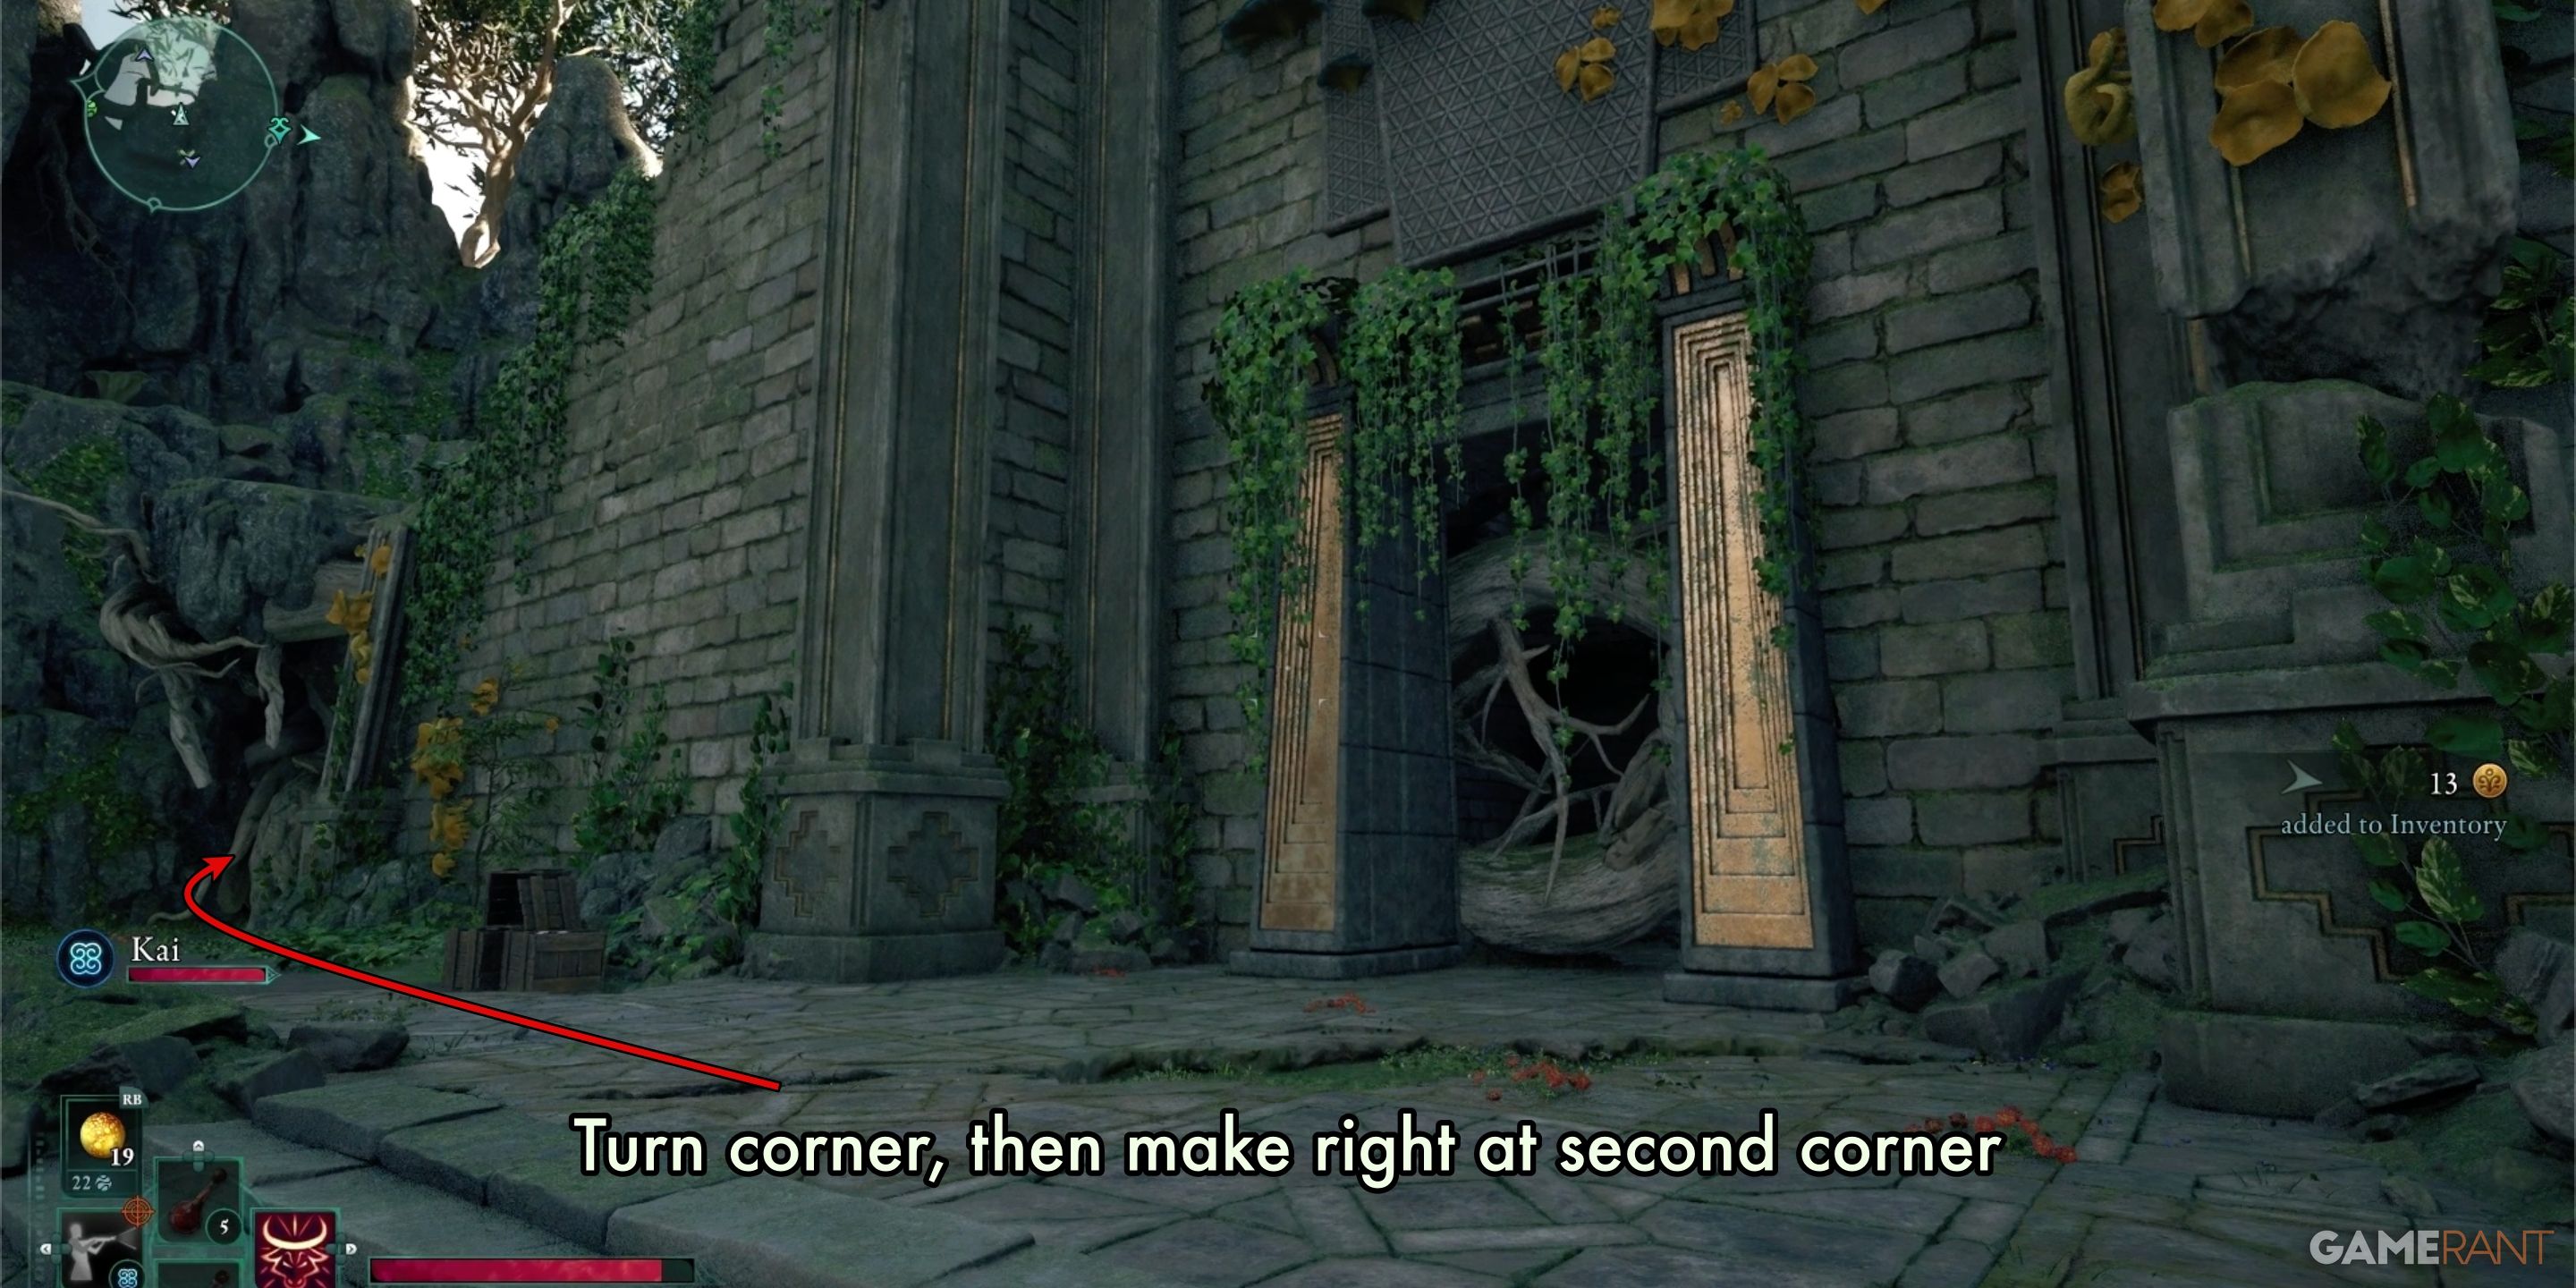
Progressing towards the summit of the old structures ahead, you’ll come across a band of adversaries. Upon reaching this spot, notice a raised stone platform shaped like a stage, standing before an antique door obscured by foliage. Once you reach the door, veer left and circumnavigate the structure on its side.
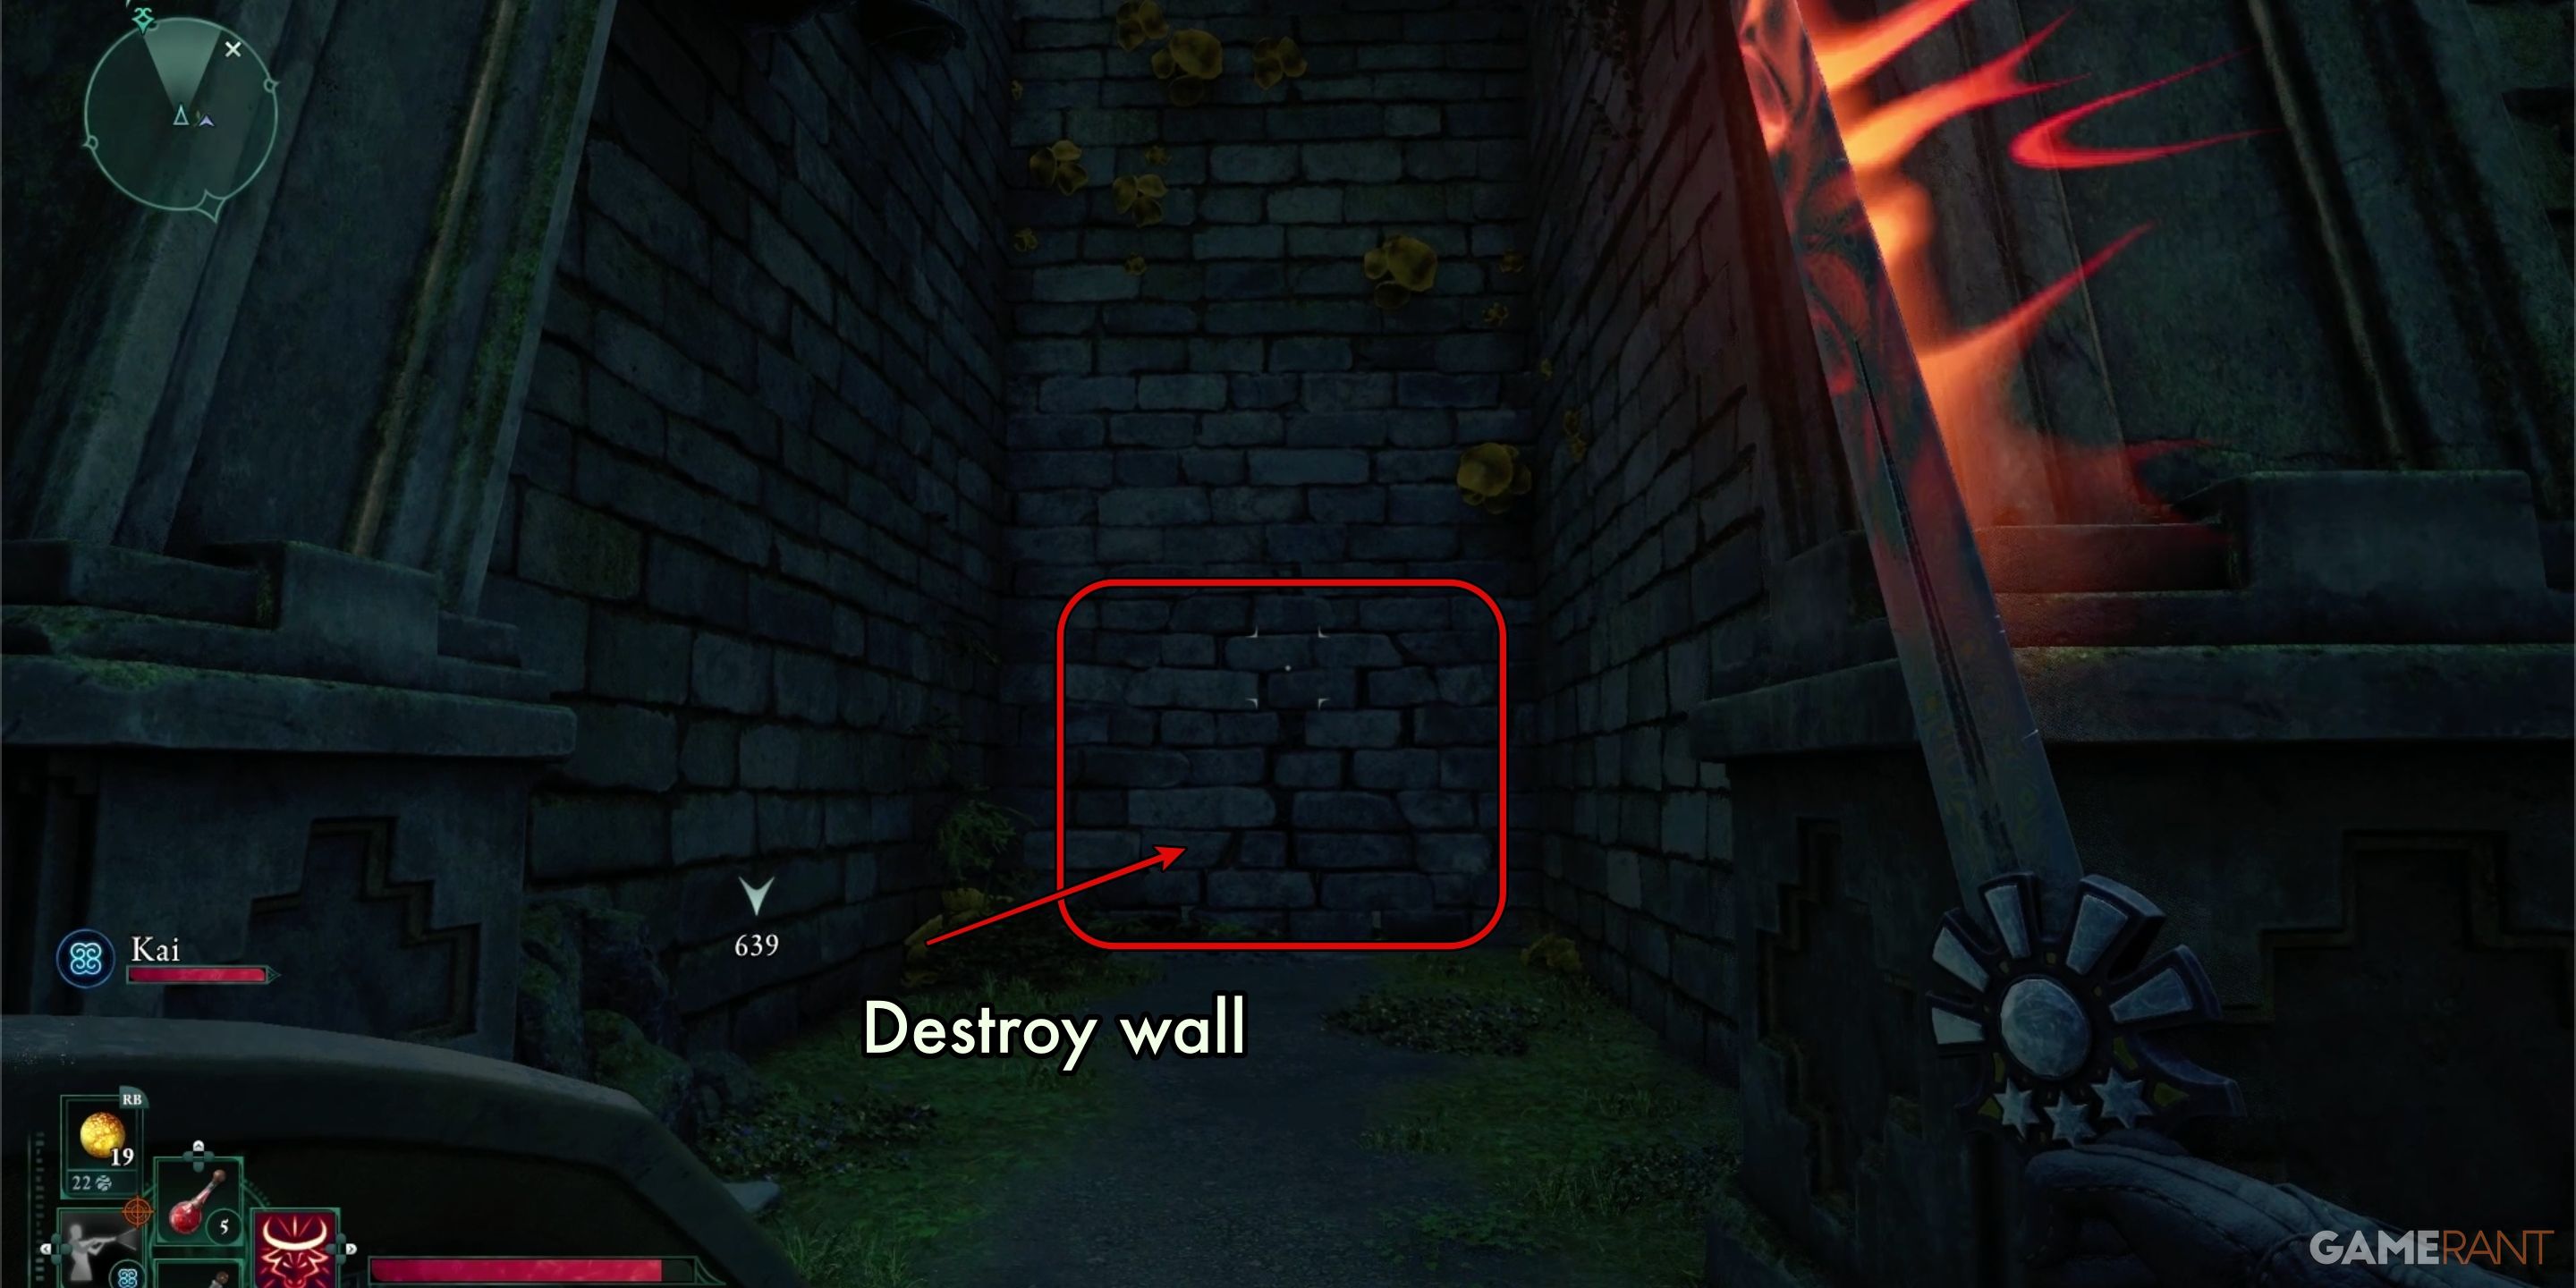
Once you round the bend, keep going along the path until you come across a wall. Break a section of it using any method at your disposal (we employed the Grimoire Snap spell). Pass through the resulting opening and don’t forget to grab the Boots of the Bricklayer from the unique chest located on the left-hand side.
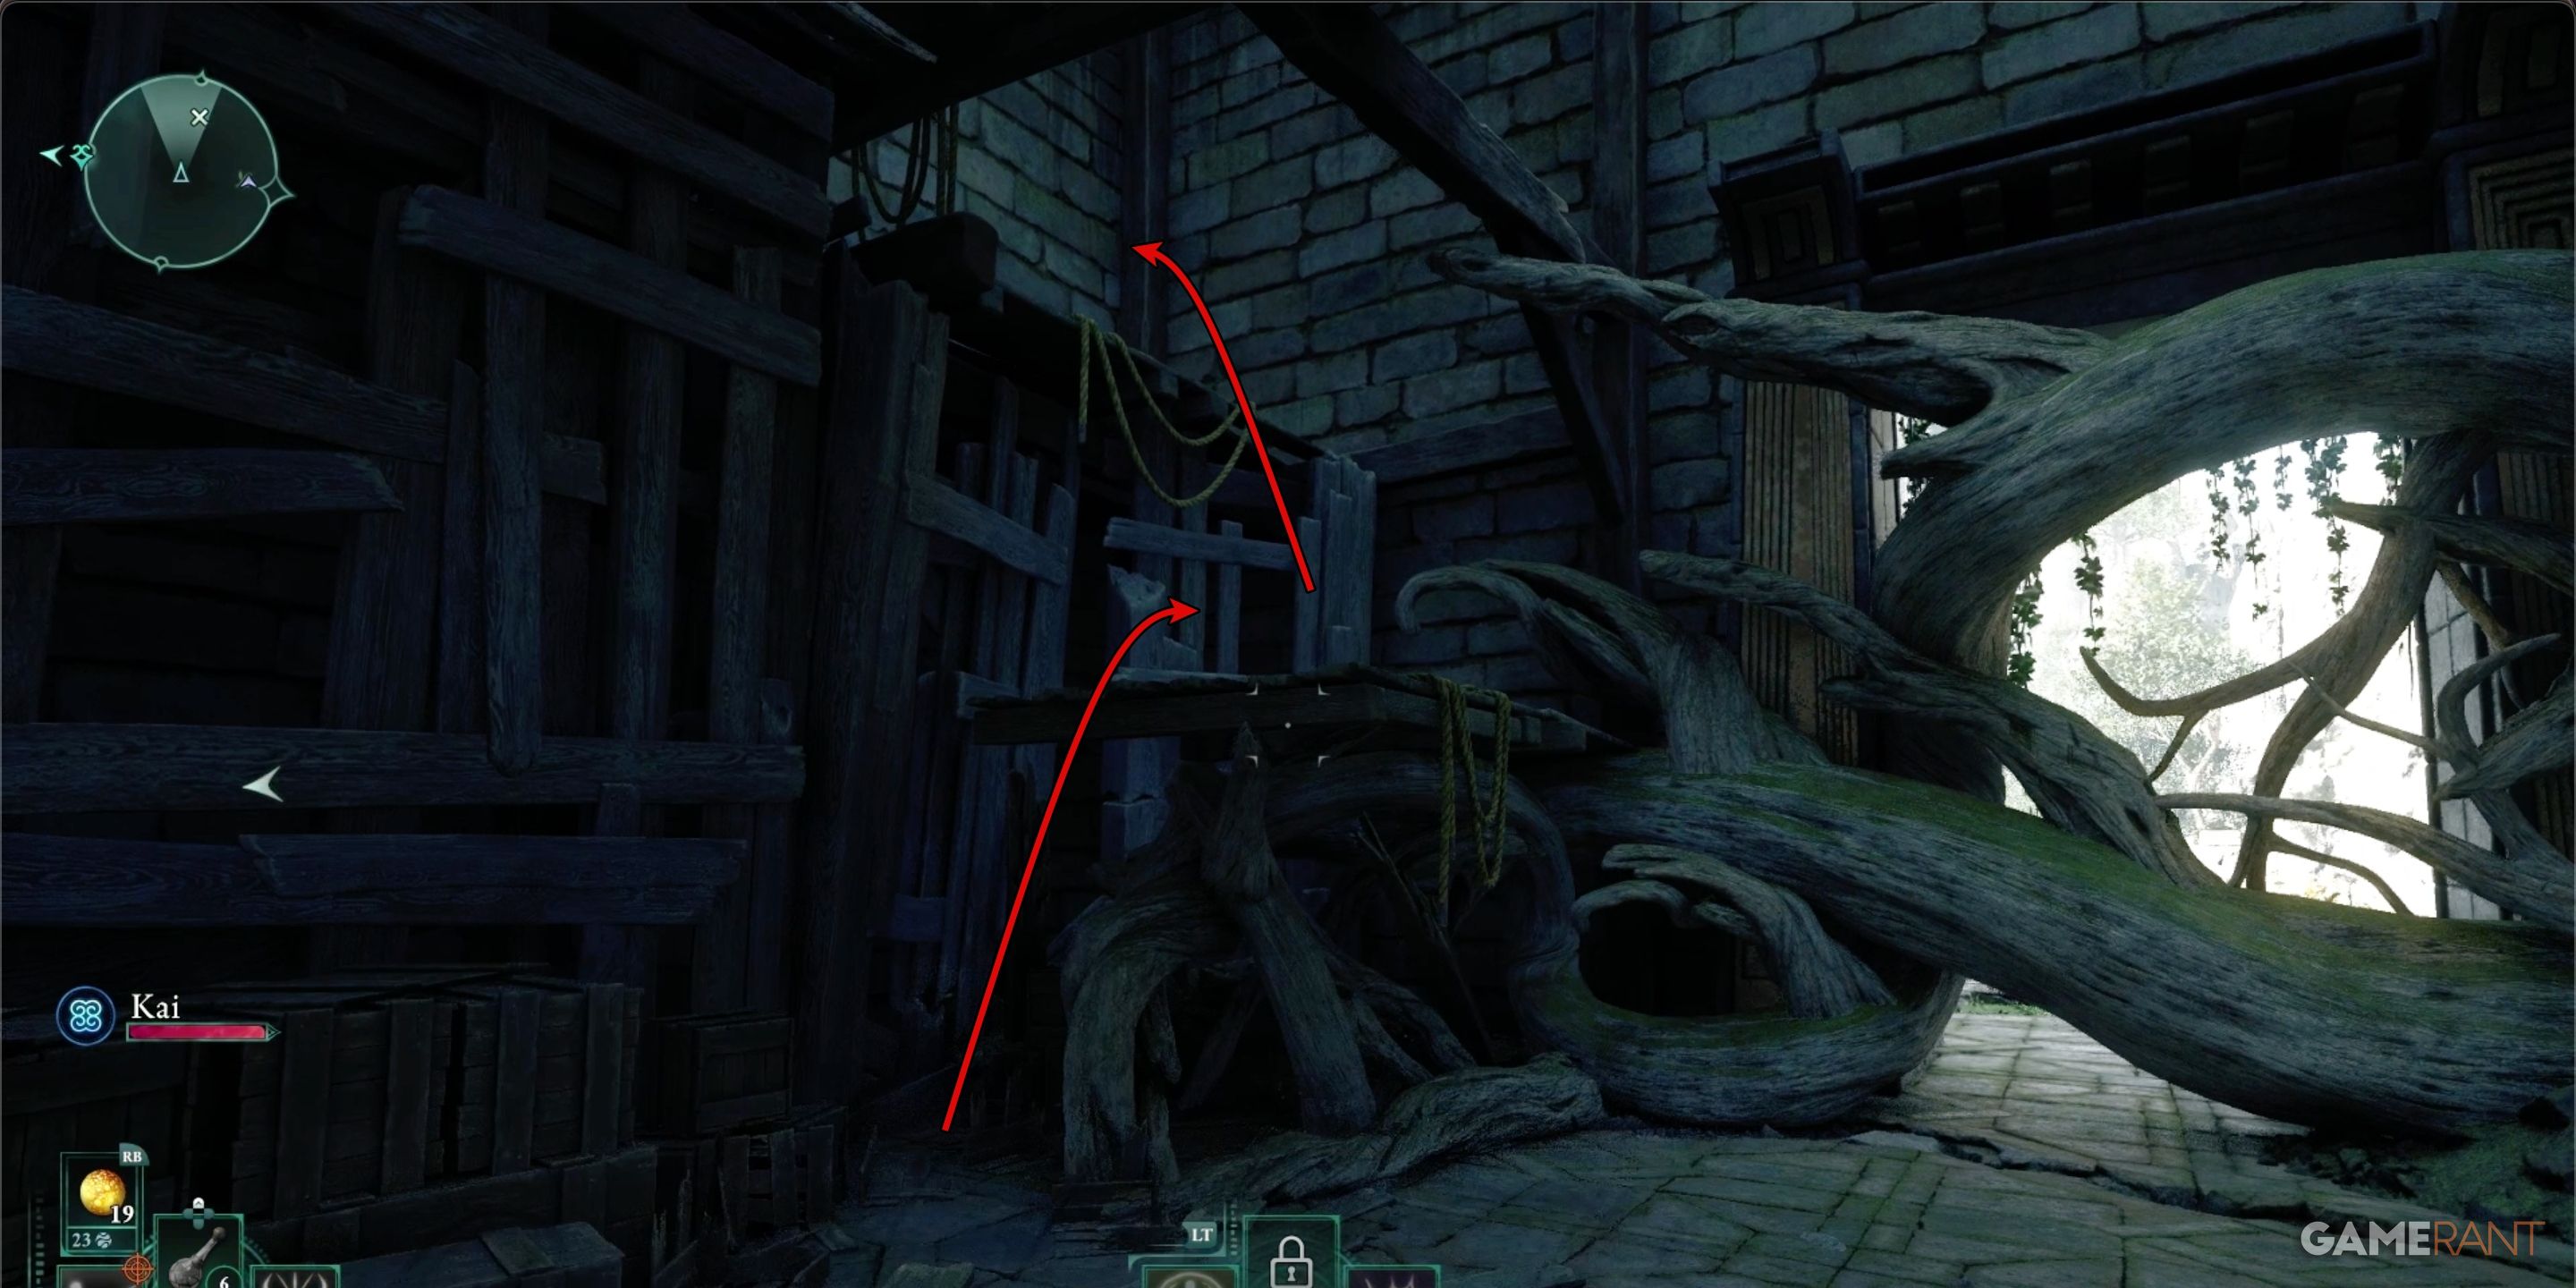
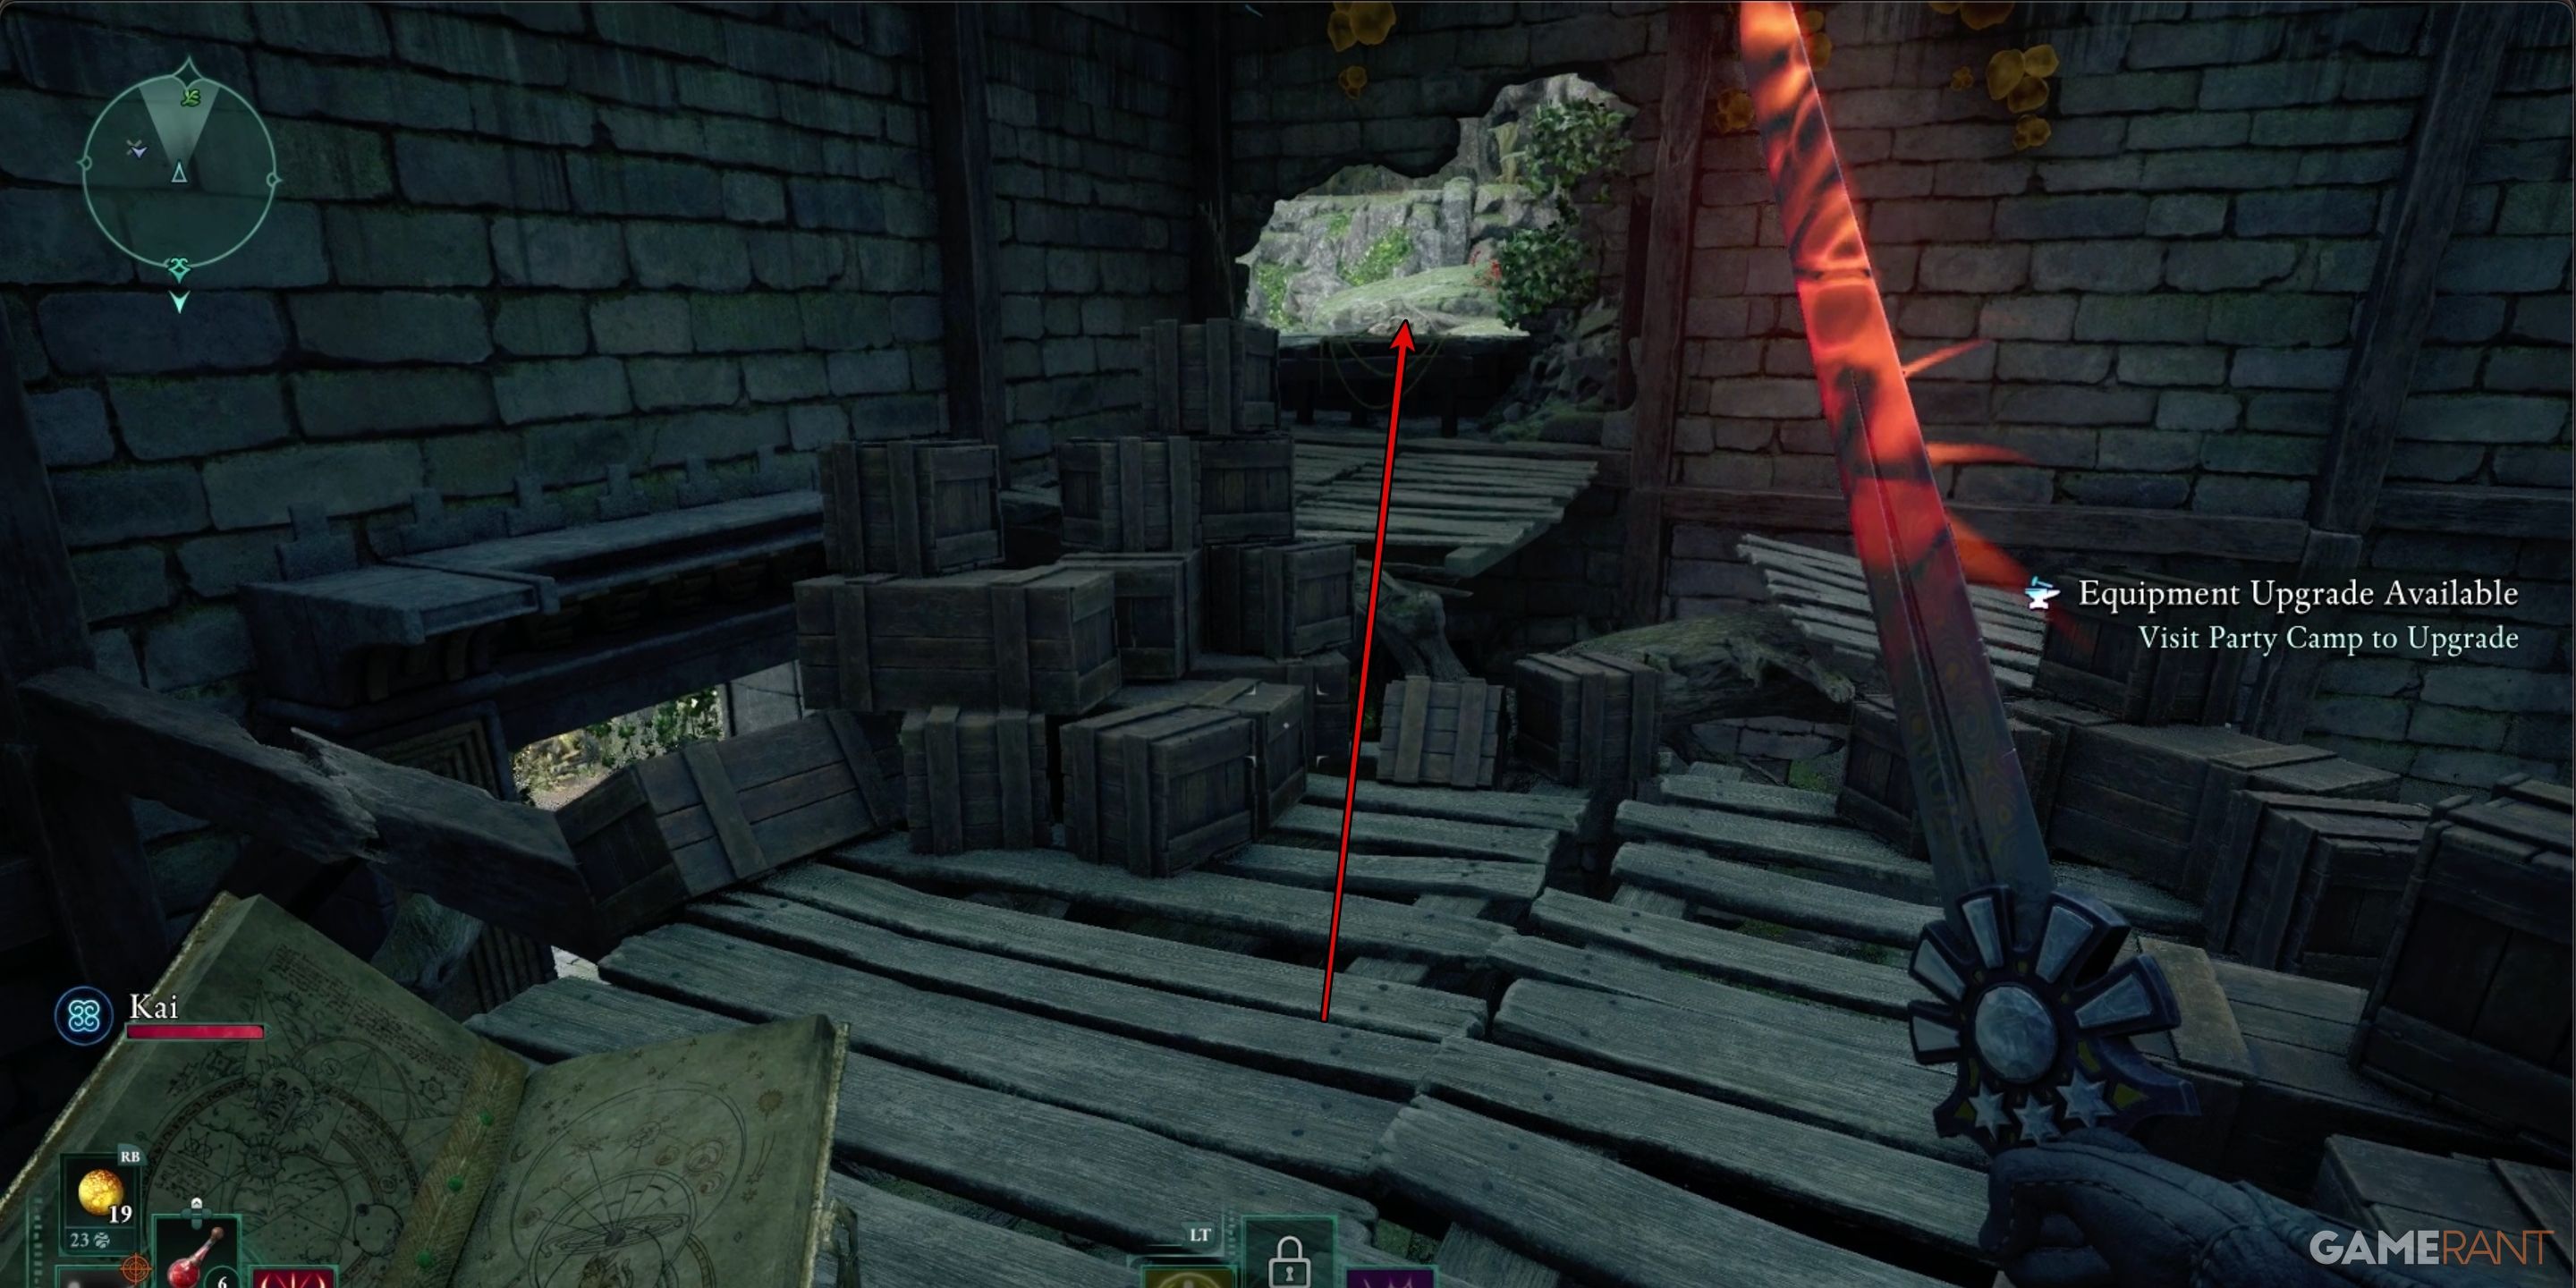
In the same room, utilize the structure close to the barricaded entrance as a means to climb up to the room’s highest point. Upon reaching the top, leap over the precarious platforms and escape through the opening in the wall. Beyond this, you can jump onto a rocky platform to traverse a wide gap.
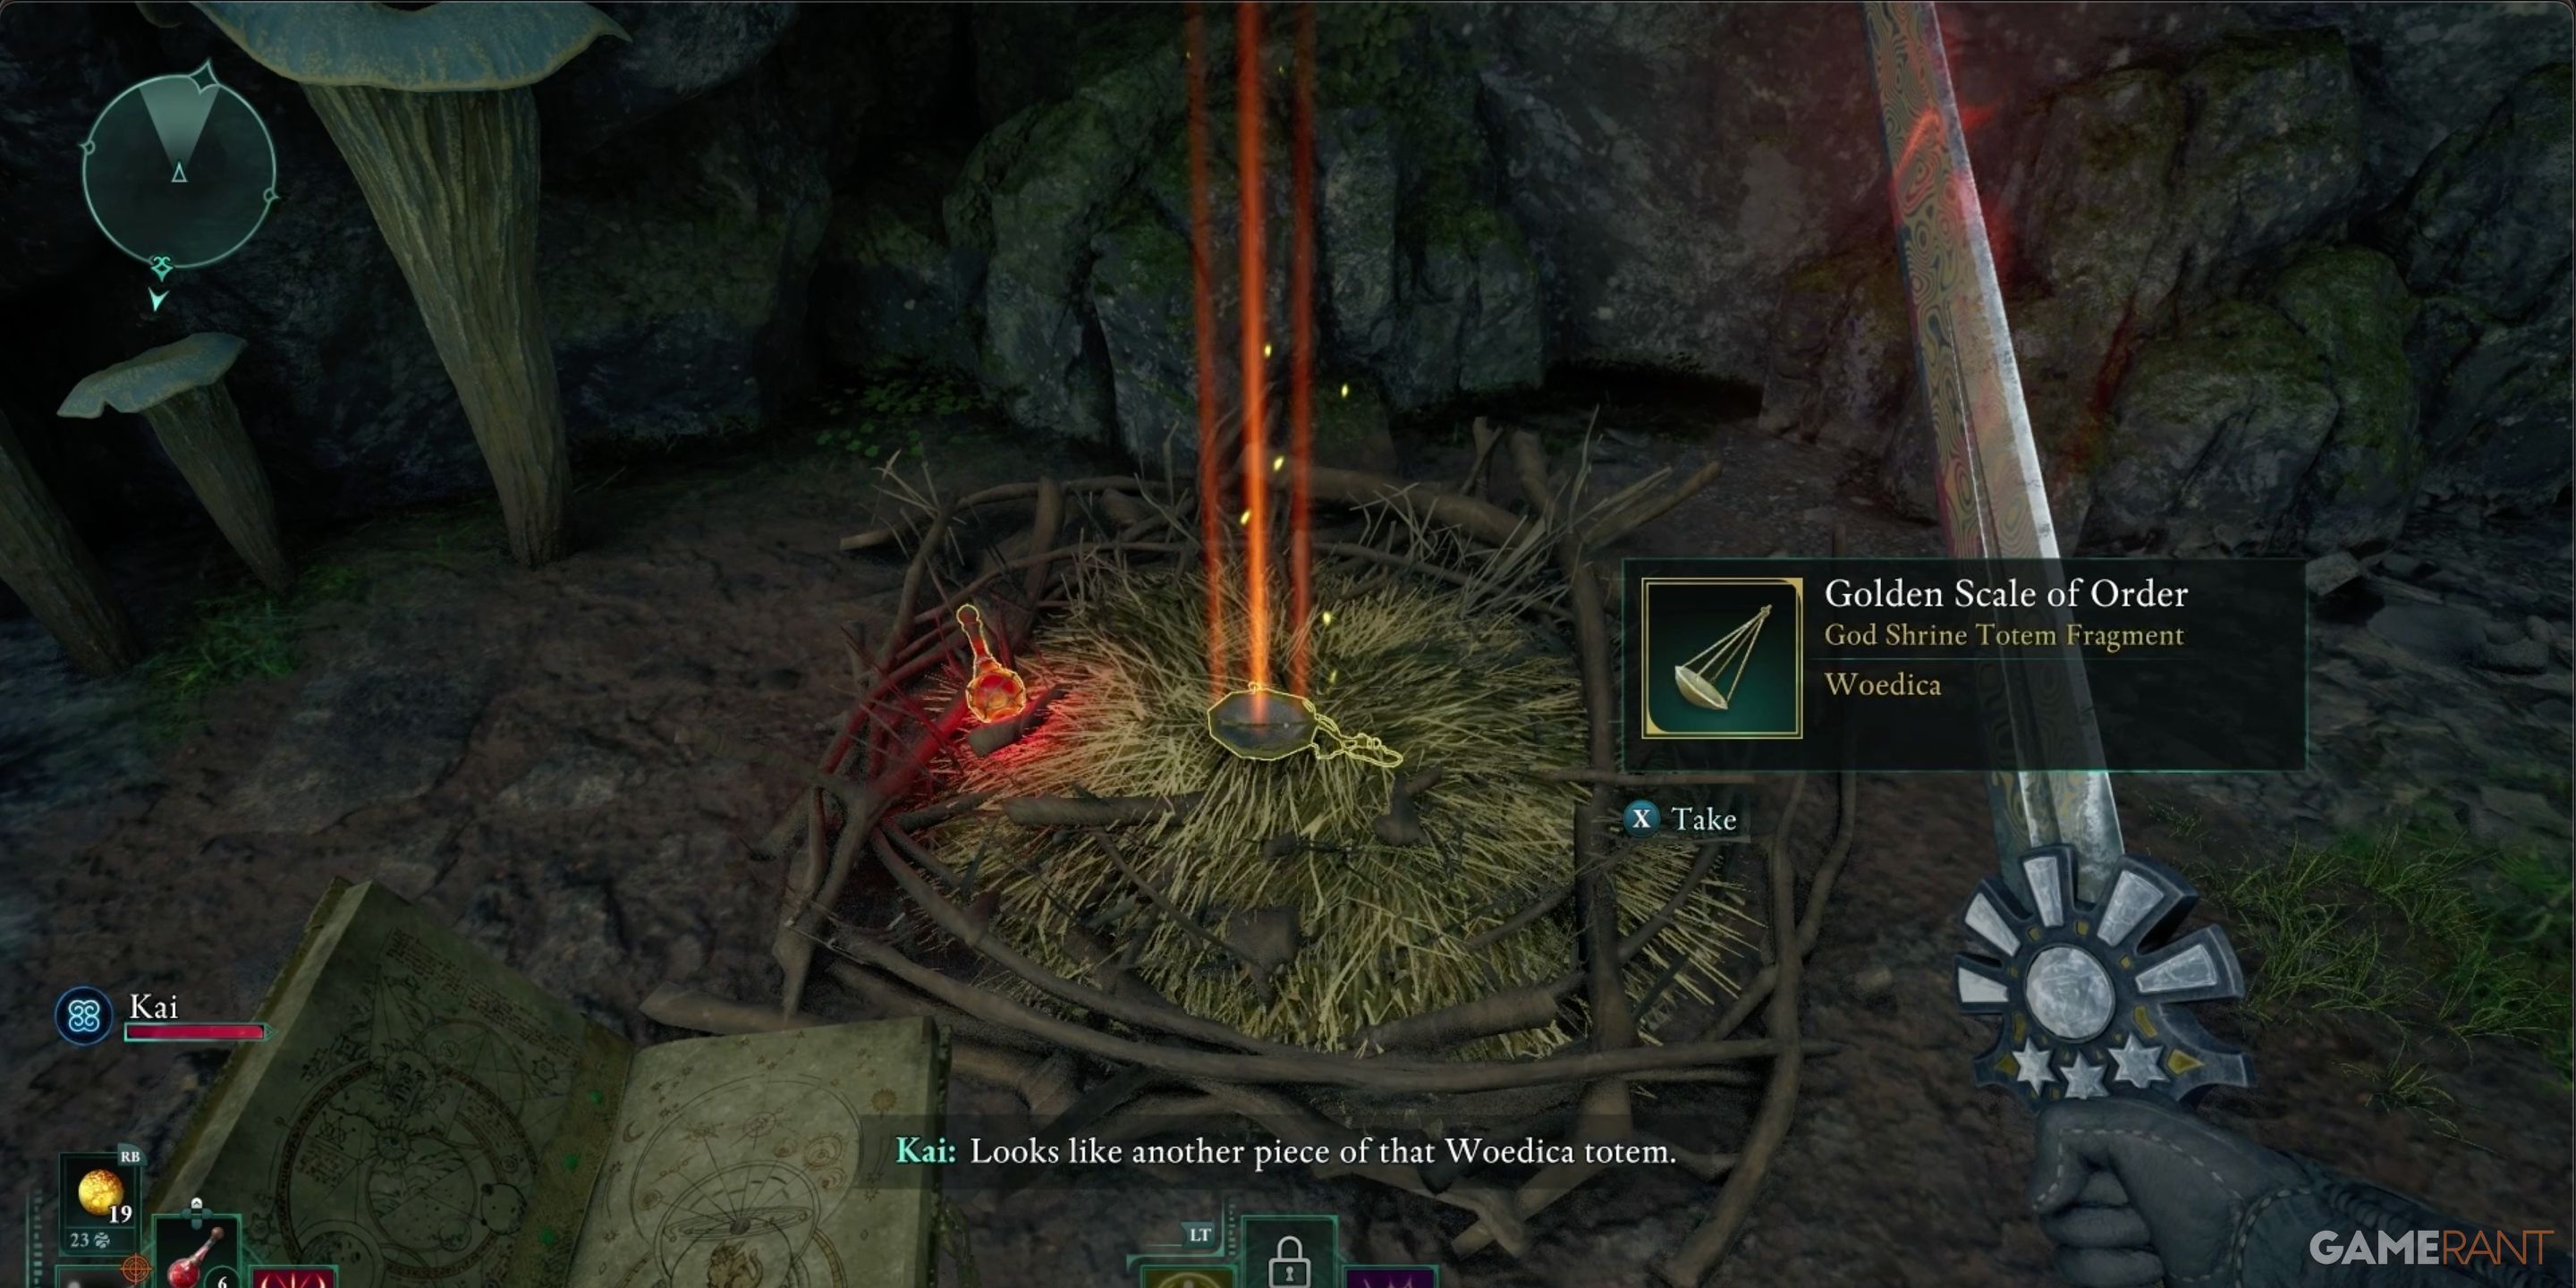
At the opposite end of the gap, you’ll find the Golden Scale of Order in a nest.
How to Get the Golden Scale of Justice:
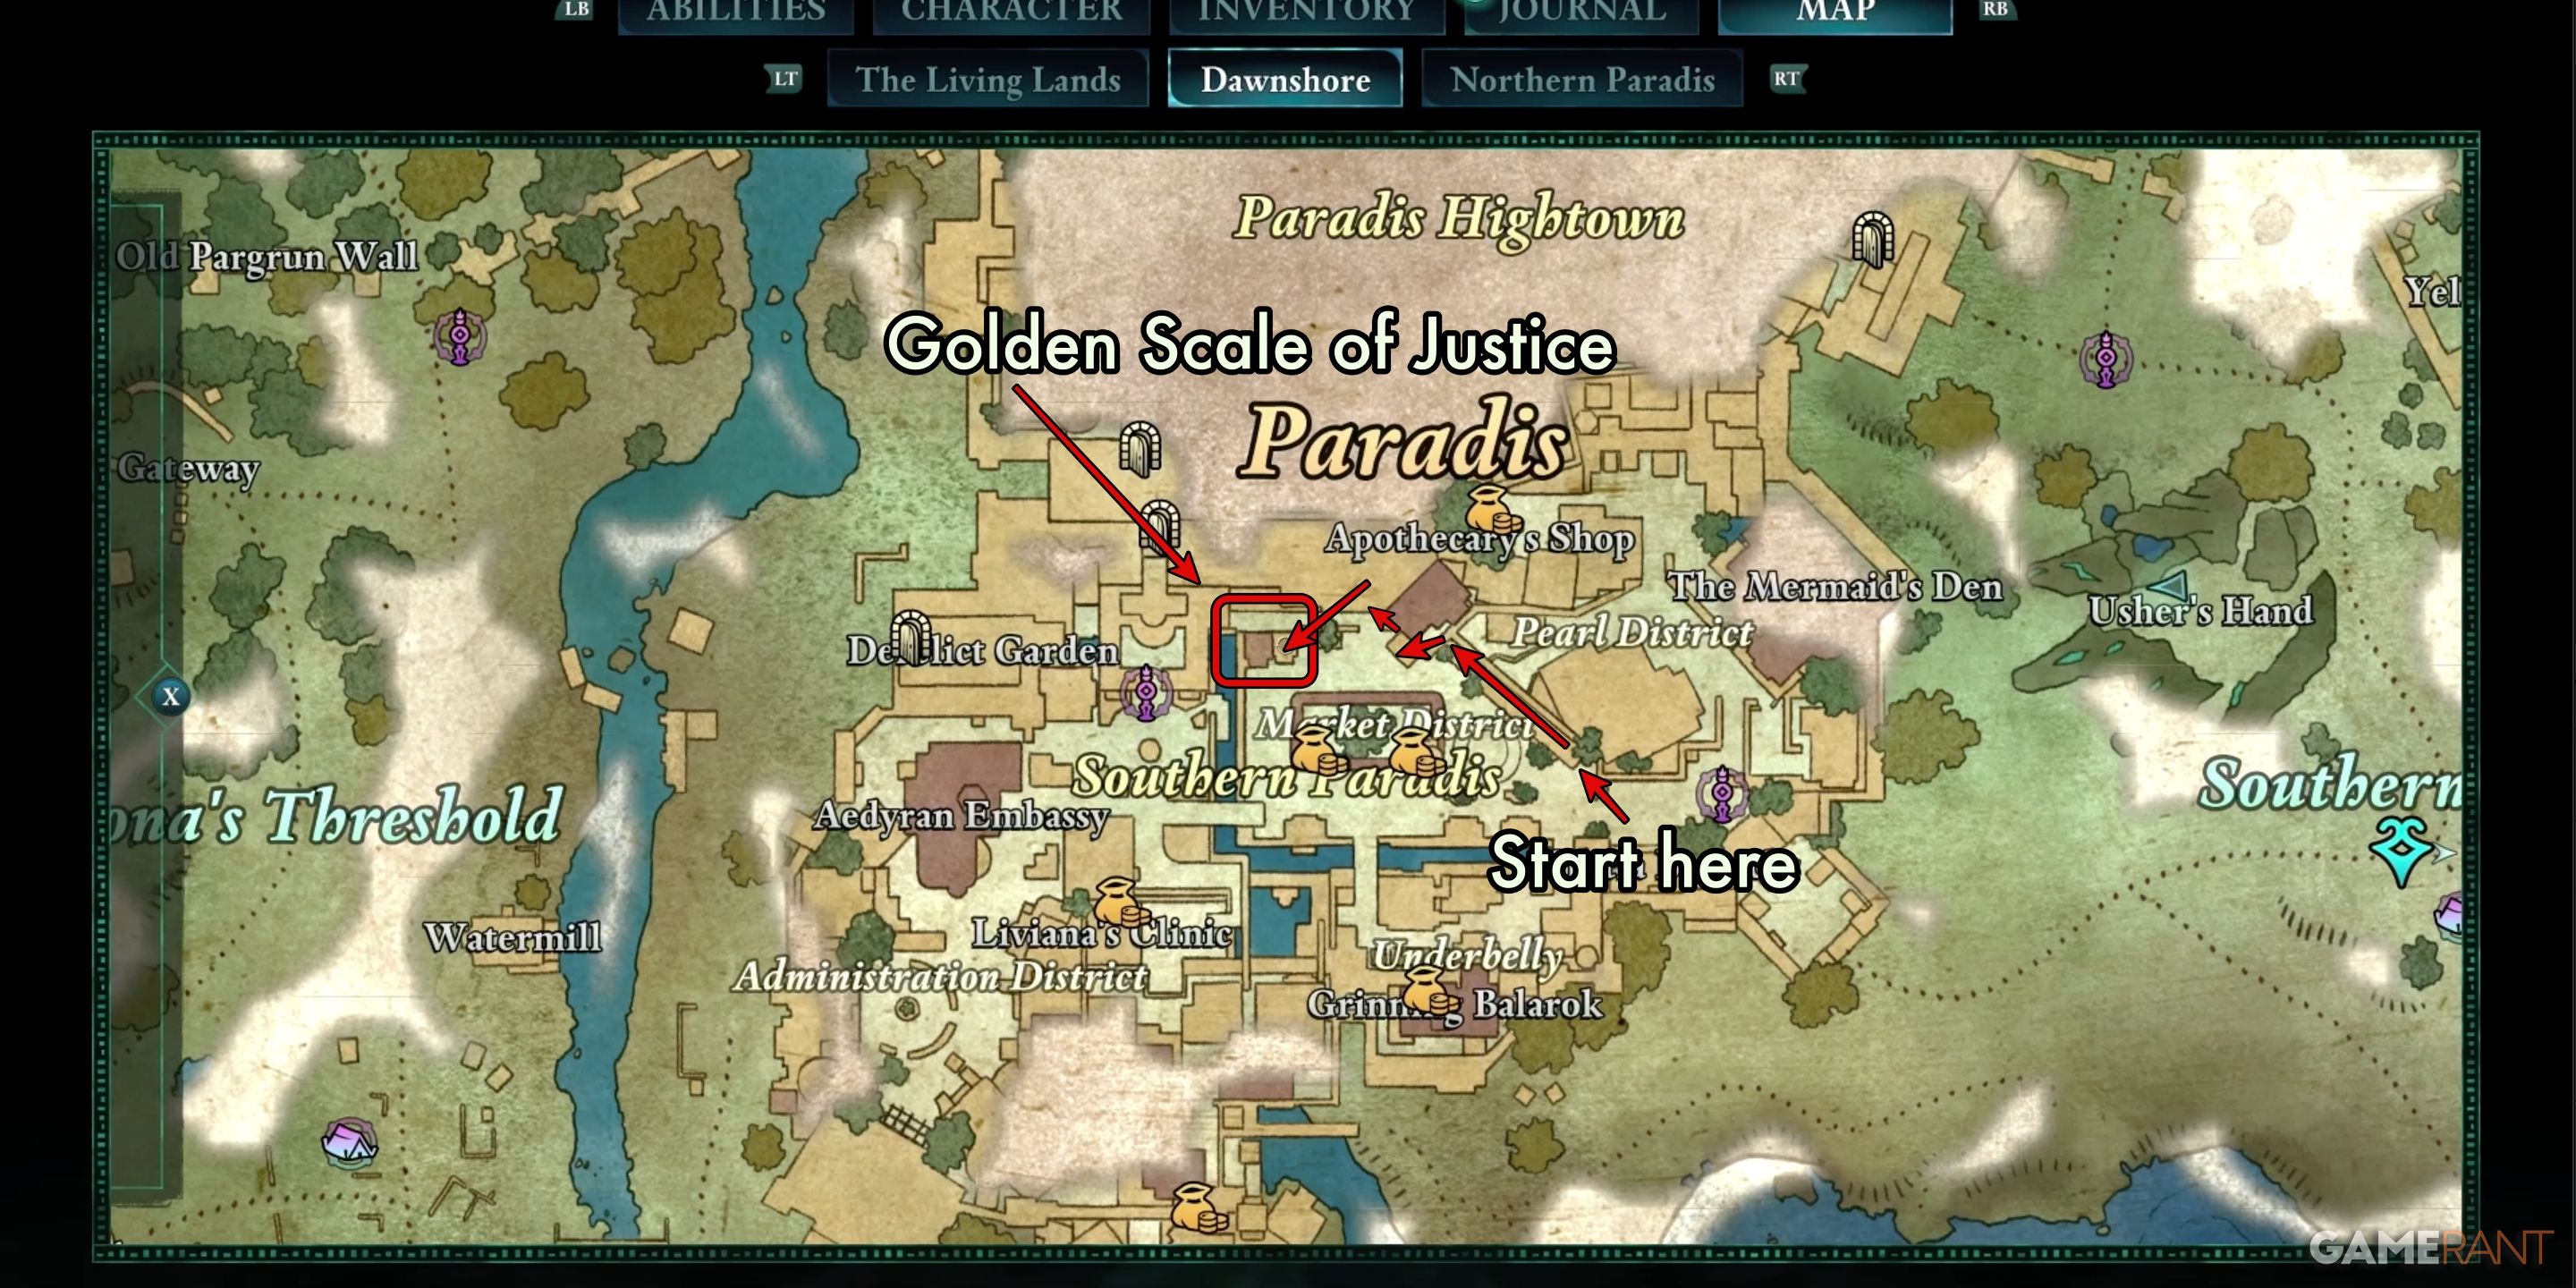
As a gamer exploring the vibrant city of Paradis, here’s my personal take on how to grab the coveted Golden Scale of Justice: I should make my way towards the northwest corner in the bustling Market District. Once there, I’ll spot a specific balcony, clearly marked on the map above. To access it, I’ll need to sneak into a separate building since the main entrance is blocked.


Initially, proceed eastwards towards the flight of graffiti-adorned stairs situated near the building with a prominent large brown rooftop as indicated on your map. As you approach, notice the wooden scaffolding at the front of this structure, follow them westward. Once you turn the corner on the scaffolds, lower yourself and continue till you reach a stone wall. Ascend the wall and veer left, then traverse the path until you find the vantage point that offers a panoramic view of the market district.
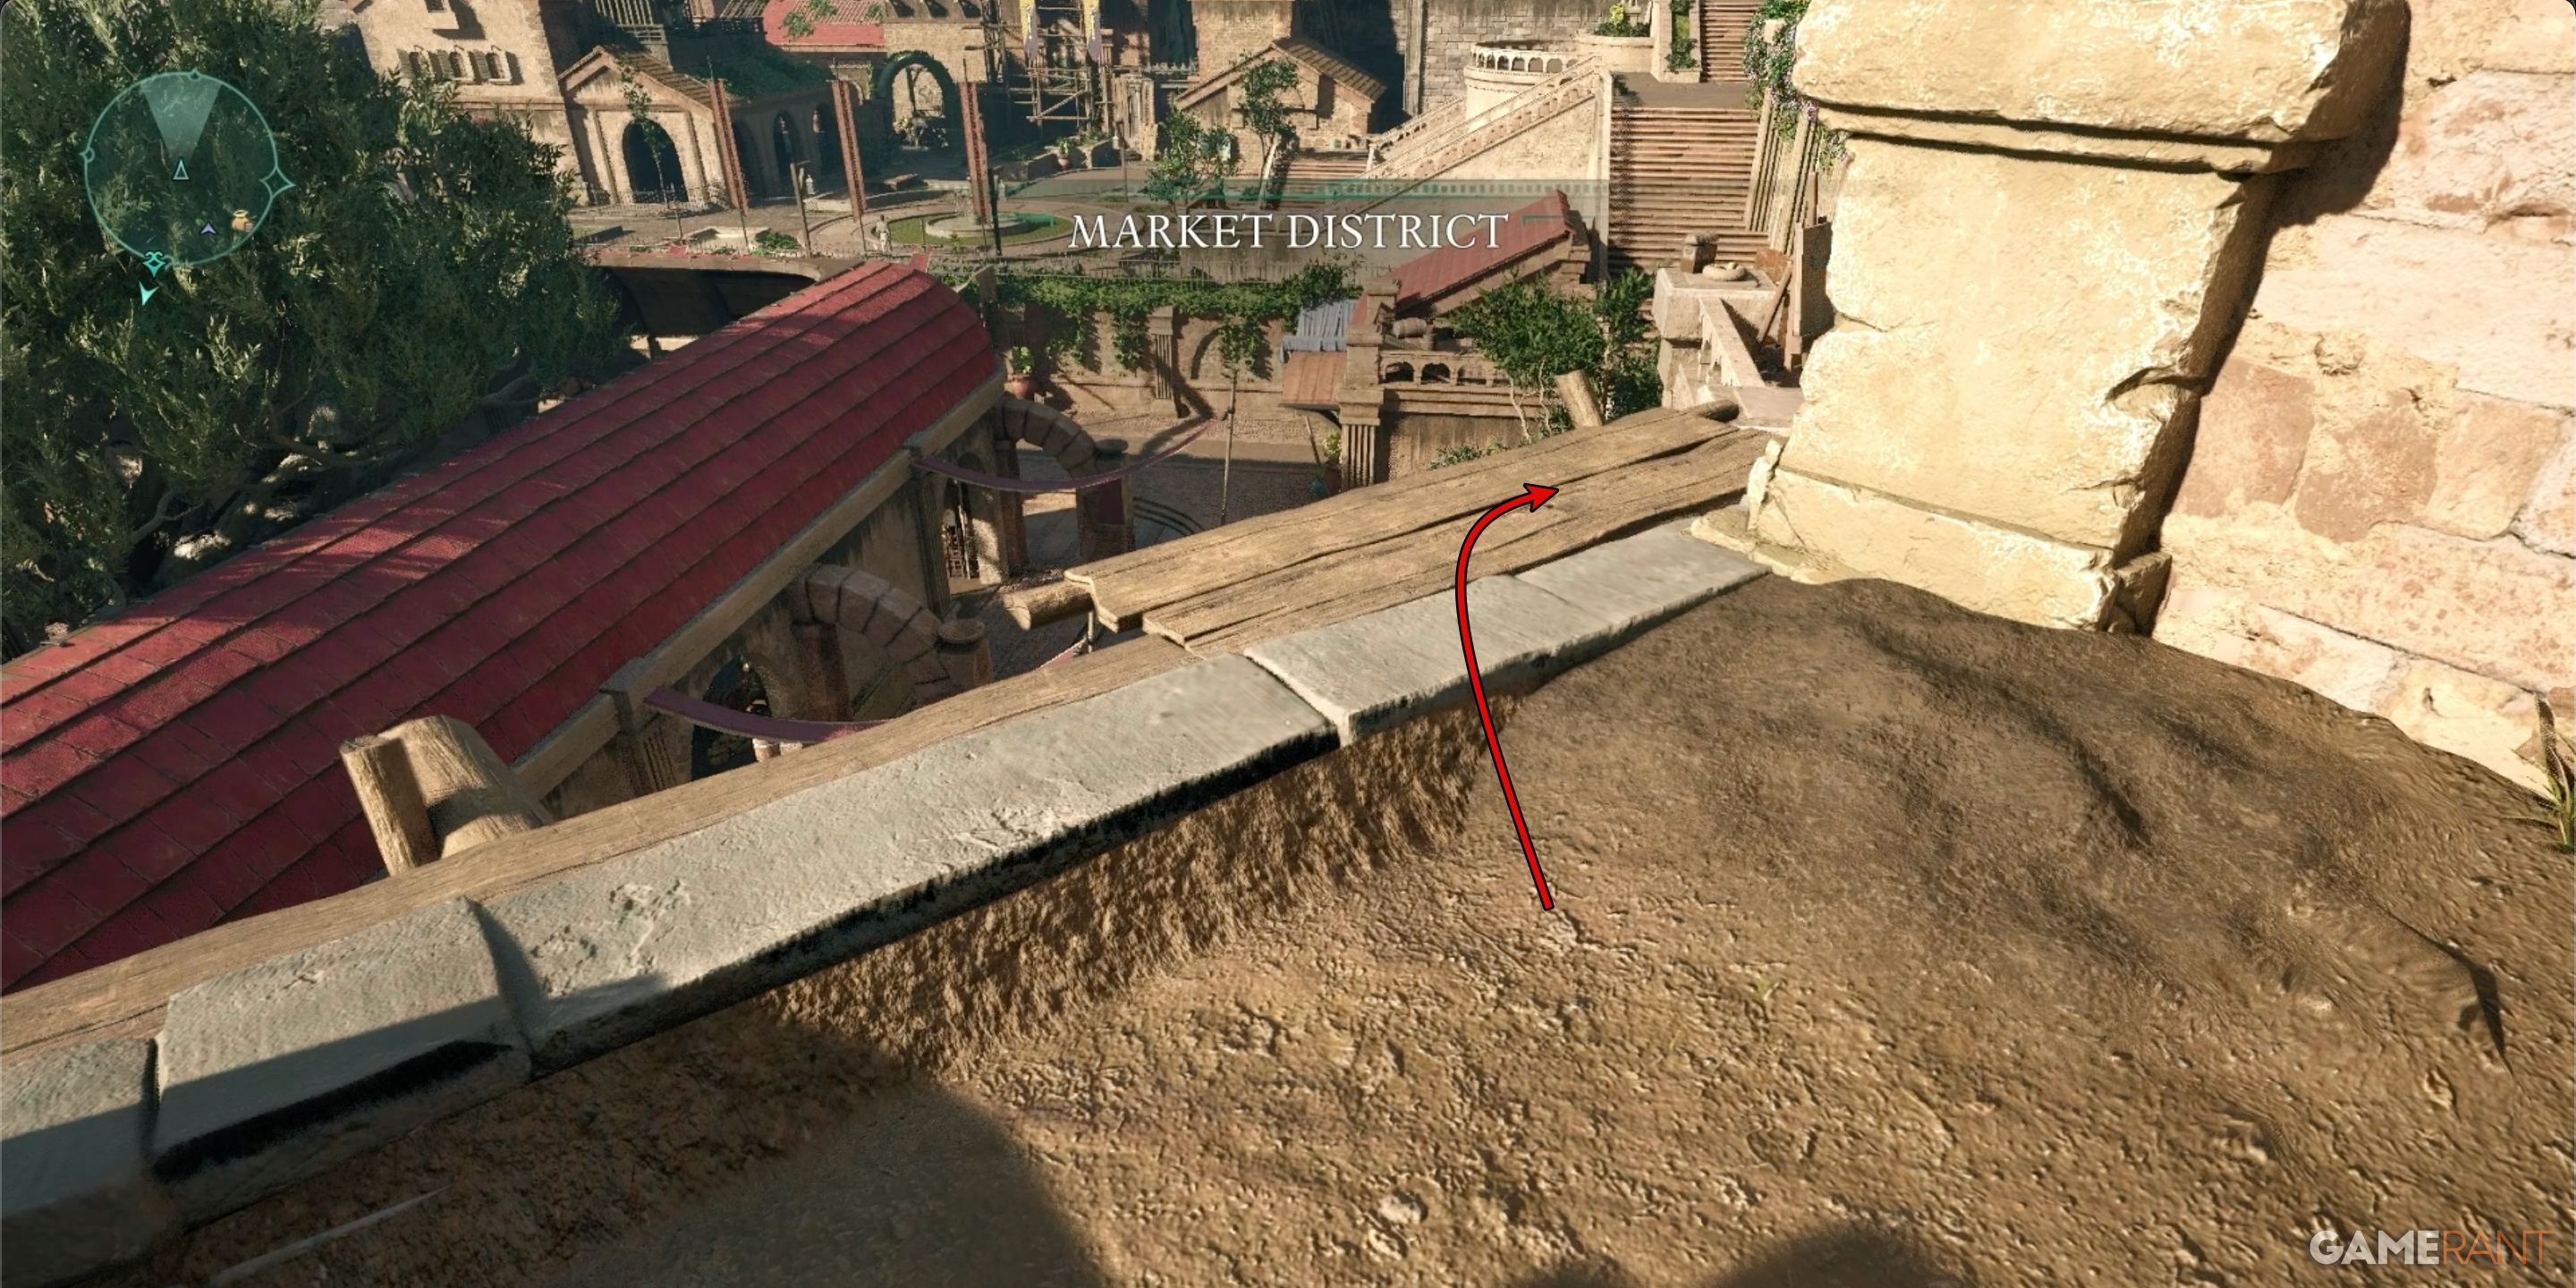
Looking towards the ledge below, you’ll spot another wooden platform. Take a right and proceed along it, and you’ll come across a balcony with an open entrance – you could easily leap onto it.
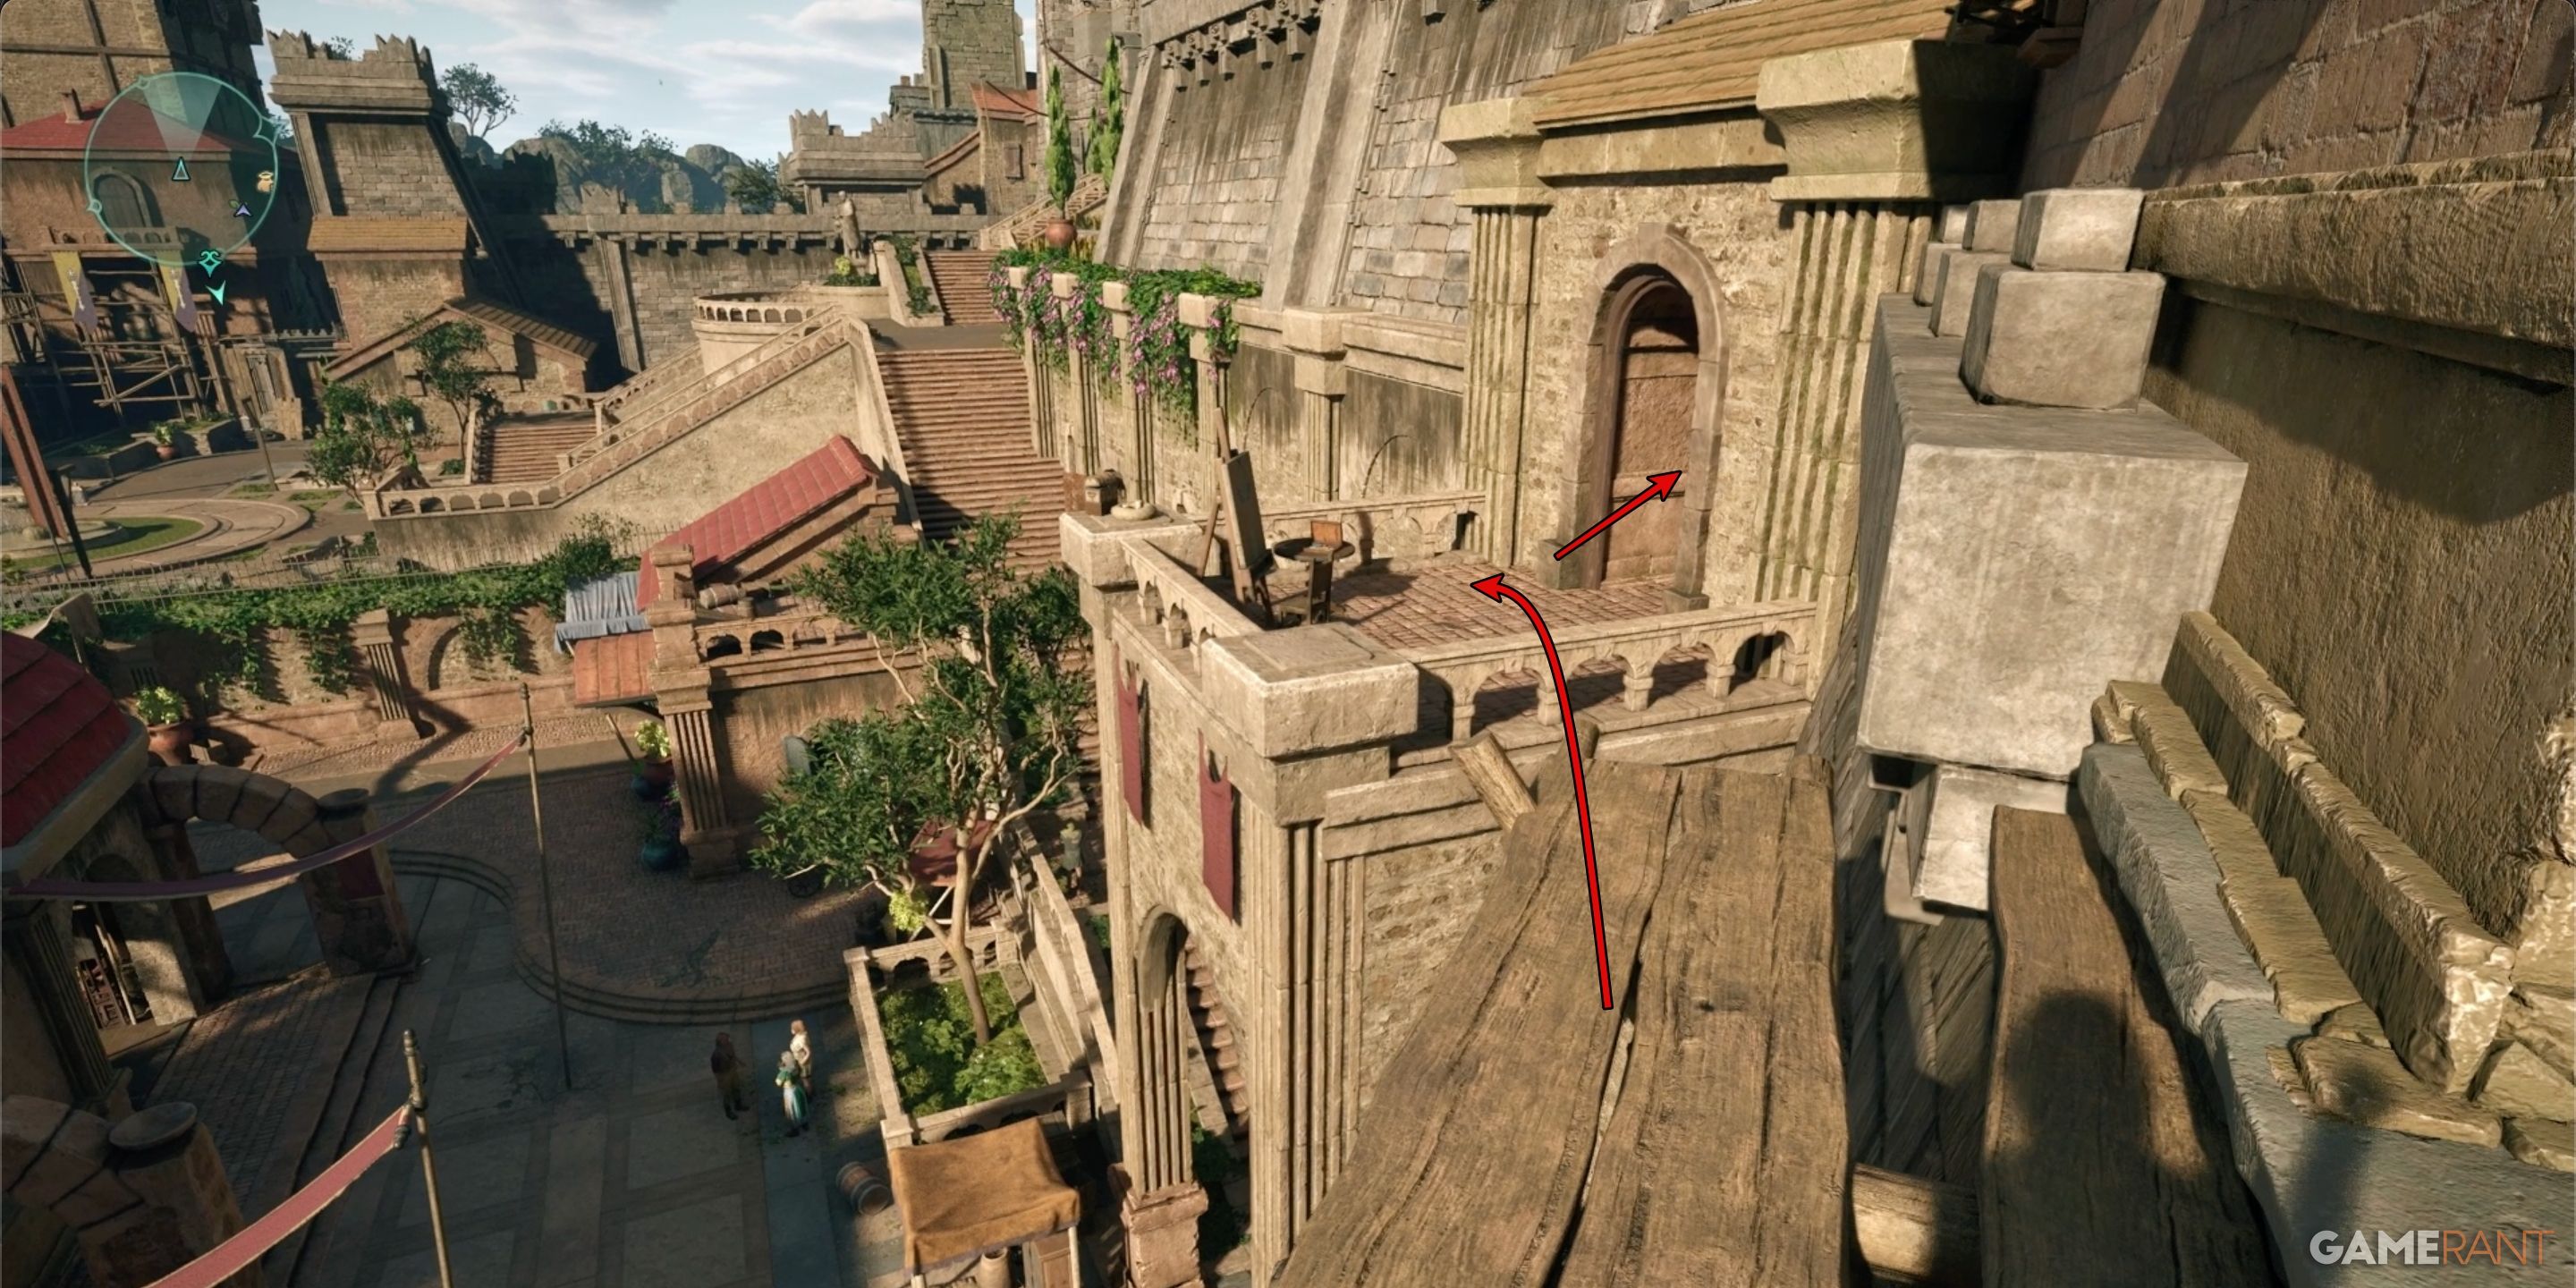
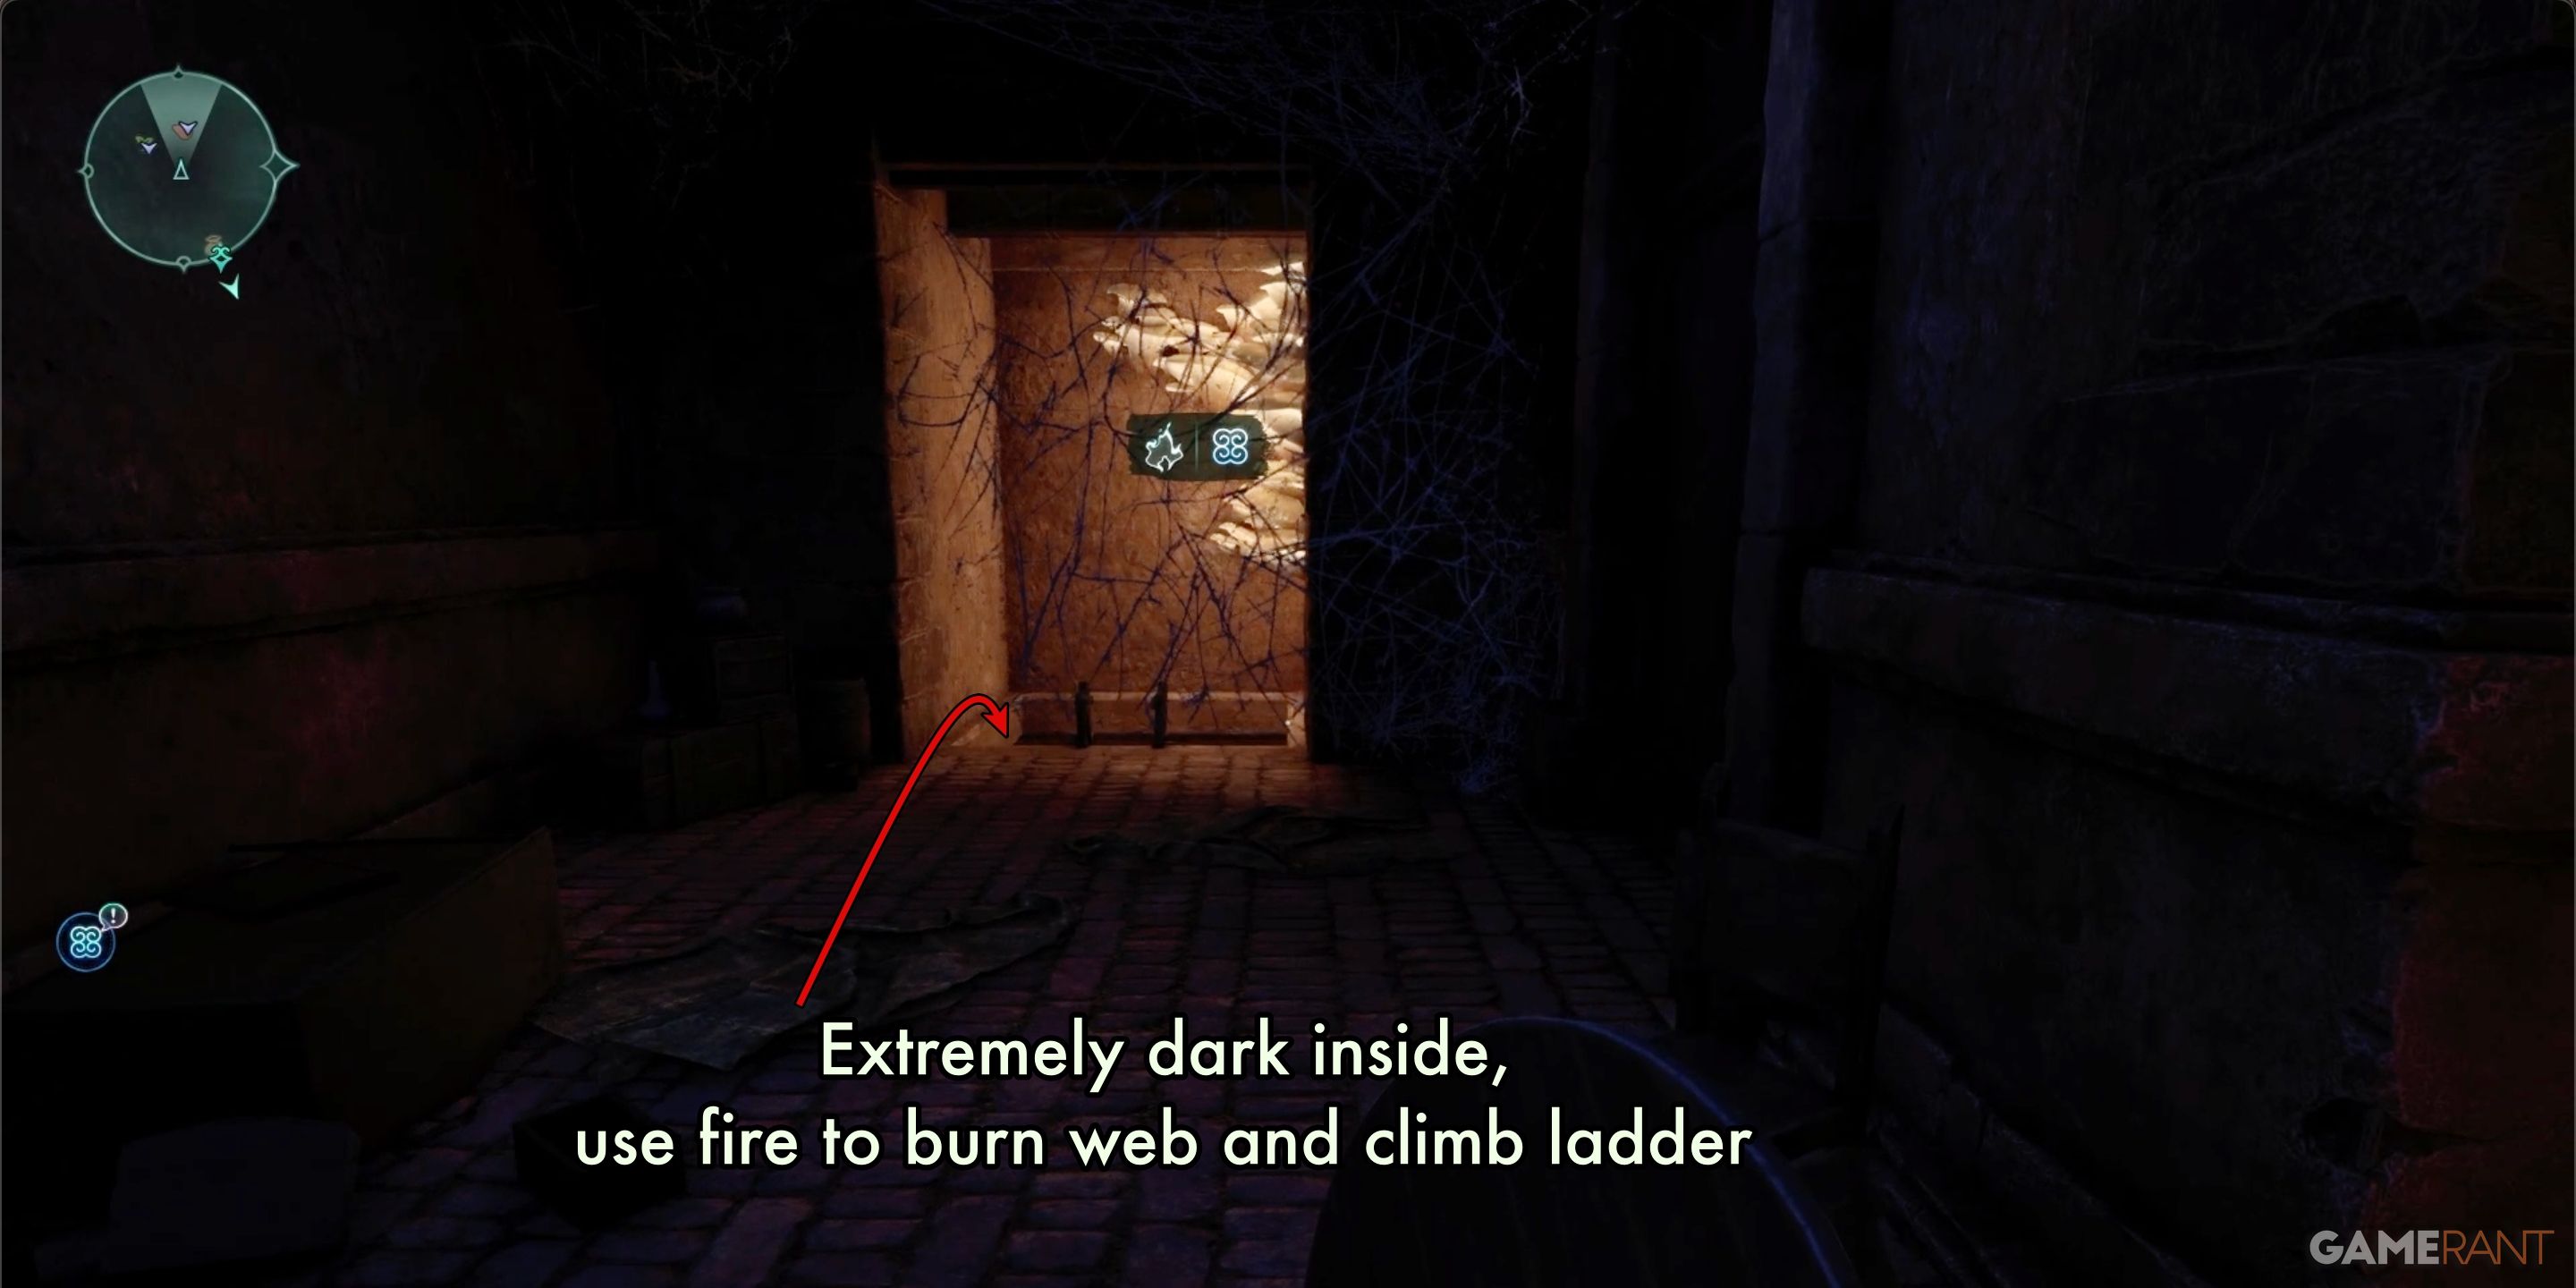
Step through the unfastened door and veer left. Ahead, you’ll encounter a ladder obstructed by a flammable net-like hindrance. Utilize any fire-based tool or weapon to incinerate the net, subsequently descend the ladder. Upon reaching ground level, prepare for multiple assaults from Phantoms.
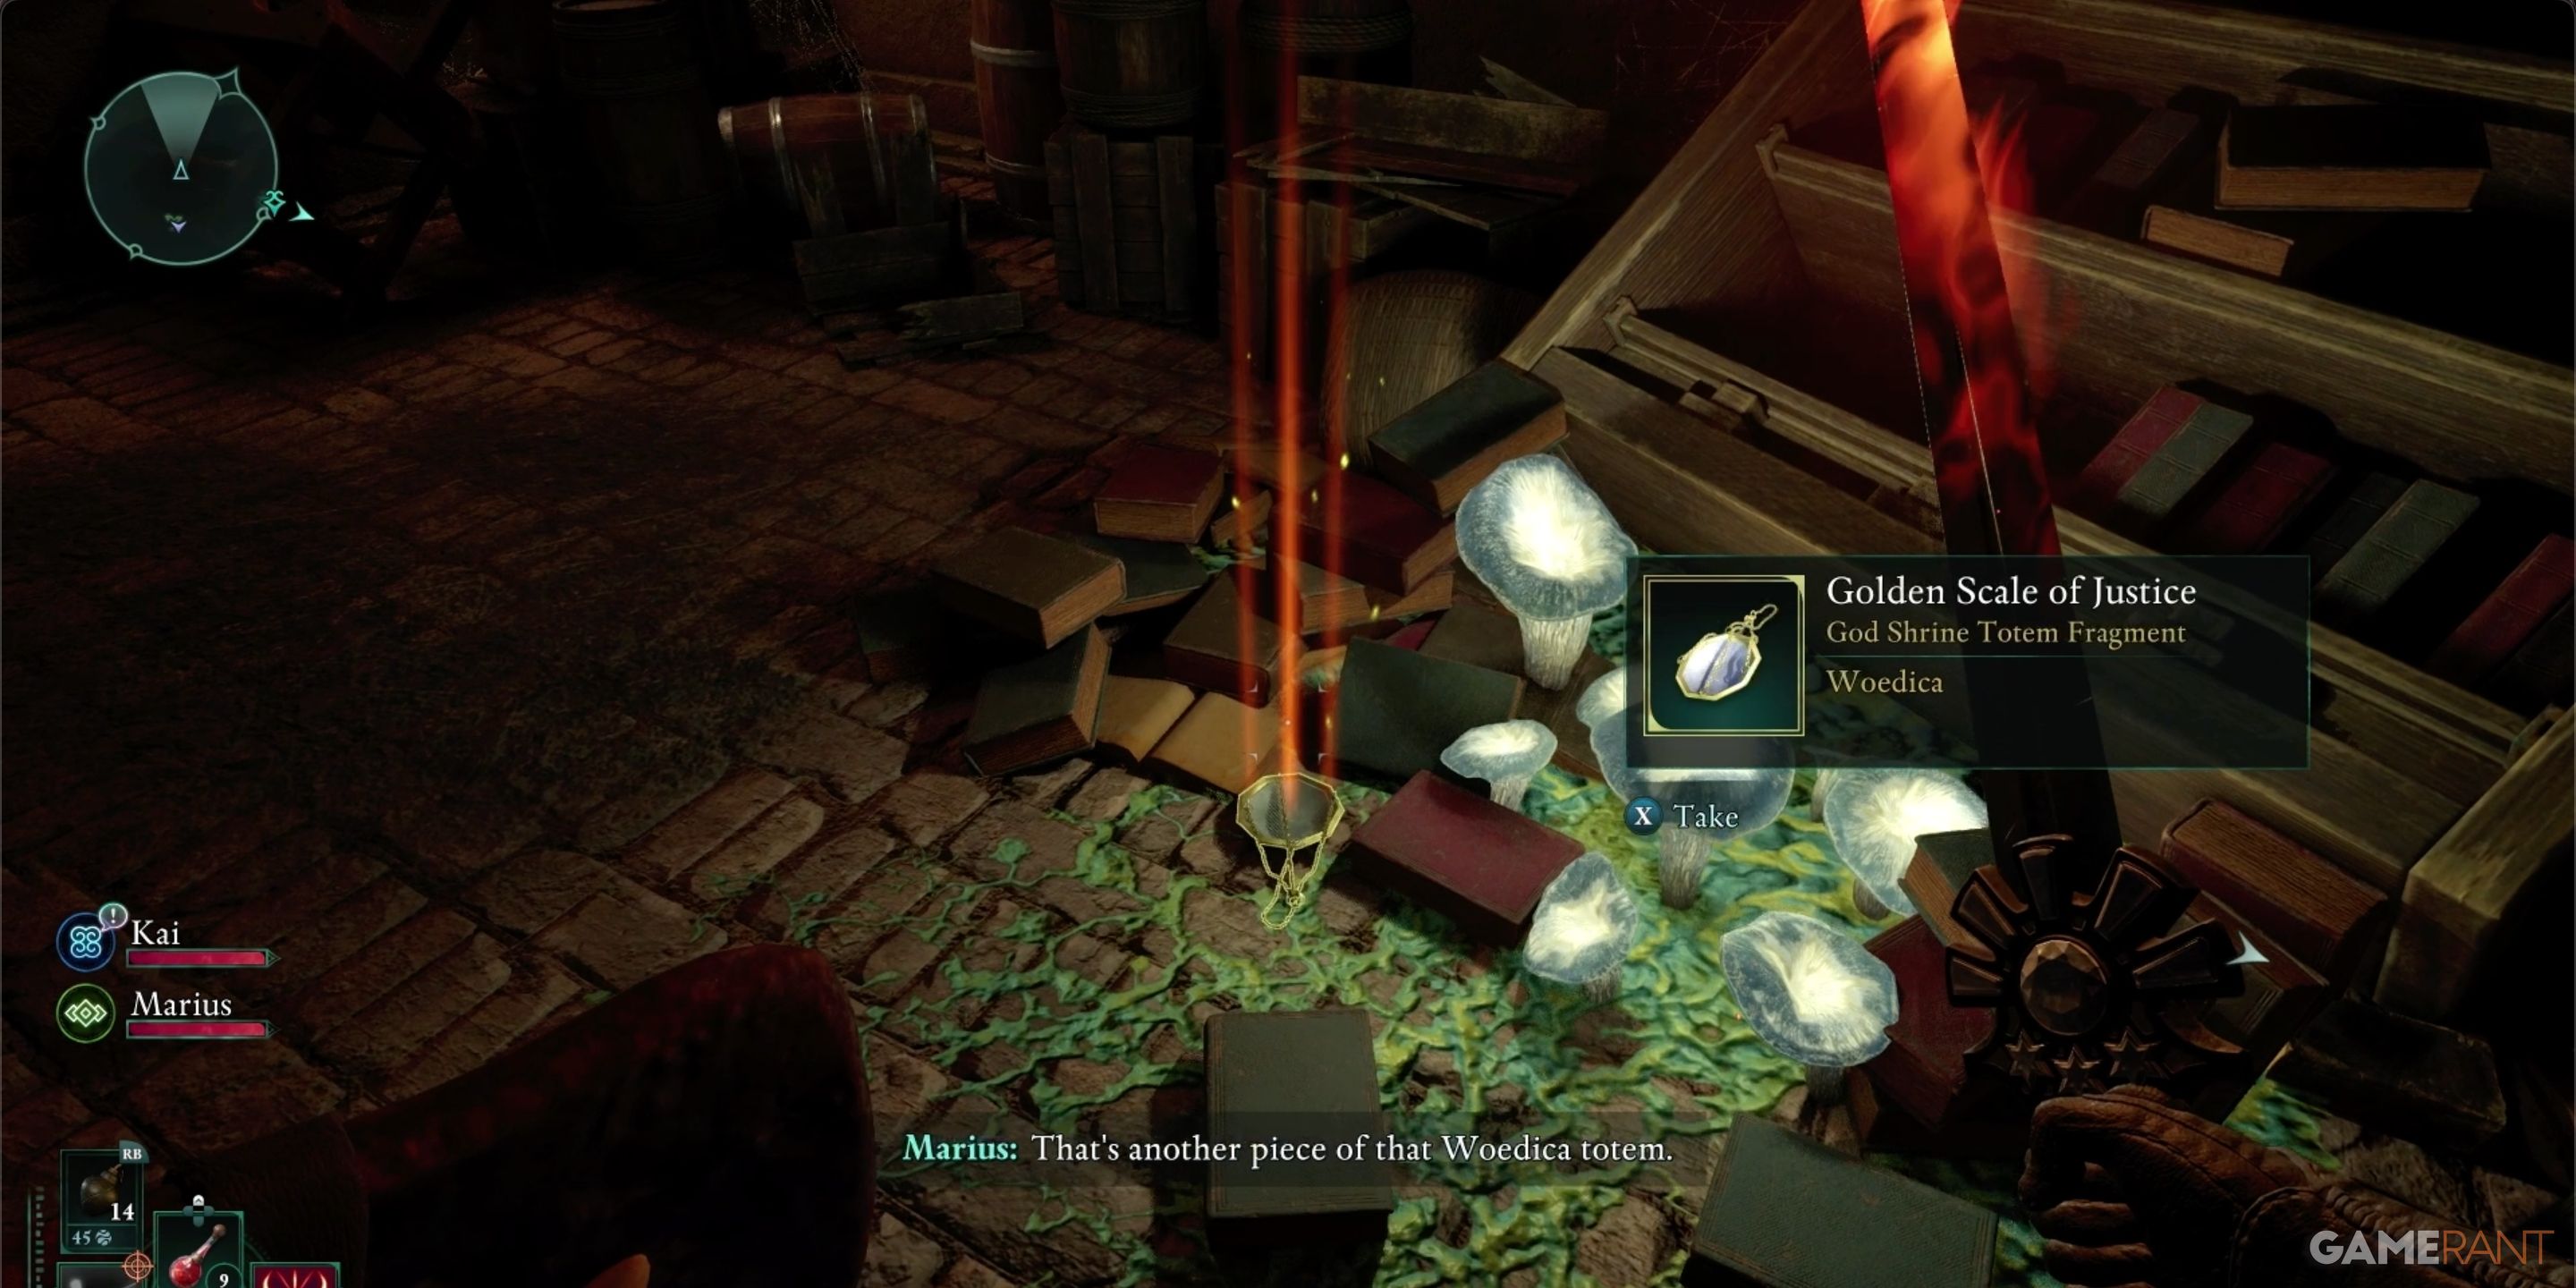
After you’ve vanquished the Phantoms, search for the Golden Scale of Justice on the ground at the base of a collapsed bookshelf near the back interior wall. Once you find it, unlock the door and make your way out to the Market District.
How to Get the Golden Plaque of Oaths:
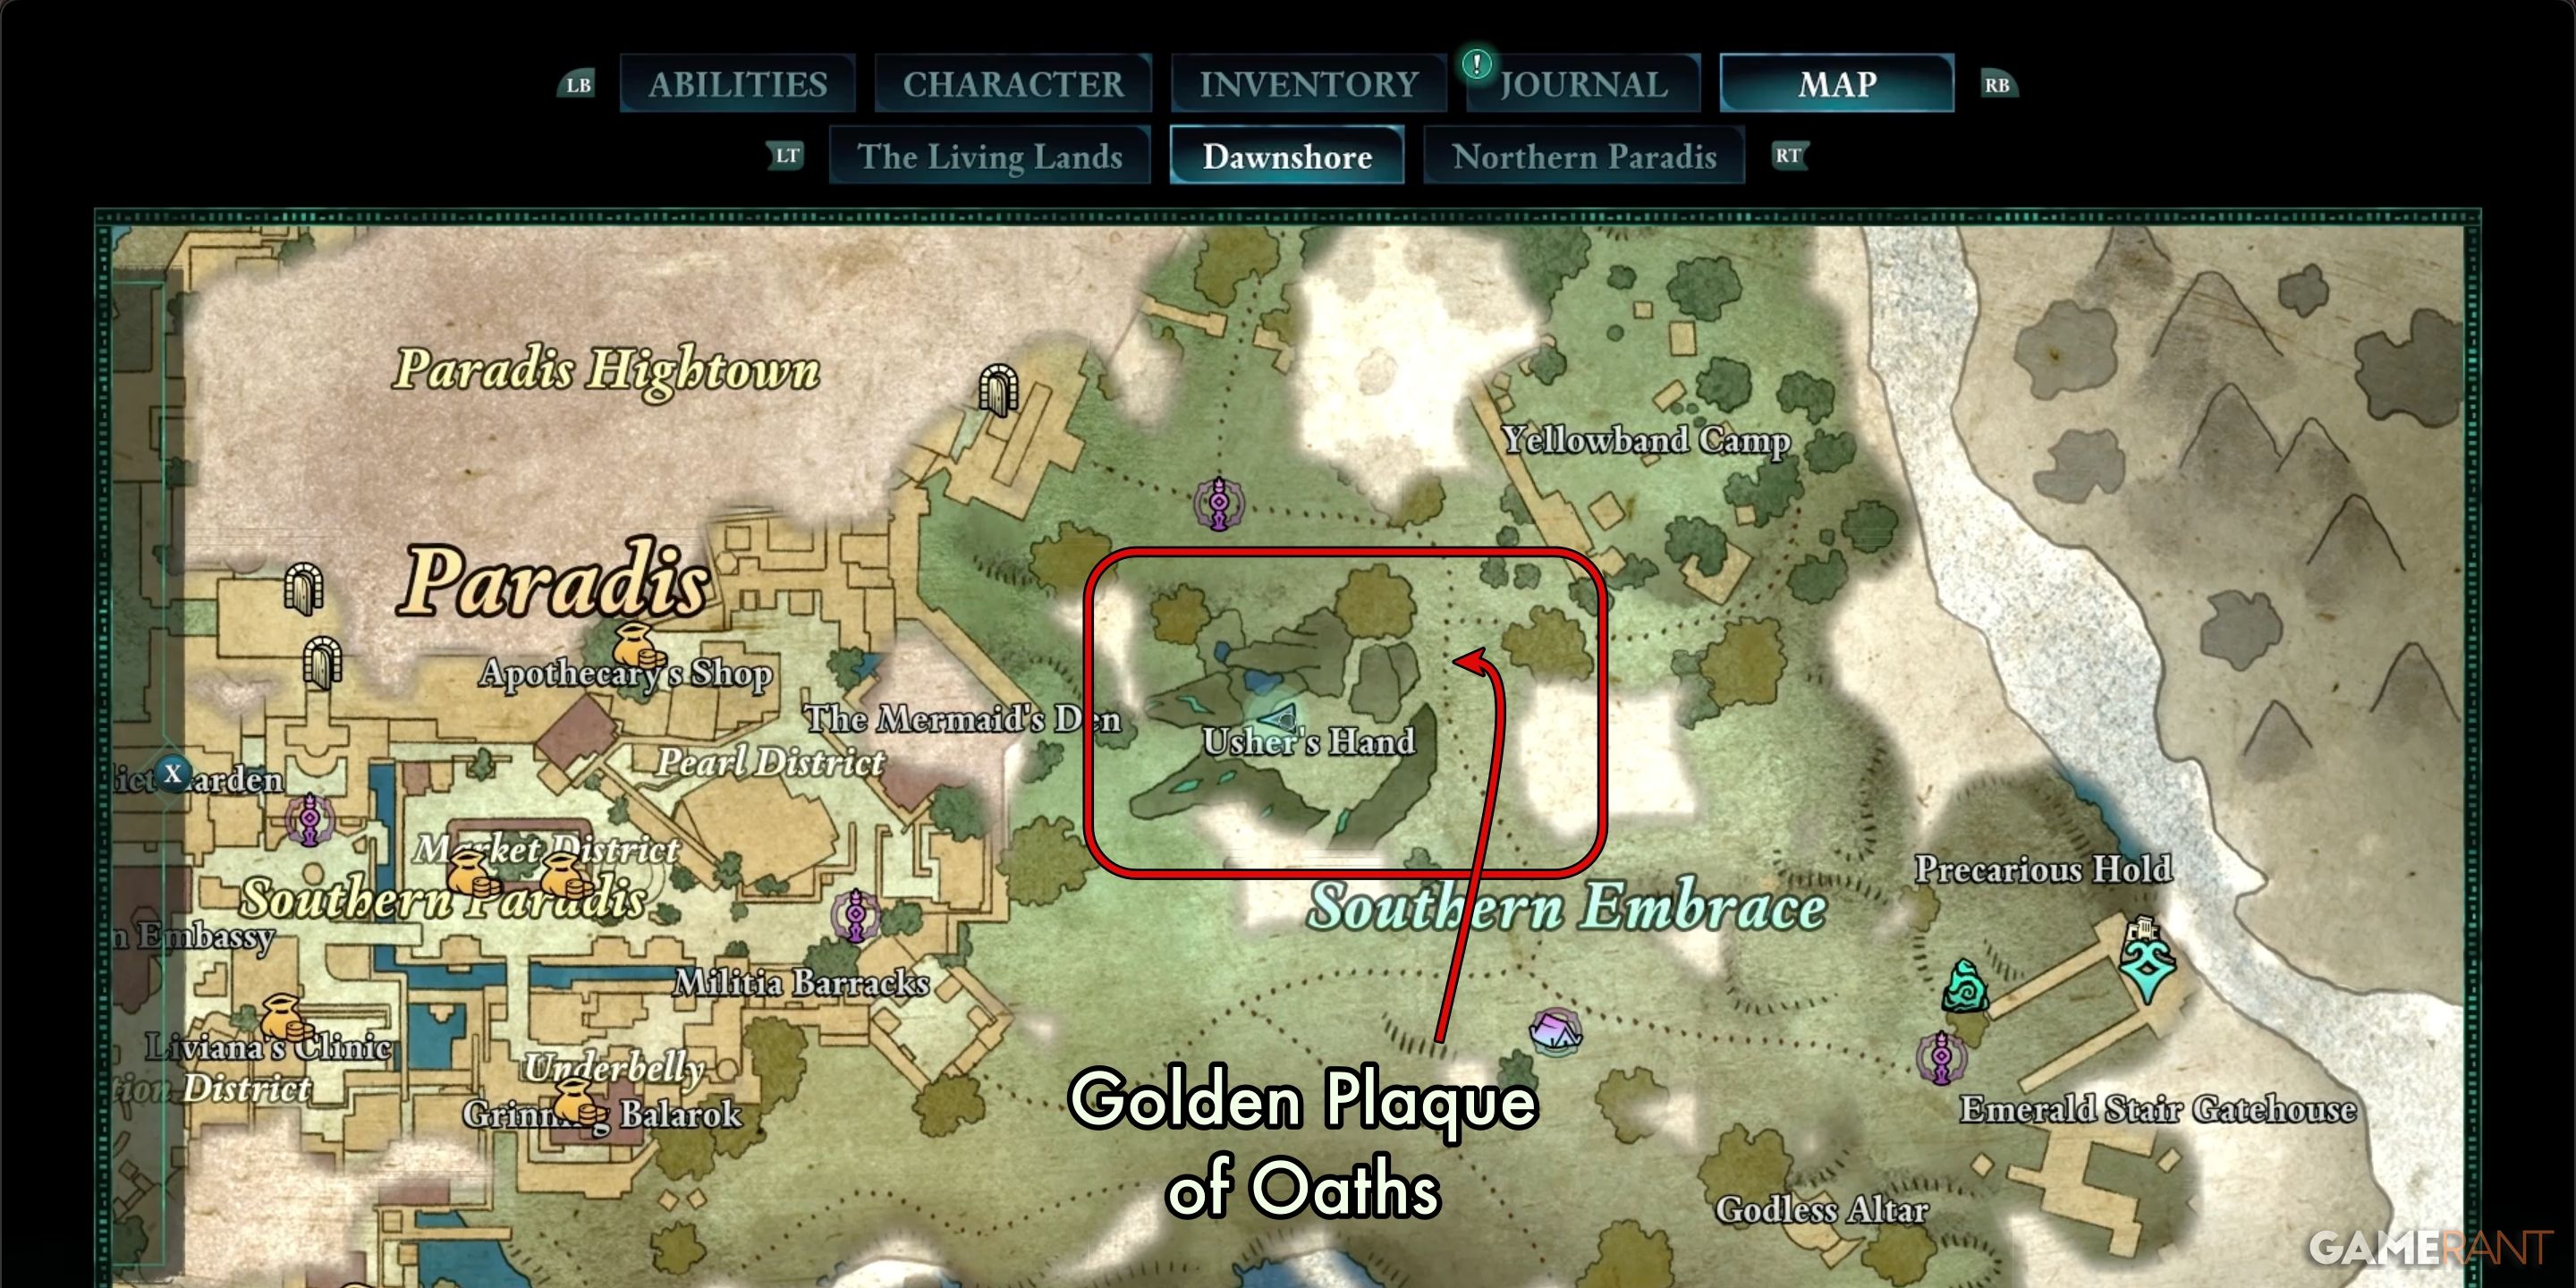
As a dedicated follower of Woedica, one task that stands out among the easier ones in her totem is acquiring the prestigious Golden Plaque of Oaths. To obtain it, I’d recommend navigating towards Usher’s Hand, which lies to the east of Paradis. A convenient starting point could be found at a Party Camp situated south of this location. Good luck on your quest!


By following the eastern edge of Usher’s Hand rock formation, if you keep going north, you’ll eventually stumble upon a little tunnel. Venture into the tunnel and continue on until you reach a tiny pond and the end of the track.
Or,
Walking along the eastern side of Usher’s Hand rock structure towards the north direction, you will discover a compact tunnel. Proceed through the tunnel and carry on walking till you hit a small body of water and the conclusion of your journey.


Step into the cool embrace of the pool, and I promise, there lies a hidden underwater passage for you to explore. Swimming through it, you’ll discover a cozy little chamber where a shimmering Golden Plaque of Oaths awaits on a delicate piece of fabric.
How to Get the Golden Plaque of Promises:
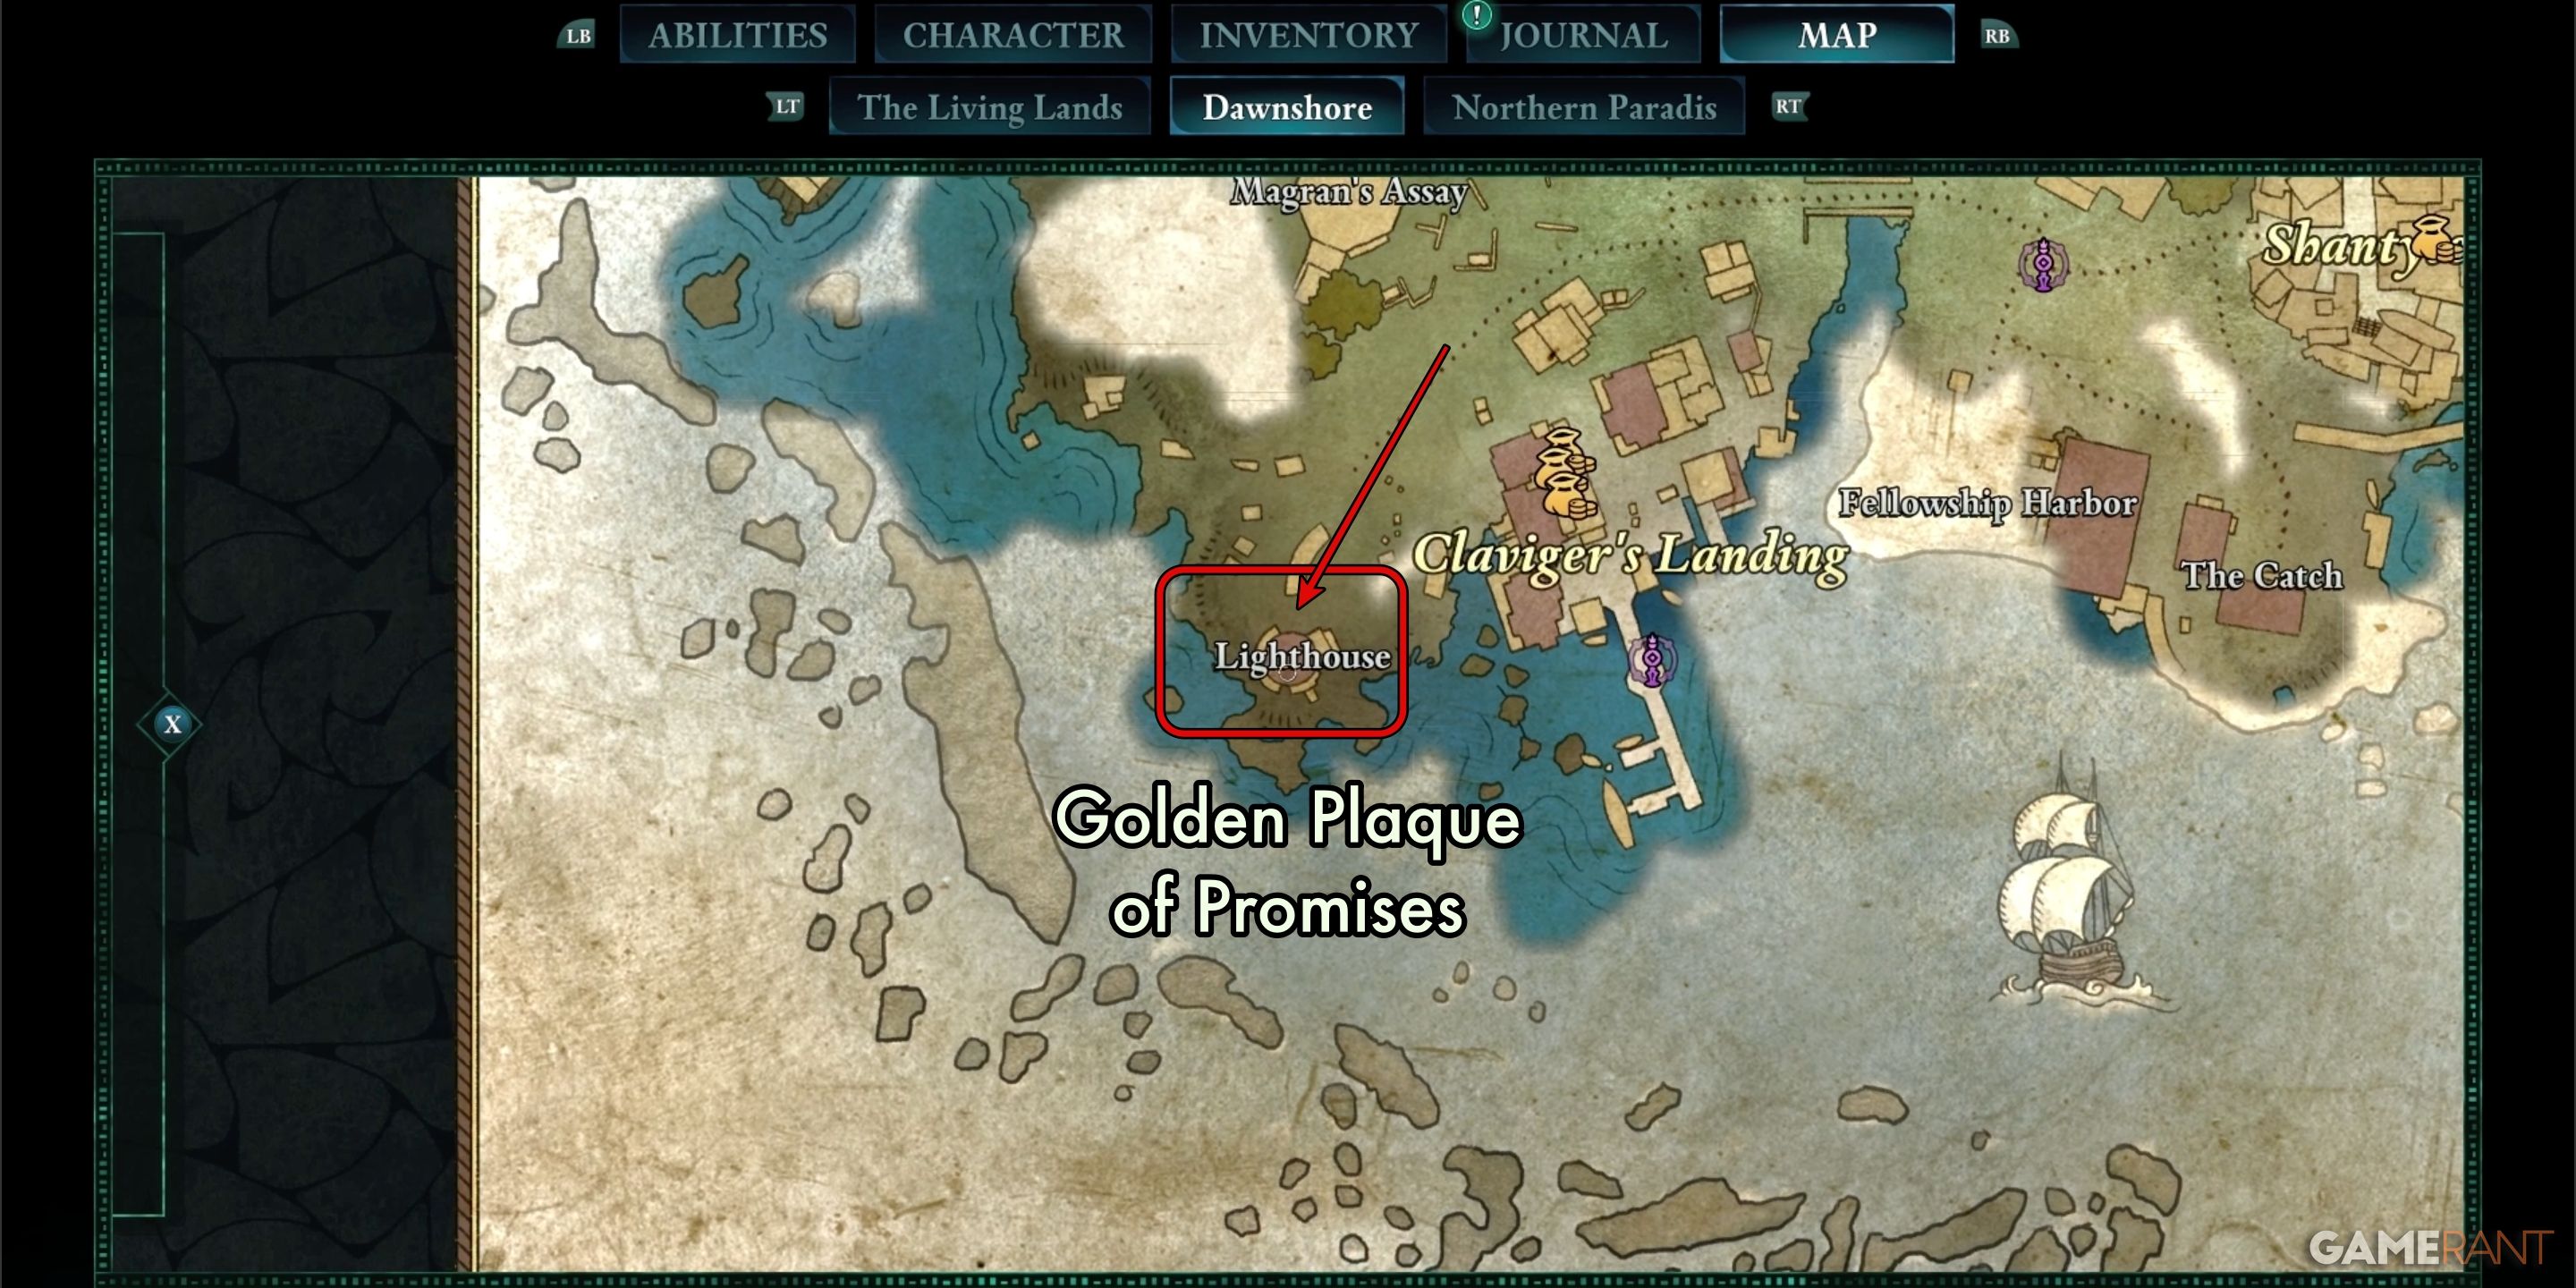
The prominent landmark known as the “Golden Plaque of Promises” can be spotted easily from Kai’s initial meeting point at the docks in Dawnshore. Simply head westward from Claviger’s Landing, and you won’t be able to overlook it.


Starting from the Lighthouse’s front, locate the ladder positioned on its left side and start your climb. Utilize the different platforms as stepping stones until you reach a part of the Lighthouse with a big hole in the wall. Inside this opening, you’ll spot the main stairwell, where you can find the Golden Plaque of Promises resting at the bottom of the stairs.
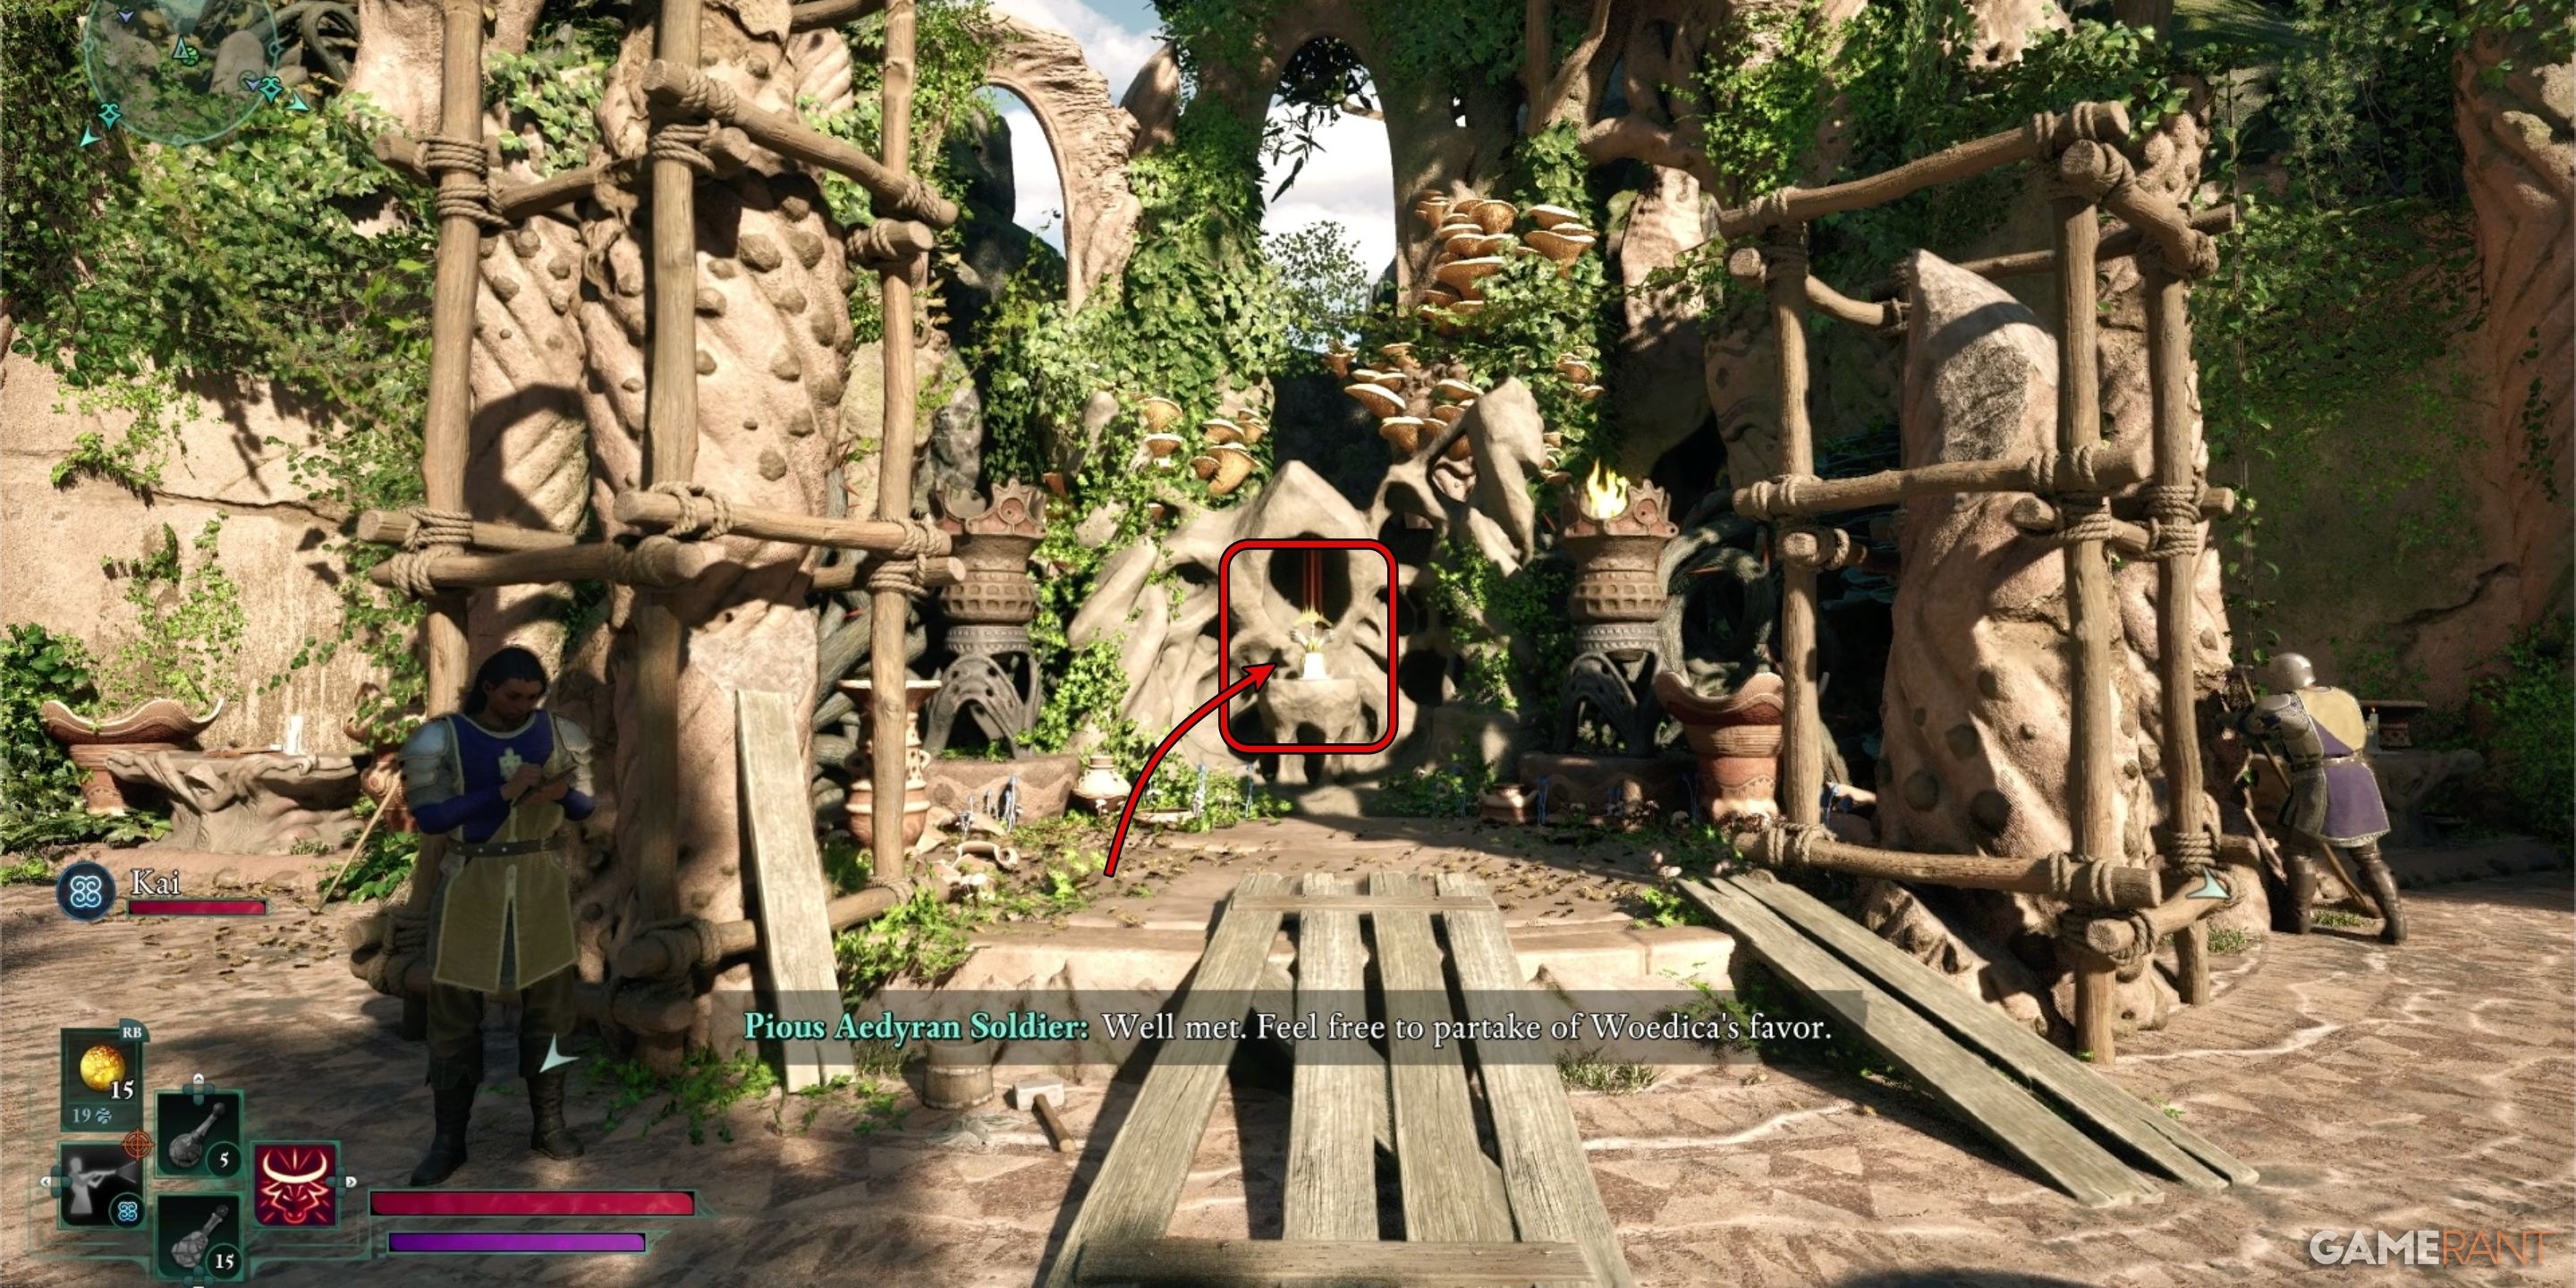
How to Get the Golden Flames:
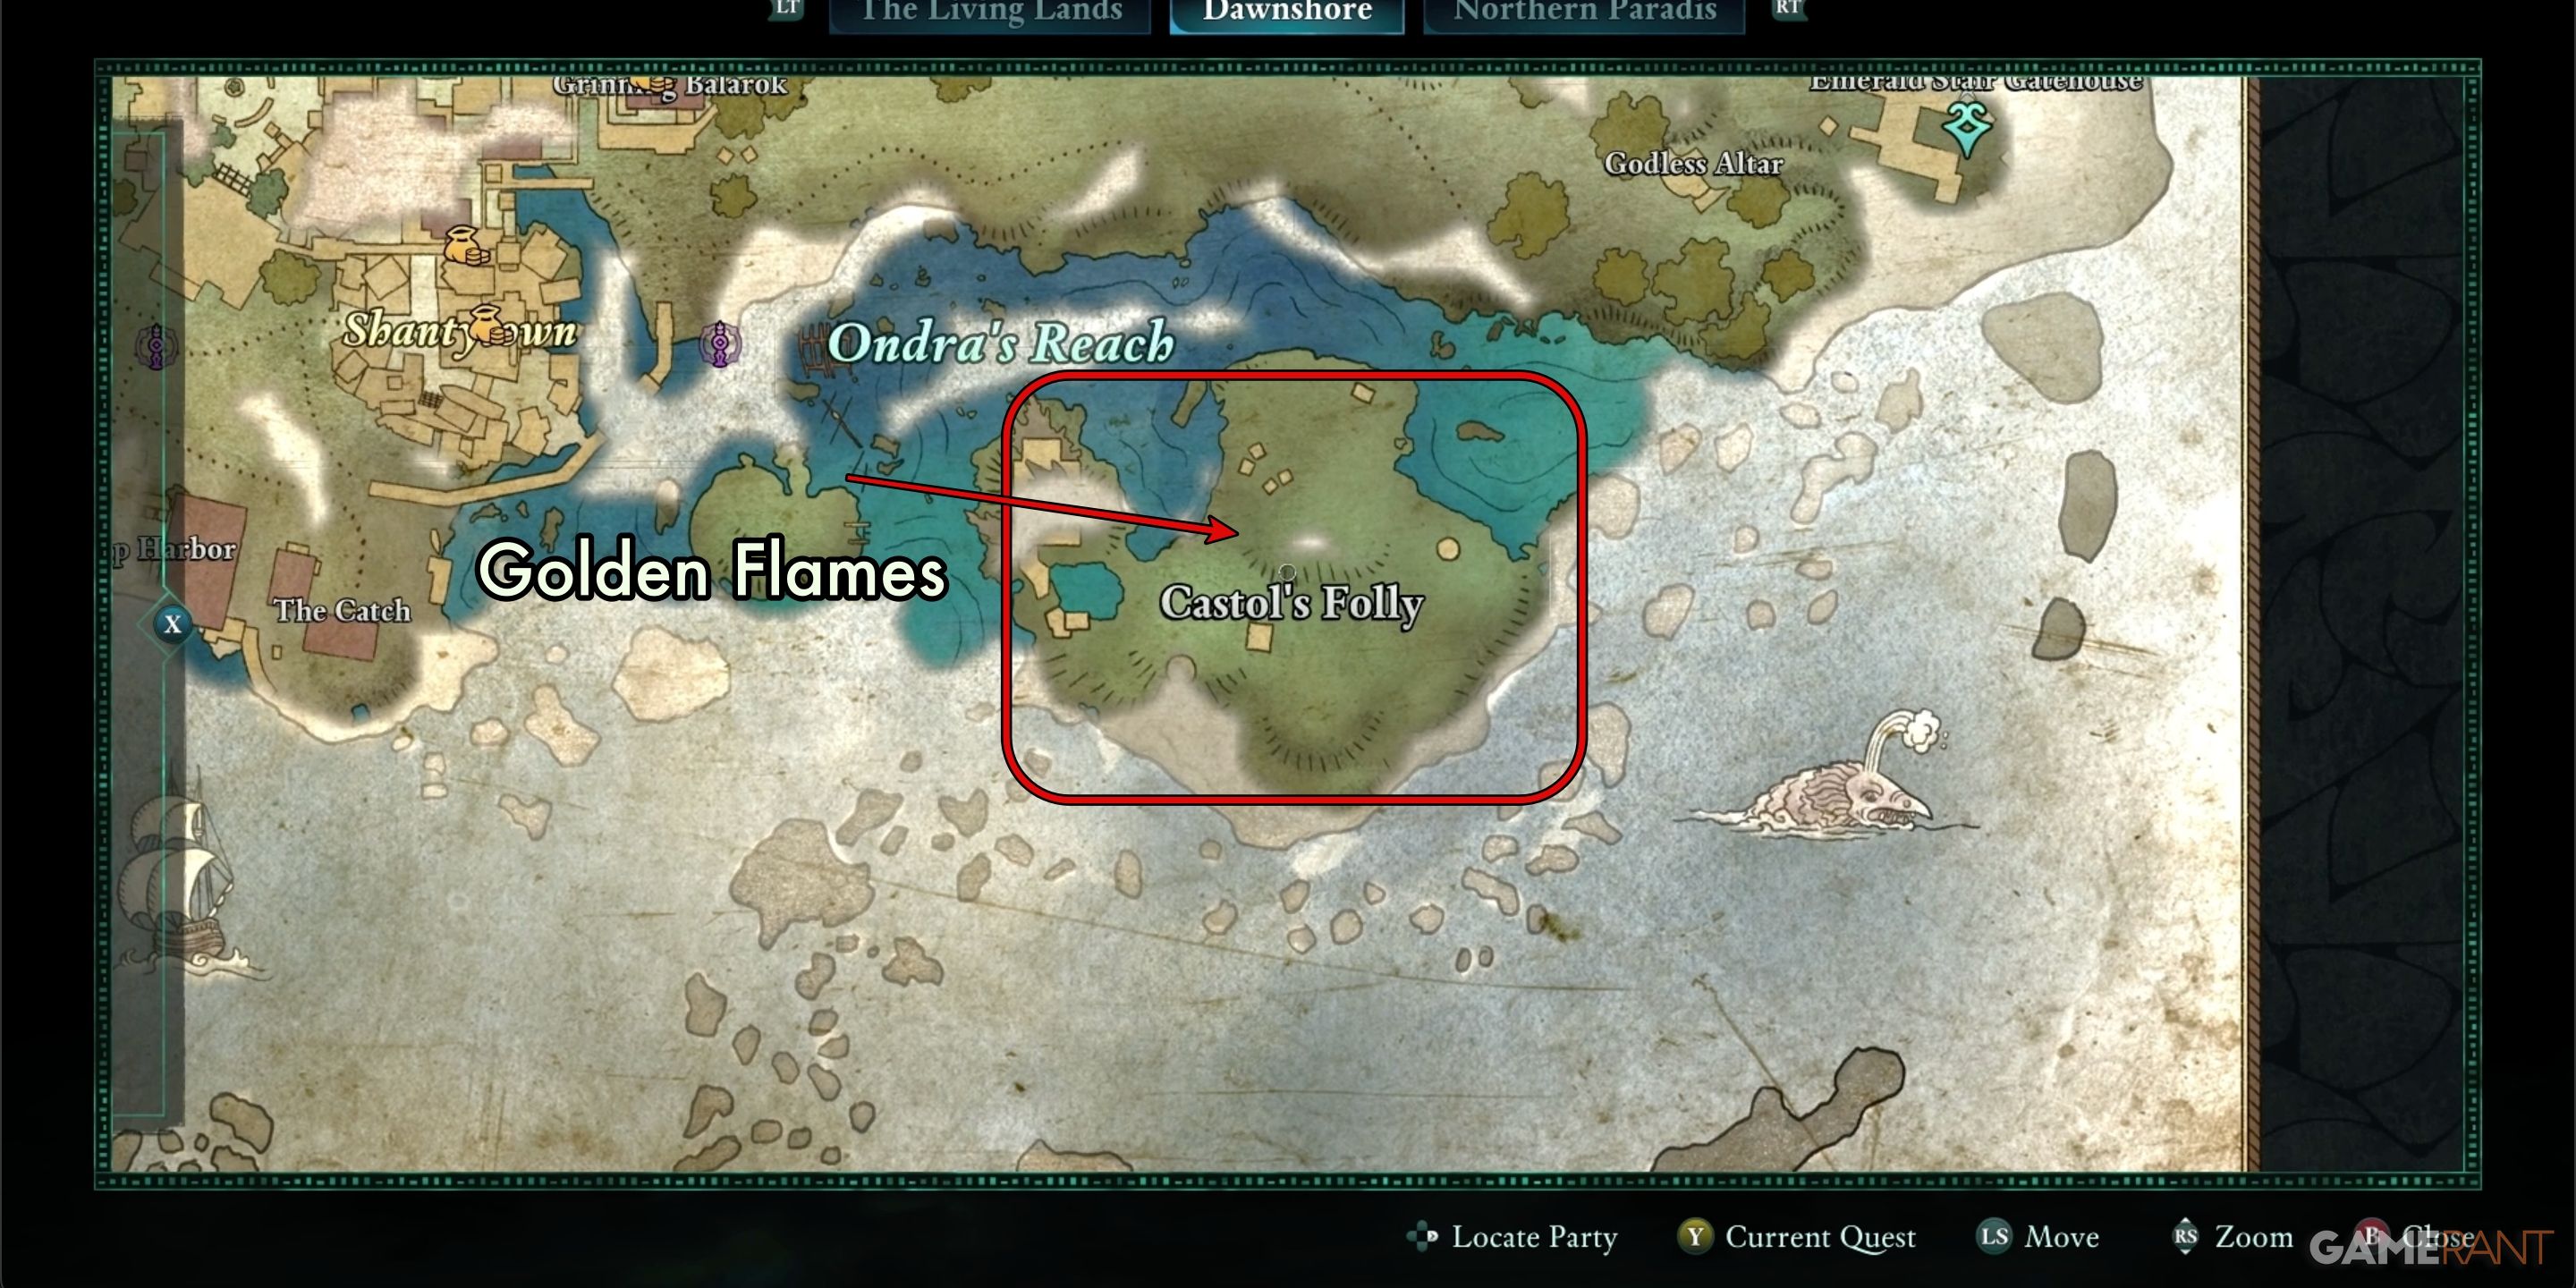
Reaching the peak of the primary island known as Castol’s Folly will lead you to a remarkable sight – a shattered tower seemingly out of place. Multiple trails meet at this tower, but identifying the one you desire can be effortless.

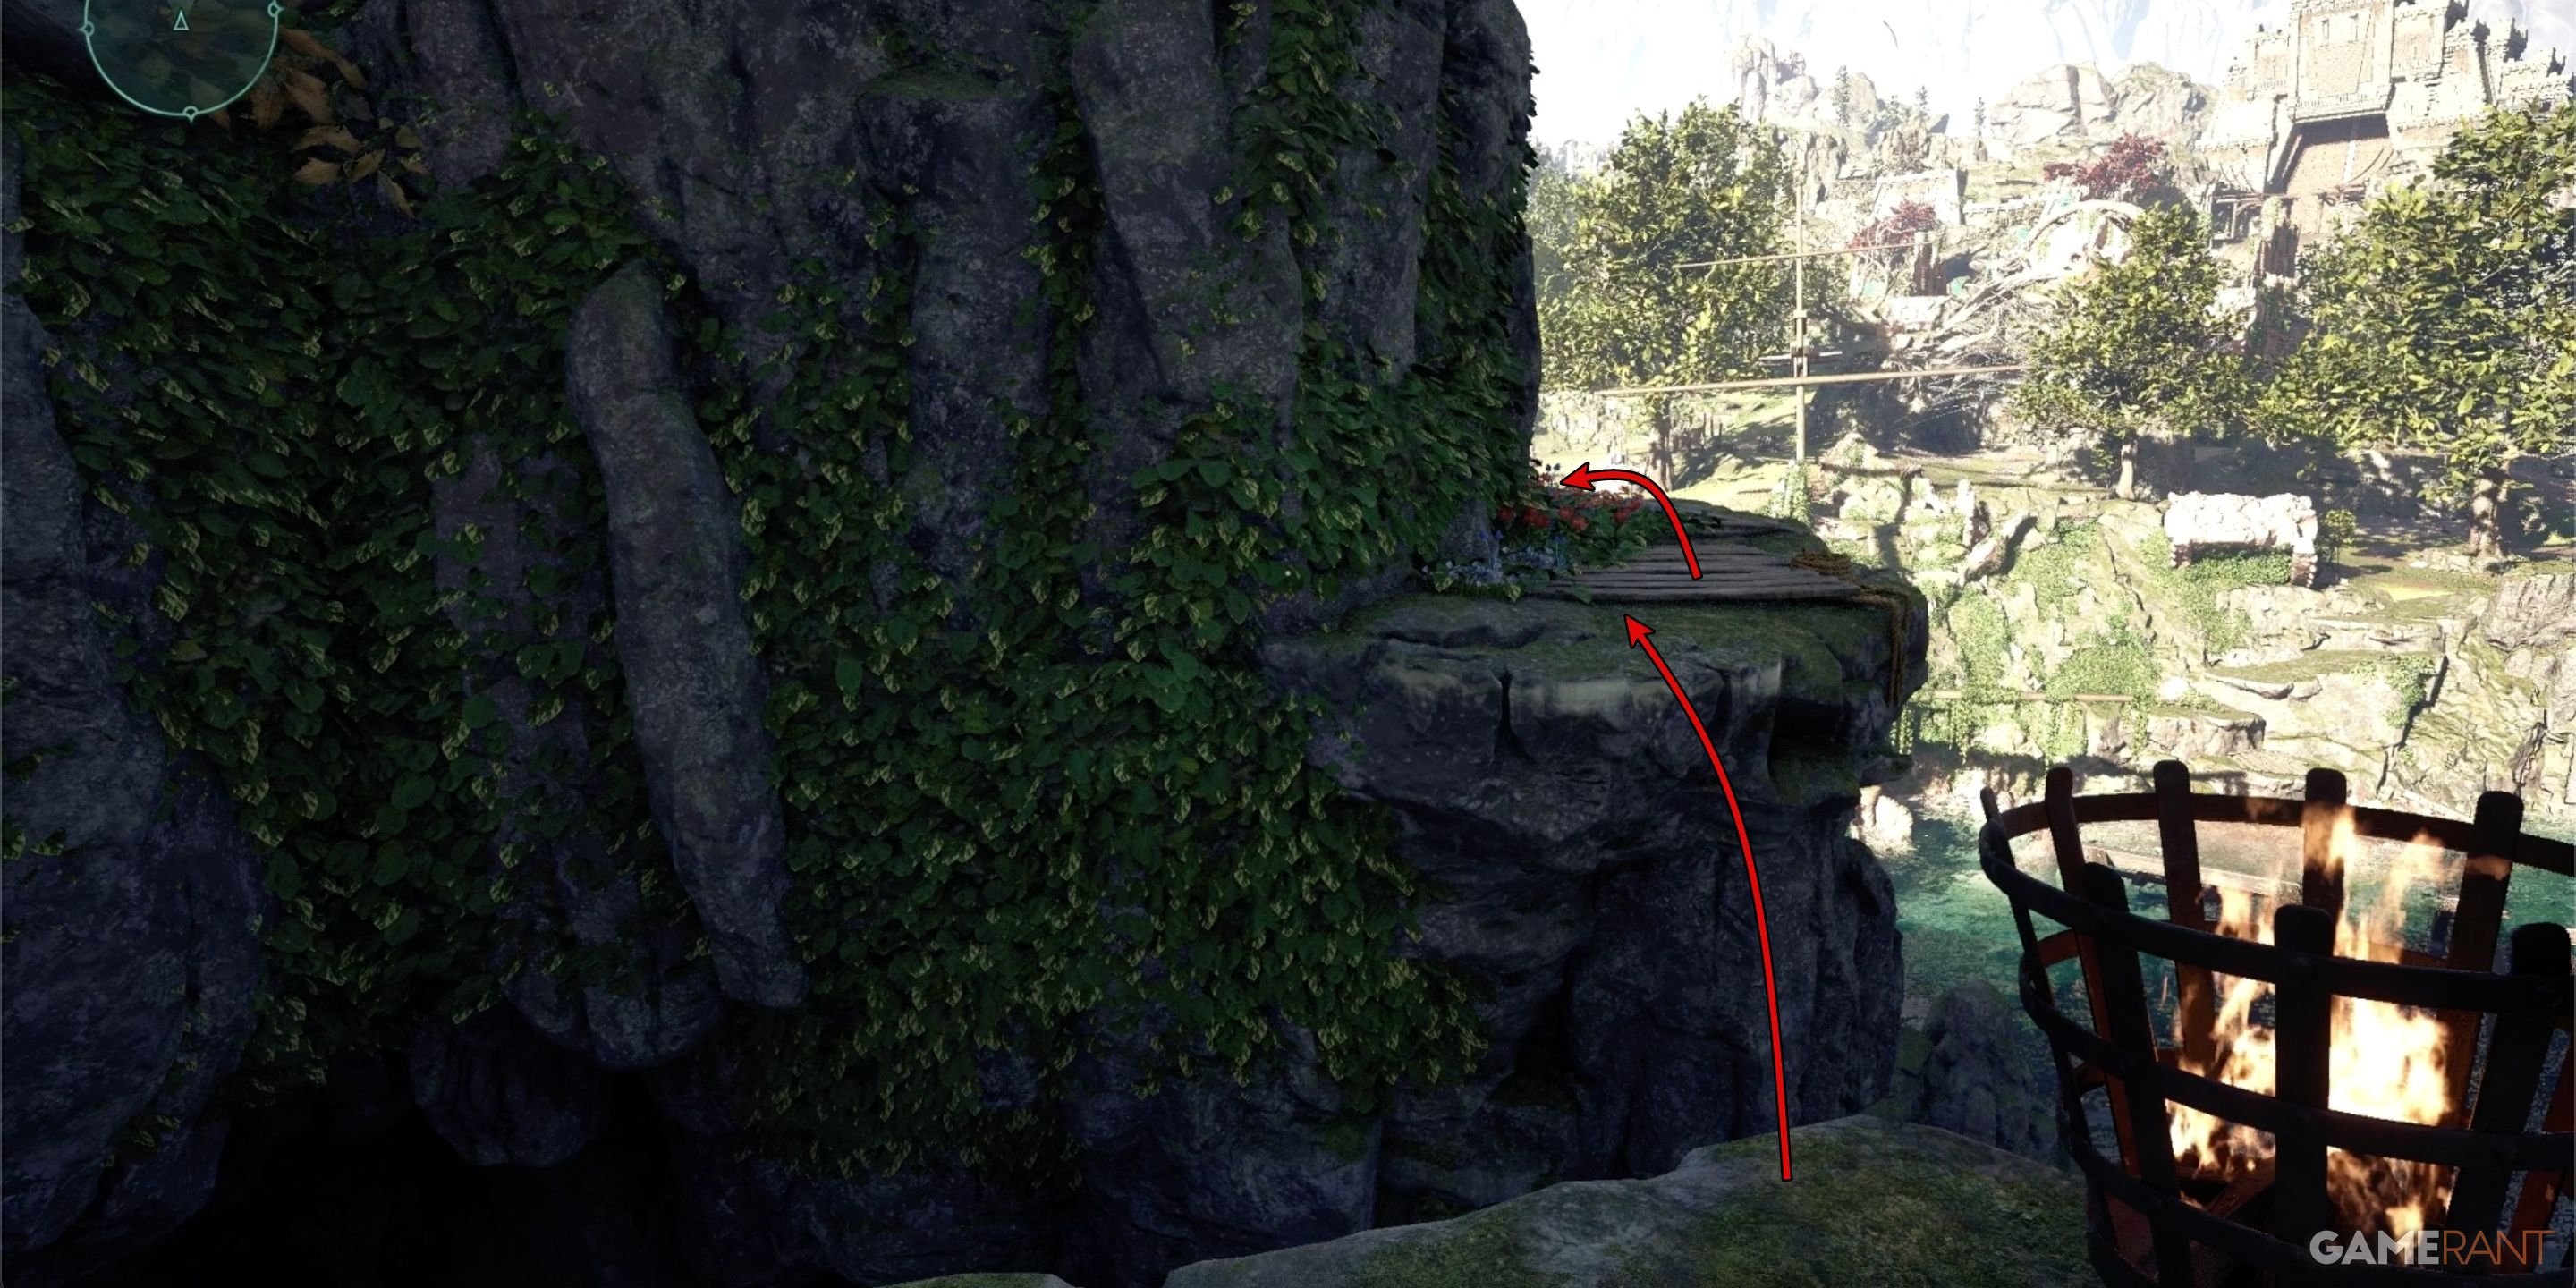
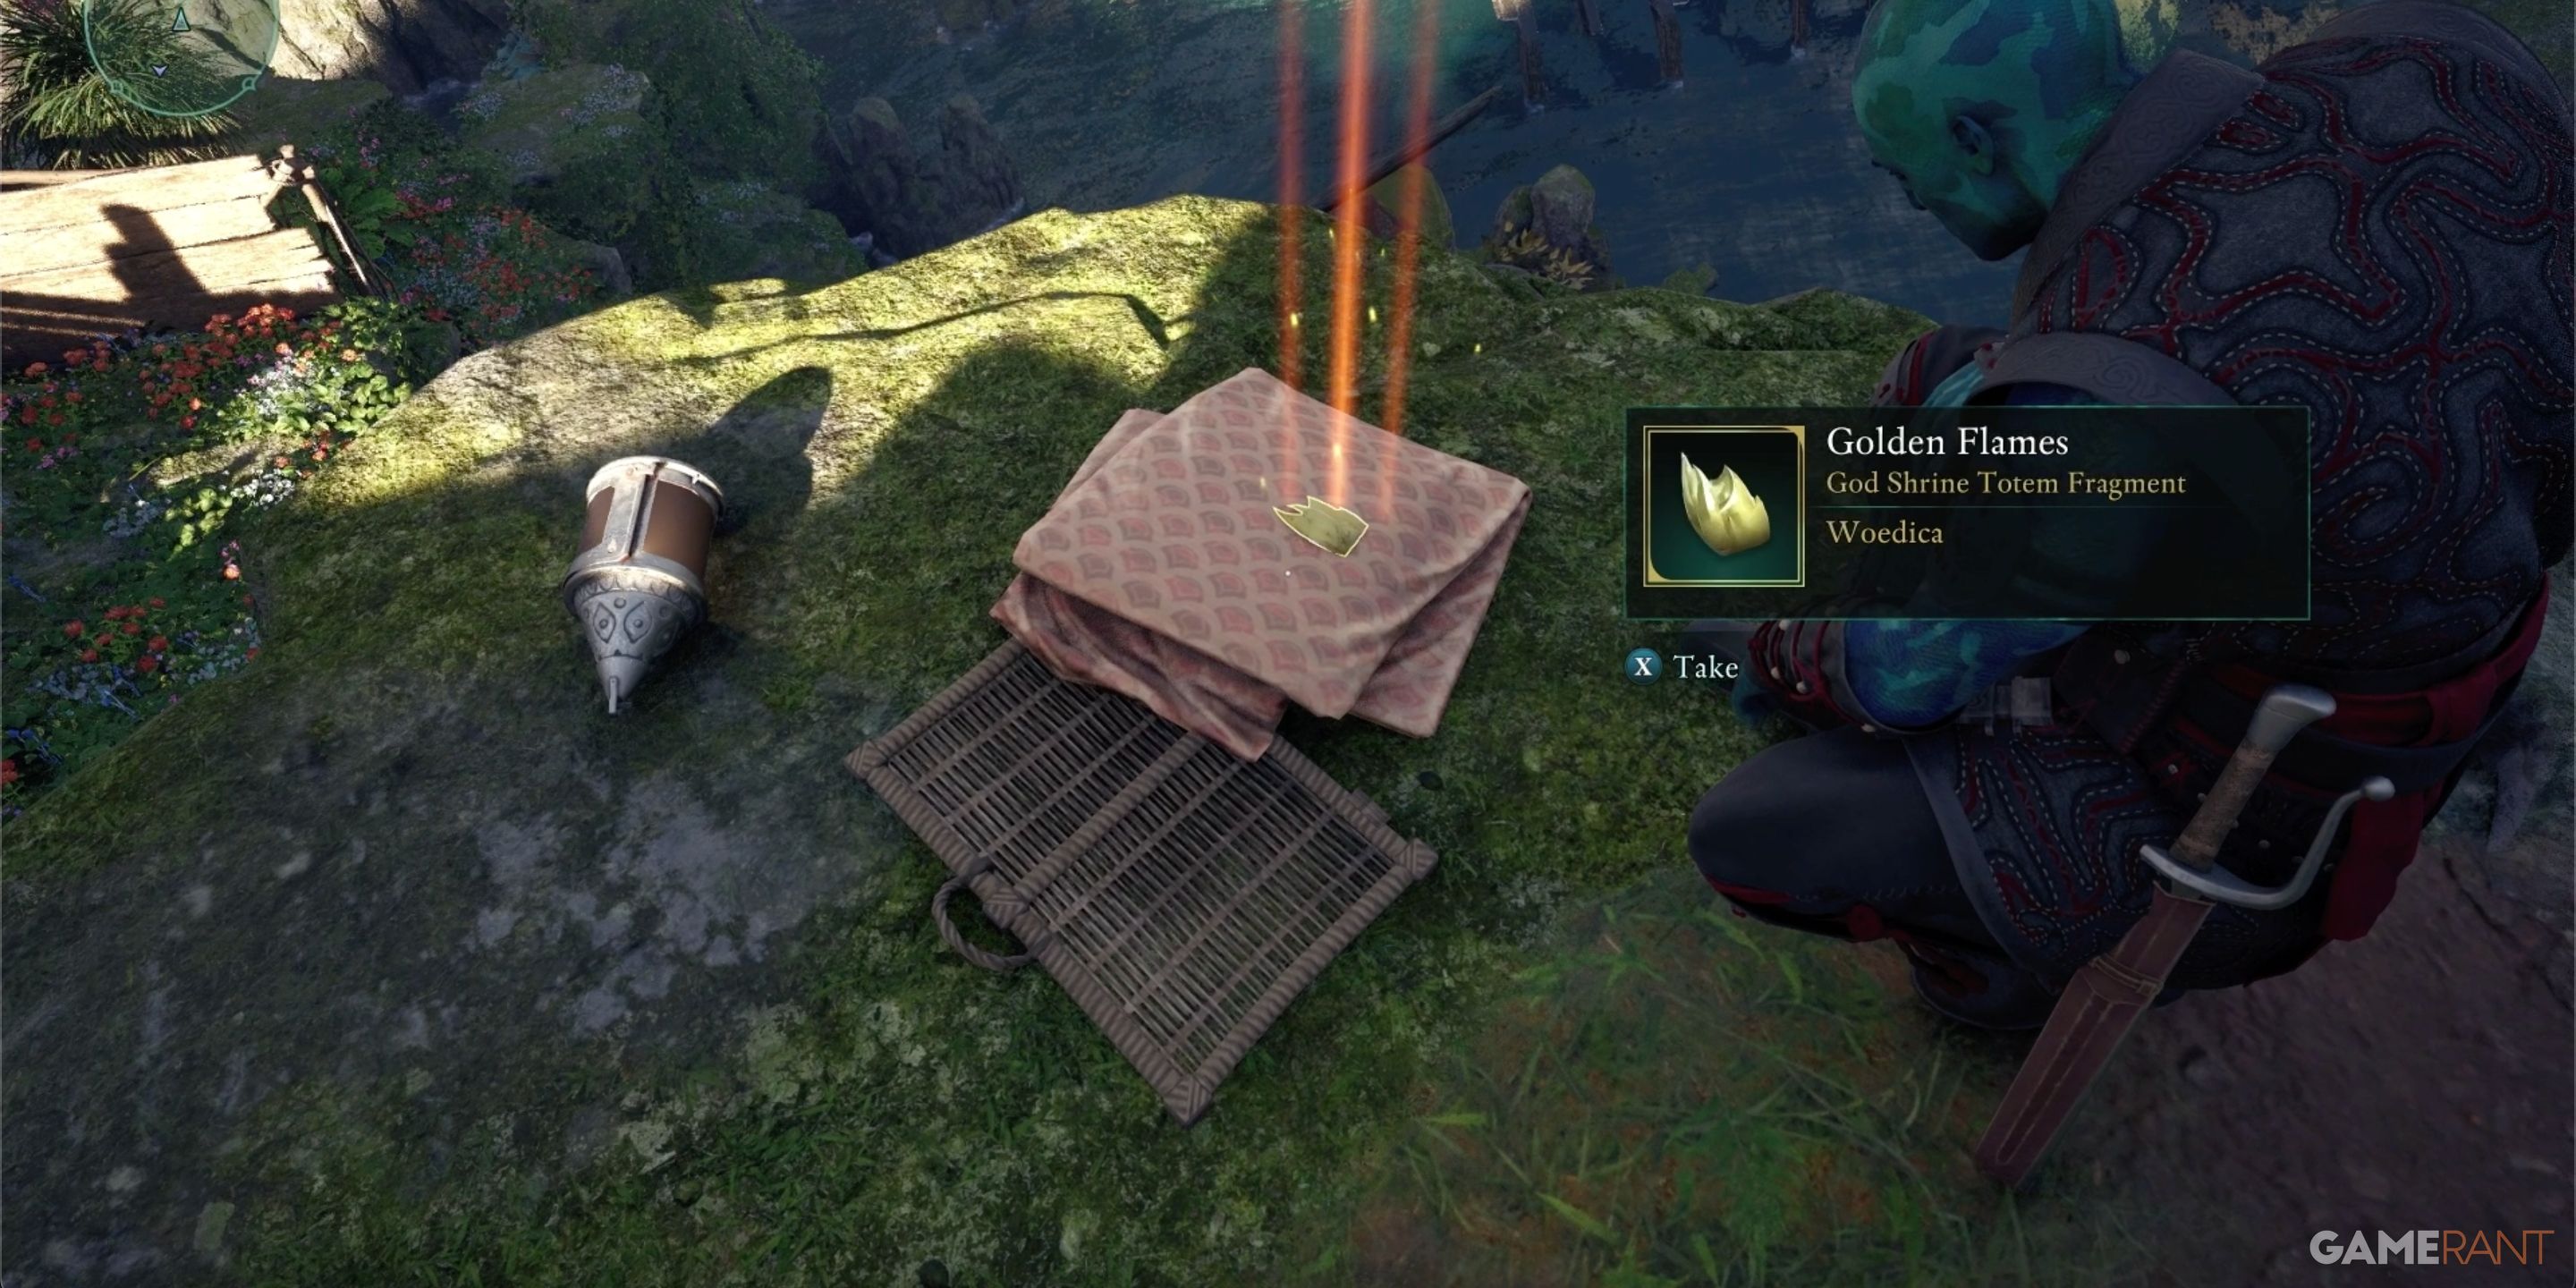
From the tower’s vantage point, gaze toward the north, and you’ll spot a flickering torch atop a cliff’s edge. Follow the trail that this torch illuminates. Leap across the chasm and continue along the brief pathway. As you near the end, you’ll discover the Golden Flames, gently resting on the ground, covered by nothing more than a small blanket.
Woedica Totem All Perks – Avowed
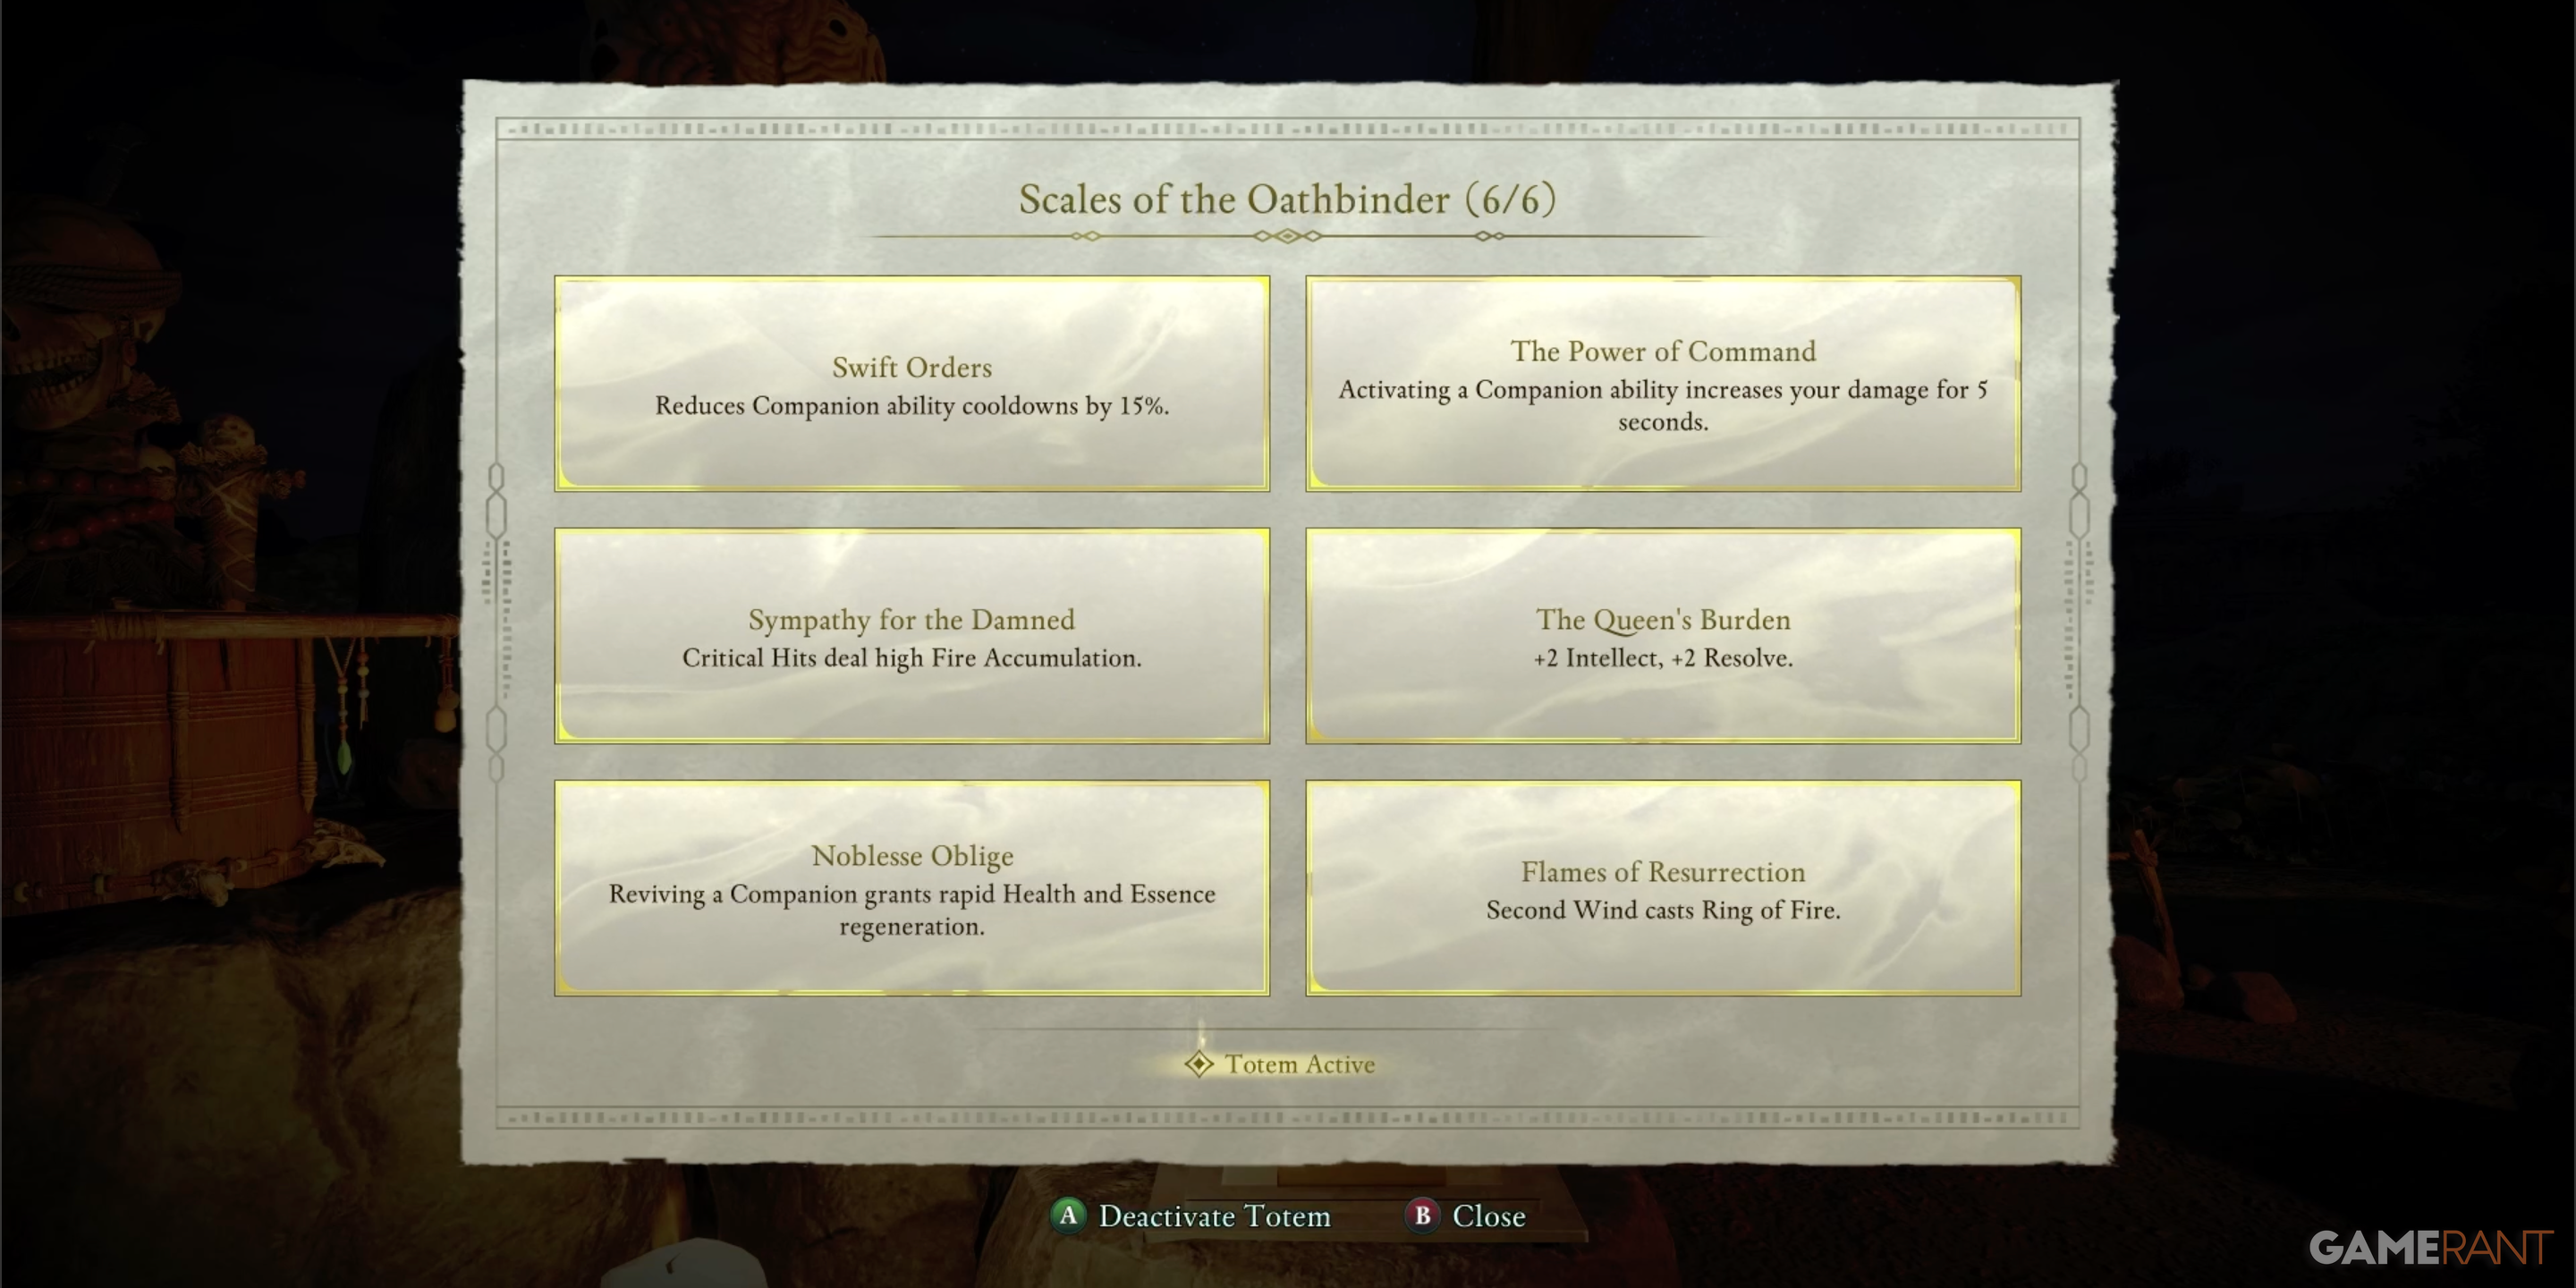
For each part of Woedica’s symbol, the Oathbinder’s Scales, you receive a special ability. Here’s the full rundown:
1. The first scale grants increased magic resistance.
2. The second scale boosts your physical strength.
3. The third scale enhances your agility and reflexes.
4. The fourth scale amplifies your mental acuity and focus.
5. The fifth scale increases your resilience against negative energies.
6. The sixth scale fortifies your connection to the elements.
7. The seventh scale strengthens your aura, making you harder to harm.
8. The eighth scale provides you with the ability to heal yourself and others.
9. The ninth scale grants you the power to manipulate time to a limited extent.
| Perk Name | Description |
|---|---|
| Swift Orders | Reduce companion ability cooldown by 15% |
| The Power of Command | Activating a companion ability increases your attack power for 5 seconds. |
| Sympathy for the Damned | Critical hits deal high fire accumulation |
| The Queen’s Burden | +2 Intellect, +2 Resolve |
| Noblesse Oblige | Reviving a companion grants rapid health and essence regeneration |
| Flames of Resurrection | Second Wind casts Ring of Fire |
Read More
- Grimguard Tactics tier list – Ranking the main classes
- Gold Rate Forecast
- 10 Most Anticipated Anime of 2025
- USD CNY PREDICTION
- Silver Rate Forecast
- Box Office: ‘Jurassic World Rebirth’ Stomping to $127M U.S. Bow, North of $250M Million Globally
- Mech Vs Aliens codes – Currently active promos (June 2025)
- Castle Duels tier list – Best Legendary and Epic cards
- Maiden Academy tier list
- All New and Upcoming Characters in Zenless Zone Zero Explained
2025-02-13 22:44