Since its debut in 2006, the pixelated playground of Roblox has become an international sensation. Offering abundant freedom and countless opportunities for creativity, it’s the ideal platform for testing your imagination. If you’re interested in jumping into the action and eager to learn how to create a game on Roblox, you’ve come to the right spot.
Don’t fret, it may not be as difficult as it seems. You don’t require complex programming skills to produce a fantastic creation. In fact, someone with minimal experience like myself can make it seem effortless using Roblox Studio. It’s quite beginner-friendly, and I’ll walk you through the essentials one step at a time. Before you know it, you’ll be unleashing your creativity, and in less than an hour, you’ll have something playable on your hands. Ready to dive in?
To kick off, it’s beneficial to ensure you have some Robux on hand for purchasing game passes or testing monetization functions. You can conveniently acquire Robux in a safe manner from U7BUY, giving you an edge and allowing you to personalize your game more swiftly.
Setting Up Roblox Studio
In simpler terms, Roblox Studio will serve as your workspace and aid in creating your future masterpiece. To use it, however, you’ll first need a Roblox account. You can easily create one by visiting roblox.com. Don’t worry, it won’t cost you a penny and takes just a minute or two. With an account, you’ll get access to all the fun stuff like game publishing tools, analytics, developer features, and much more!
Be sure to confirm your email address as well. This step grants additional benefits such as monetization options and group management tools. Additionally, it provides an extra layer of security for your account if any unexpected issues arise. Lastly, remember to enable two-factor authentication for enhanced account safety in the future.
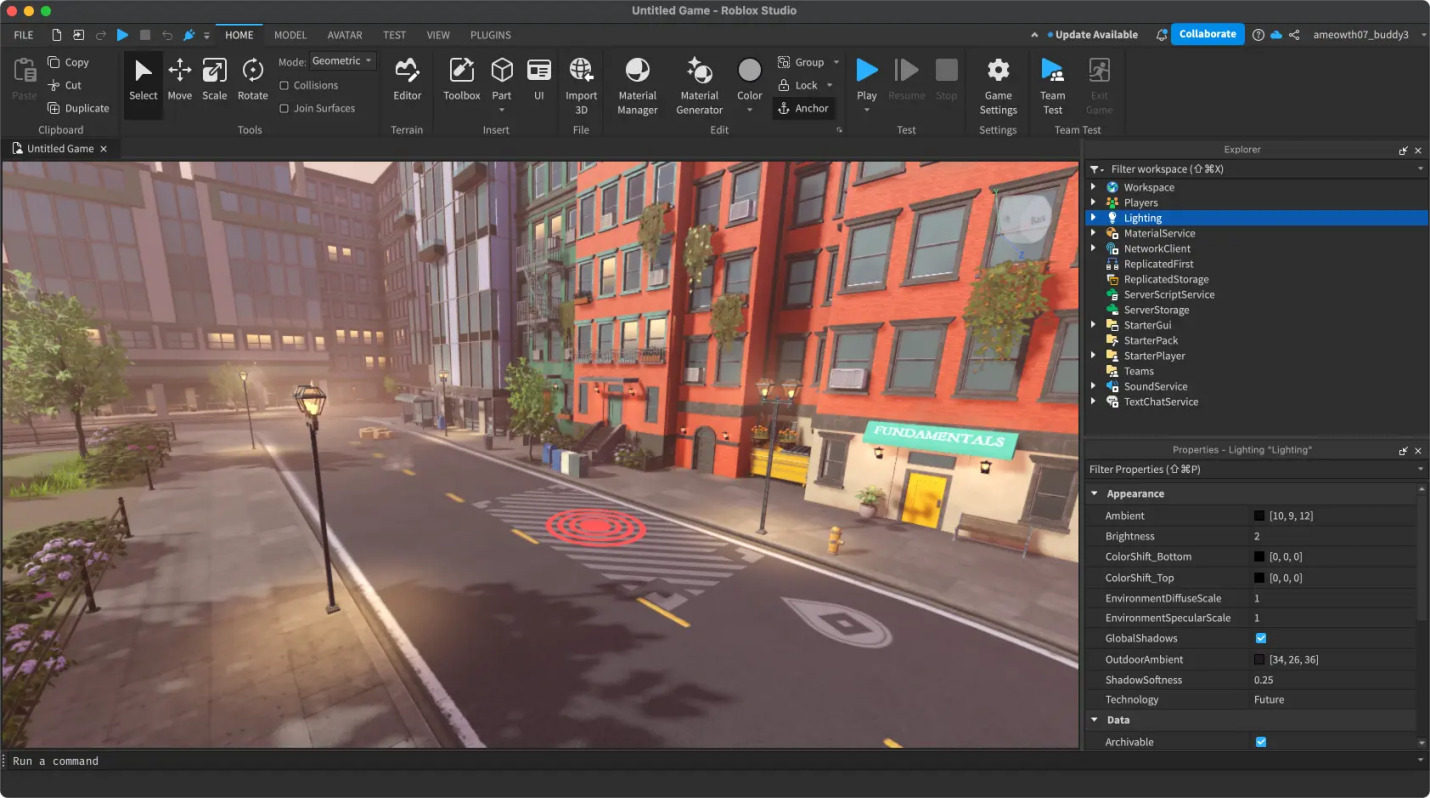
Equipped with your account, let’s move forward and download “Roblox Studio”. Compatible with both Windows and Mac systems, this software offers a hassle-free installation process. Upon completion of the setup, simply log in to access your workspace for the first time. This is where the enchantment unfolds!
Getting Familiar With The Workspace
When you log into Roblox, you’ll find a selection of pre-designed models ready for use. If you’re new here and still getting familiar with things, I’d strongly recommend choosing one of these templates to expedite your process. Some common templates you might encounter immediately include:
1. The Basic Places template is a great starting point for creating simple environments like parks or houses.
2. The StarterCity template offers a more complex cityscape with buildings, roads, and other urban elements.
3. The RPG StarterPack is perfect for creating role-playing games with pre-made characters and game mechanics.
4. The TycoonTemplate provides a basic framework for building economic simulations like business or factory games.
5. The Animation Template offers tools for creating animated scenes, making it an excellent choice for storytelling games.
- Baseplate — Just a flat, empty space. Good if you want to start from zero.
- Obby Template — Already has some basic parkour stuff set up.
- Village or City Templates — Nice for roleplay, simulators, or anything more open-ended.
Using templates can save time on the preliminary setup process, which can be challenging for beginners. But remember, selecting a template doesn’t limit your freedom. You can easily modify or replace elements as needed, and you always have the option to rebuild from scratch later. A template serves more as a starting point than as a rigid blueprint. Ultimately, it’s your unique creative vision that guides your work, and you remain in control.
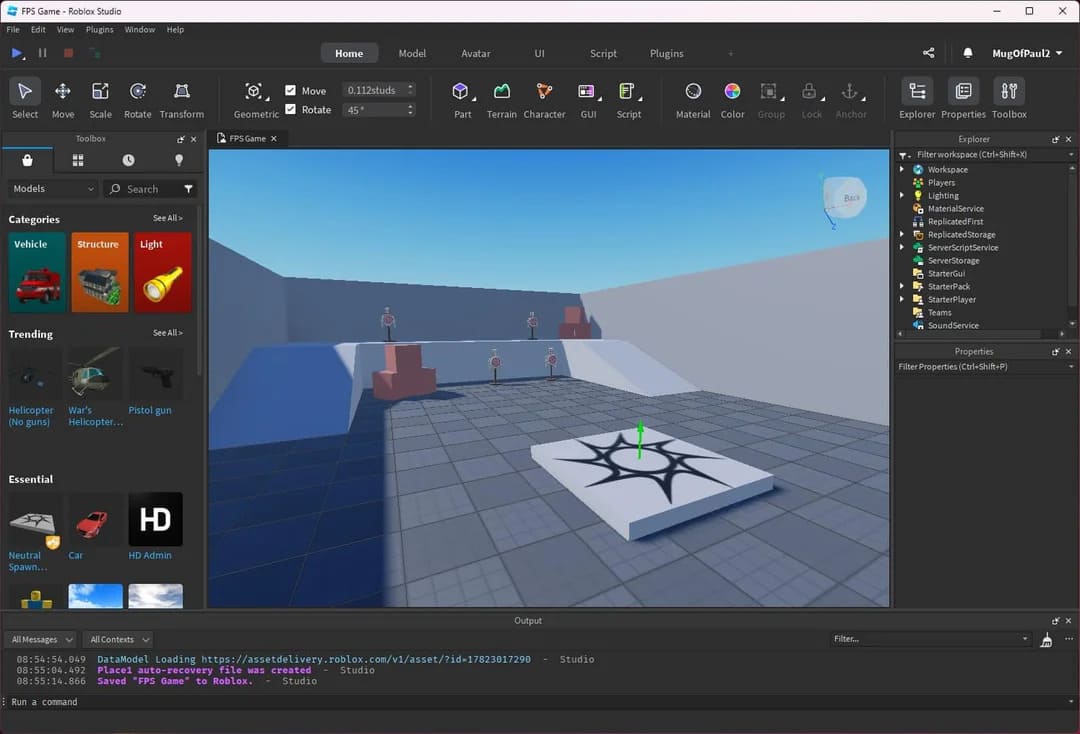
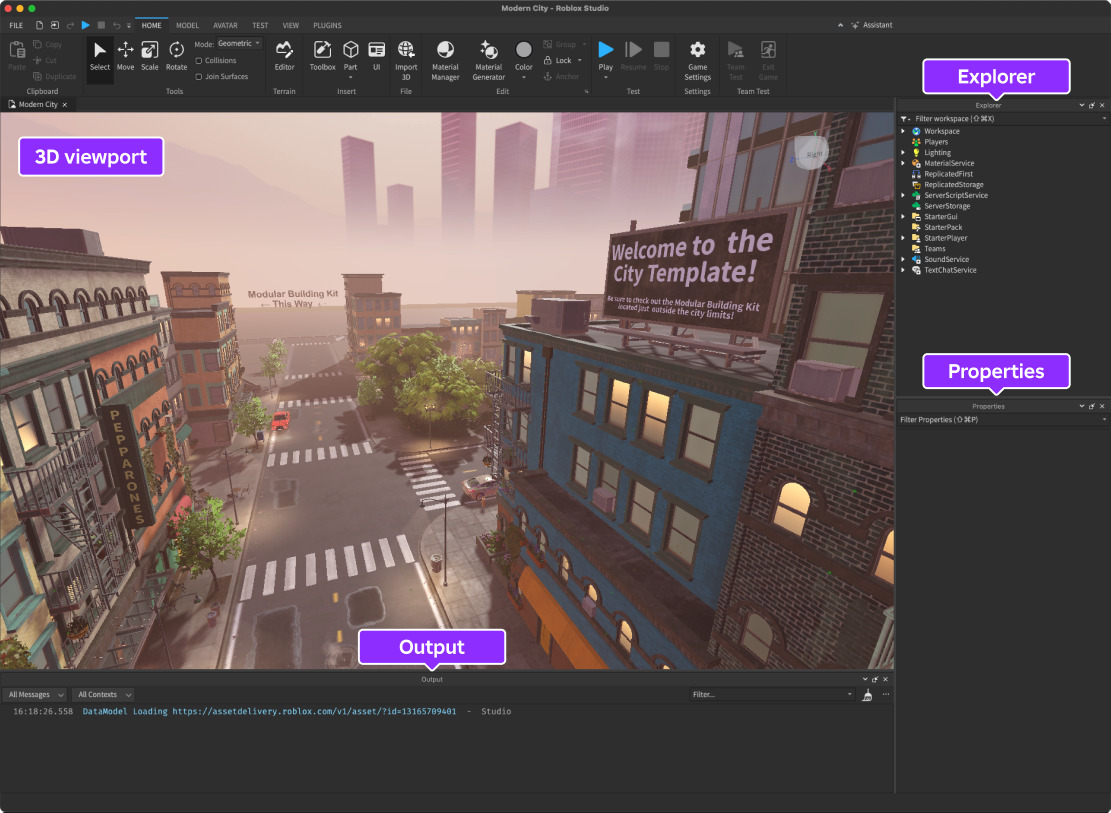
In Roblox Studio, the template serves as a simple starting point for beginners who may initially feel bewildered, given the complexity of new software. The abundance of technical terms can be daunting, but it’s an essential aspect of learning. For now, explore and discover what each button does through trial and error. This hands-on approach will help you learn more effectively. To give you a head start, I’ll clarify some of the key panels in this software.
- Explorer keeps track of everything in your game. Think of it like a folder view.
- Properties lets you change stuff like size, color, material, all the key details.
- Toolbox gives you access to free models, audio, and scripts. Just be careful what you grab; not everything in there is safe or clean.
- Output and the Script Editor are where you’ll test code and mess with scripts (I know it sounds like some coding thing, but it’s not as complicated).
Absolutely, you might not get everything right the first time around, but isn’t that part of what makes life interesting? By all means, if the design of your workspace doesn’t suit you, go ahead and adjust it according to your preference.
Adding Terrain And Scripting
After covering the fundamental aspects, it’s time to delve into the intricate details of game design that will set your project apart. Let’s begin with Parts, which serve as the foundational components in Roblox games. Navigate to the Model tab, select Part, and you’ll find options for blocks, spheres, wedges, or cylinders. These basic elements can be assembled to construct platforms, barriers, buildings, even grand structures similar to those found in other creators’ works.
As a creative gamer, I can shape and mold my very own gaming landscapes using the Terrain Editor! With it, I have the freedom to splash grass, water, lava, or sand across the map, or delve deep into the earth by carving caves and rivers. If that’s not enough, let your inner artist loose with the Brush Tool and watch as your masterpiece comes to life!
As an enthusiast, I’d never want to overlook this: If your game incorporates advancement milestones or parkour elements, don’t forget to include spawn points and checkpoints. You can effortlessly find these within the Toolbox, or even add them yourself for a smoother gaming experience.
With your project having a solid foundation now, let me explain the concept of ‘Scripts’. These are essential tools to make your Roblox game interactive and engaging. Initially, ‘Scripts’ might seem complex, but don’t be intimidated! They use Lua, a user-friendly programming language that even beginners can master. Even simple scripts have the potential to build impressive mechanics for your game.
Try a simple “kill brick” script:
In my gaming world, I’ve set up a system to handle touch events like this:
script.Parent.Touched:Connect(function()
if self.Parent.Name “Lava” then
game.Players.LocalPlayer:Kick(“Oops! You just touched the lava!”)
end
end)
In this example, I’ve used a script attached to an object named “Lava”. When the LocalPlayer character touches the Lava object, they will be kicked from the game with a message saying they touched the lava.
If you’re finding it complex, you’ll discover numerous tutorials and free script resources available online. Desire your character to gather coins or unlock doors? There’s a straightforward script designed for exactly that. Additionally, you can utilize various scripts for camera effects, UI buttons, or animations. The art of skillfully utilizing scripts is crucial in creating an exceptional game.
Finishing Touches
With your Roblox game fully scripted, it’s now time to take it online. However, prior to going live, ensure you thoroughly test it to confirm all features function as designed.
Press the ‘Play’ button or hit the ‘F5’ key. This initiates a local test of your game, allowing you to explore, interact, jump, and even attempt to damage things. This is an efficient method to discover problems related to terrain, collisions, or scripts. Additionally, you can use ‘Play Here‘ to mimic various player perspectives, or employ ‘Team Test‘ for multiplayer debugging purposes.
As an enthusiast, I’d recommend utilizing breakpoints within your script editor whenever you encounter issues during testing. Breakpoints serve as handy pauses that enable you to scrutinize values and troubleshoot effectively. By doing so, debugging becomes smoother. Additionally, testing provides a unique vantage point, allowing you to experience the product from a user’s perspective and assess whether your creative vision is accurately materializing for the player.
At long last, we’ve reached the moment you’ve been anticipating! Navigate to “File” and then select “Publish to Roblox As,” after that, simply provide your game with a title, a brief description, and an appealing icon for visibility. Subsequently, determine who can access it: either the public, friends, or only yourself while you make further adjustments if needed.
Friend, your project has been launched and can now be viewed by all – here’s your first official publication! The sense of accomplishment you’re experiencing is completely justified; you deserve it!
Pro Tips For Beginners
With your game published, you can now monetize and share it. Here’s how to earn Robux.
- Sell Gamepasses for special in-game powers
- Offer Developer Products like coins or skins
- Enable ads or sponsor your game for visibility
- Create a group and collect revenue from sales
Additionally, you could share news about our game on platforms like TikTok, YouTube Shorts, or Discord. These are excellent venues to display your game, disseminate updates, and generate enthusiasm for what’s coming next!
As a newcomer to creating games on Roblox, allow me to offer some advice that should help you find your bearings in this exciting world. Keep an eye on these key points:
1. Understanding the basics of Lua scripting language, as it’s used for programming in Roblox.
2. Familiarizing yourself with the Roblox Studio, the primary development environment for creating games on Roblox.
3. Exploring the Roblox community and learning from others’ experiences by joining groups, forums, or watching tutorials.
4. Experimenting with different game mechanics, such as movement, collision detection, and user interaction.
5. Keeping up-to-date with the latest updates and changes to the platform by regularly checking the Roblox Developer Blog.
6. Creating a clear plan for your game, including its objectives, target audience, and overall design.
7. Testing your game frequently to ensure smooth performance and addressing any issues that arise.
8. Lastly, don’t be afraid to ask questions or seek help when needed – the Roblox community is always eager to support fellow creators!
- Save often. Roblox Studio can crash occasionally.
- Random models from the Toolbox should not be inserted since they may include dangerous code.
- Use the Team Create feature to collaborate with friends in real time.
- Check out the DevForum and Creator Hub for guides and inspiration.
- It broadens your audience by optimizing for console and mobile users.
Final Thoughts
With this, I conclude my tutorial on crafting a Roblox game. If you’ve followed along, you now have a good grasp of the basics. Just remember that enjoyment is key here. The size or complexity of your project isn’t important; feel free to make it as unique and eccentric as you like, letting your imagination flourish!
By all means, don’t be deterred by the dread of failure. It could very well lead to the birth of something extraordinary. However, if you don’t make that initial move, nothing will come to fruition. I am eagerly anticipating the surge of creativity that lies dormant within you.
Read More
- USD MXN PREDICTION
- 10 Most Anticipated Anime of 2025
- Silver Rate Forecast
- Pi Network (PI) Price Prediction for 2025
- USD JPY PREDICTION
- How to Watch 2025 NBA Draft Live Online Without Cable
- USD CNY PREDICTION
- Brent Oil Forecast
- Gold Rate Forecast
- PUBG Mobile heads back to Riyadh for EWC 2025
2025-07-03 13:13